Skip to main content Skip to complementary content

Integrating the generic business glossary report in a Business Intelligence tool

You can integrate the generic business glossary report in a Business Intelligence tool to customize the reports and provide the terms and definitions associated with the reports.

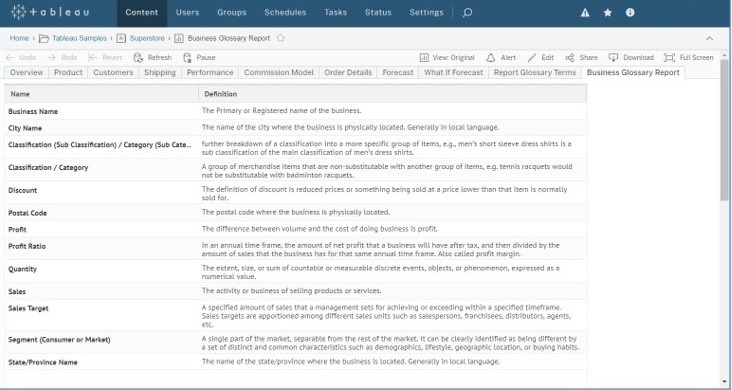
The business glossary report is a simple report of all elements and sub reports contained in a report and then all terms linked to those elements and sub reports, as well as any terms linked to the report as a whole. It is designed to be invoked from a URL which can be called from the BI tool itself. You must authenticate to receive the report.

The URL signature is http://localhost:<port>/MM/BusinessGlossaryReport.

Before you begin

  • You have imported the report in the repository.
  • You have created a glossary and add the terms.
  • You have mapped the glossary terms to the report elements using a semantic mapping.
  • You have added the models to a configuration and defined the connections.

About this task

You need to define the new environment for calls via URL in the MetadataExplorer.xml configuration file.

Procedure

  1. Go to the conf\template\resources installation folder on the application server machine.
  2. Copy the MetadataExplorer.xml file from conf\template\resources\ to conf\resources\ to activate it.
    MetadataExplorer.xml contains complete XML providing definition of the behavior of the UI. This is where you include the new environment for calls via URL. The UI will be controlled by your settings.
  3. Open the file located in the conf\resources\ folder.
  4. Add an Environment section and specify the following:
    • configPath: The path of the configuration in the repository. You can copy the path property of the configuration from the property view.
    • contentPath: The path of a BI multi model in the repository that must be part of the configuration. You can copy the path property of the content from the property view.
    • Environment URL options:
      URL option Description
      noHeader=(true|false) Set to true to hide the header of the report.
      noTitle=(true|false) Set to true to hide the title of the report.
      noGridHeader=(true|false) Set to true to hide the grid header.
      noHyperlink=(true|false) Set to true to make hyperlinks non clickable.
      noContext=(true|false) Set to true to hide the context information.
      nolcon=(true|false) Set to true to hide all icons.
      showDefinitionsOnly=(true|false) Set to true to show only the list of distinct terms documenting the report.
      modelDefinitionsOnly=(true|false) Set to true to show only the definitions of the model itself (not the report item ones).
    Here is an example with Tableau:
    <Environment name="Env1" configPath="/Demo/Config" contentPath="/Demo/Tableau">
    			<URLParameter>noHeader=true</URLParameter>
    			<URLParameter>noTitle=true</URLParameter>
    			<URLParameter>noGridHeader=false</URLParameter>
    			<URLParameter>noHyperlink=true</URLParameter>
    			<URLParameter>noContext=true</URLParameter>   			
    			<URLParameter>noIcon=true</URLParameter>
    			<URLParameter>showDefinitionsOnly=true</URLParameter>
    			<URLParameter>modelDefinitionsOnly=false</URLParameter>
    			</Environment>
  5. Save your changes.

Results

Once defined the environment, you can append any of the following elements to the UI URLs:
URL option text Value
&env Environment as defined in MetadataExplorer.xml
&report A unique report ID or name

You can now call the following URL: http://localhost/MM/BusinessGlossaryReport?env=<EnvironmentName>&report=<WorkbookName>.

If you embed a link in Tableau, you can use the following URL to take advantage of the workbook name substitution parameter: http://localhost/MM/BusinessGlossaryReport?env=<EnvironmentName>&report=<WorkbookName>. <WorkbookName> is the workbook name as it appears on the Tableau server URL (no spaces in the name).

Example

Using the sample Tableau report for Superstore, the adjusted URL would look like: http://localhost:11480/MM/BusinessGlossaryReport?env=Env1&report=Superstore.
Here is an example in Tableau:
  1. Open and edit the report in Tableau.
  2. Add a new dashboard then add a new web page object.
  3. Provide the URL and save.
  4. Rename the dashboard tab and save it, in this example Business Glossary Report.
    The business glossary report is now available in Tableau as a separate tab.

Did this page help you?

If you find any issues with this page or its content – a typo, a missing step, or a technical error – let us know how we can improve!