Skip to main content Skip to complementary content
Close announcements banner

Step 1: Job creation, input definition, file reading

Procedure

  1. Launch Talend Studio, and create a local project or import the demo project if you are launching Talend Studio for the first time.
  2. To create the Job, right-click Job Designs in the Repository tree view and select Create Job.
  3. In the dialog box displaying then, only the first field (Name) is required. Type in California1 and click Finish.

    An empty Job then opens on the main window and the Palette of technical components (by default, to the right of the Studio) comes up showing a dozen of component families such as: Databases, Files, Internet, Data Quality and so on, hundreds of components are already available.

  4. A tFileInputDelimited component is used to read the file California_Clients. This component can be found in the File > Input group of the Palette. Click this component then click to the left of the design workspace to place it on the design area.
  5. Define the reading properties for the tFileInputDelimited component (such as file path, column delimiter, encoding, and so on) using the Metadata Manager. This tool offers numerous wizards for configuring parameters. It also stores these properties for a one-click re-use in all future Jobs.
  6. As the input file is a delimited flat file, select File Delimited on the right-click list of the Metadata folder in the Repository tree view. Then select Create file delimited.

    A wizard dedicated to delimited file thus displays.

    • At Step 1, only the Name field is required: simply type in California_clients and go to the next Step.

    • At Step 2, select the input file (California_Clients.csv) by clicking the Browse... button. Immediately an extract of the file shows on the Preview, at the bottom of the screen so that you can check its content. Click Next.

      In this example, the California_Clients.csv file is stored under C:/talend/Input.

    • At Step 3, define the file parameters: file encoding, line and column delimiters, and so on. As the input file is standard, most default values are fine. The first line of the file is a header containing column names. To retrieve automatically these names, click Set heading row as column names, click Refresh Preview, and click Next to the last step.

    • At Step 4, each column of the file is to be set. The wizard includes algorithms which guess types and length of the column based on the file first data rows. The suggested data description (called schema in Talend Studio) can be modified at any time. In this scenario, they can be used as is.

    The California_clients metadata is created after the above four steps.

  7. Select the tFileInputDelimited you had dropped on the design workspace earlier and select the Component view at the bottom of the window.
  8. Select the vertical tab Basic settings. In this tab, you'll find all technical properties required to let the component work.
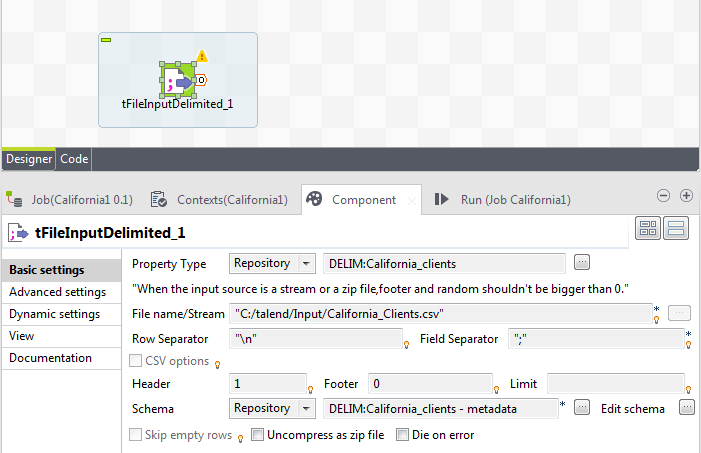
  9. Select Repository as Property Type in the list. A new field shows: Repository, click the [...] button and select the relevant Metadata entry on the list: California_clients.

    All parameters of the tFileInputDelimited component get automatically filled out.

  10. Add a tLogRow component (from the Logs & Errors group). To link both components, right-click the input component and select Row > Main. Then click the output component: tLogRow.
  11. Select the Run tab on the bottom panel.
  12. Enable the statistics by selecting the Statistics check box in the Advanced Settings vertical tab of the Run view, then run the Job by clicking Run in the Basic Run tab.

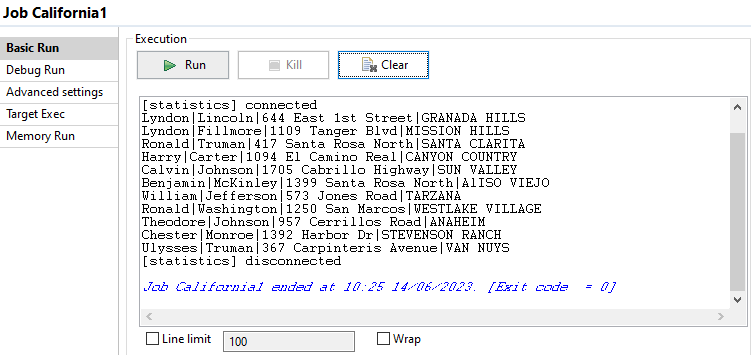
    The content of the input file is listed in the console.

Did this page help you?

If you find any issues with this page or its content – a typo, a missing step, or a technical error – let us know how we can improve!