
Creating filters on the ages and states
Creating a filter is a quick way to identify or isolate data.
You will once again use filters to isolate the data that is of the most interest to you in this example, namely the age and location of your customers. The data profiling area on the bottom right of the interface allows you to interact with the charts illustrating the data of the age and state columns, and select a specific range of data.
Procedure
-
Click the header of the age column to select its
content.
In the data profiling area, on the bottom right of the screen, you can see a vertical bar chart, displaying the number of occurrences of each value listed in the column.
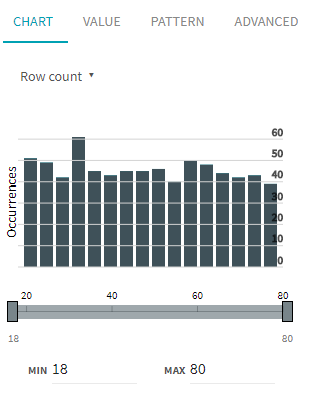
You can see here that the minimum age that can be found is 18, and the maximum value is 80.
-
To limit the age values displayed on the grid and create a filter on the 30-55
range, you can either:
- Drag both ends of the range slider to select the minimum and maximum
values to be displayed.
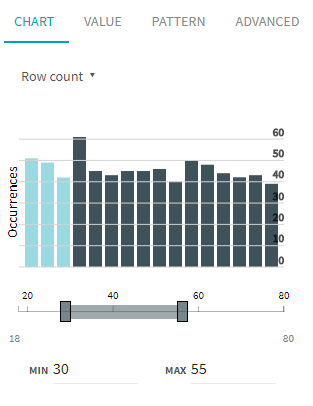
- Enter 30 as minimum value and 55 as maximum directly in the dedicated fields.
You can see that a new filter was applied on the dataset, and customers data is only displayed if it matches the condition set on the 30-55 age range.

Filters can be created by manually entering values in the filter bar text area, but diagrams are a convenient and quick way to apply filters on your data, for one or several columns at a time.
Now that you have vision on a specific age range, you will add a second filter on top of the previous one. Filters can be combined in many ways. Here you will choose to display the five state with the highest number of customers.
- Drag both ends of the range slider to select the minimum and maximum
values to be displayed.
-
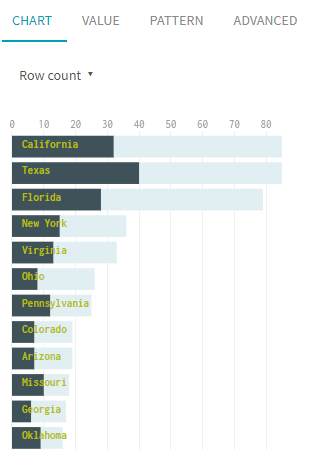
Click the header of the state column to select its
content.
This time, the data is displayed as an horizontal bar chart in the profiling area.
-
To create a filter on the top five states, those with the most customers, keep
the
Shift
key pressed and click
California, Texas,
Florida, New York and
Virginia.
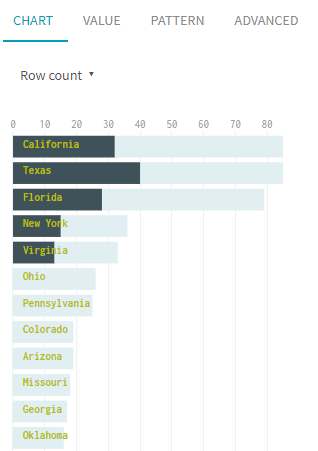
As you can see in the filter bar, the filter is applied on top of the first one, and only the data that corresponds to both is displayed on the grid.

Results
Your sample now only displays a restricted list of customers, that match the conditions you had fixed.
Did this page help you?
If you find any issues with this page or its content – a typo, a missing step, or a technical error – let us know how we can improve!