
Configuring the components
Procedure
-
Double-click the tELTOracleInput component to display its Basic settings view.

-
Select your database connection and the desired schema from the
Repository Content dialog
box.
The selected schema name appears in the Default Table Name field automatically.
- In this use case, the database connection is Talend_Oracle and the schema is new_customers.
- In this use case, the input schema is stored in the Metadata node of the Repository tree view for easy retrieval. For further information concerning metadata, see Talend Studio User Guide.
- You can also select the input component by dropping the relevant schema from the Metadata area onto the design workspace and double-clicking tELTOracleInput from the Components dialog box. Doing so allows you to skip the steps of labeling the input component and defining its schema manually.
-
Click the tELTOracleMap component to display its Basic settings view.

-
Select all the columns in the input table and drop
them to the output table.

-
Click the Generated SQL Select query tab to display the query
statement to be executed.
 Click OK to validate the ELT Map settings and close the ELT Map editor.
 -
In the table that appears, select the check boxes
for the columns you want to update.
In this use case, youupdate all the data according to the customer ID. Therefore, select all the check boxes except the one for the ID column.
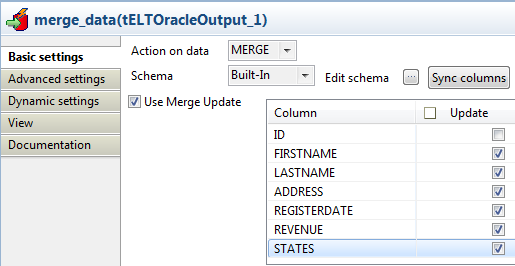 Information noteWarning: The columns defined as the primary key cannot and must not be made subject to updates.
 -
Leave the other parameters as they are.

Did this page help you?
If you find any issues with this page or its content – a typo, a missing step, or a technical error – let us know how we can improve!