Creating a connection to HDFS - Cloud - 7.3

Talend Studio User Guide

Version
Cloud
7.3
Language
English
Product
Talend Big Data
Talend Big Data Platform
Talend Cloud
Talend Data Fabric
Talend Data Integration
Talend Data Management Platform
Talend Data Services Platform
Talend ESB
Talend MDM Platform
Talend Real-Time Big Data Platform
Module
Talend Studio
Content
Design and Development
Last publication date
2024-02-13
Available in...

Big Data

Big Data Platform

Cloud Big Data

Cloud Big Data Platform

Cloud Data Fabric

Data Fabric

Real-Time Big Data Platform

Procedure

  1. Expand the Hadoop cluster node under Metadata in the Repository tree view, right-click the Hadoop connection to be used and select Create HDFS from the contextual menu.
  2. In the connection wizard that opens up, fill in the generic properties of the connection you need create, such as Name, Purpose and Description. The Status field is a customized field you can define in File >Edit project properties.
  3. Click Next when completed. The second step requires you to fill in the HDFS connection data. The User name property is automatically pre-filled with the value inherited from the Hadoop connection you selected in the previous steps.
    The Row separator and the Field separator properties are using the default values.
    If the Hadoop connection you are using enables the Kerberos security, the User name field is automatically deactivated.
  4. If the data to be accessed in HDFS includes a header message that you want to ignore, select the Header check box and enter the number of header rows to be skipped.
  5. If you need to define column names for the data to be accessed, select the Set heading row as column names check box. This allows the Studio to select the last one of the skipped rows to use as the column names of the data.
    For example, select this check box and enter 1 in the Header field; then when you retrieve the schema of the data to be used, the first row of the data will be ignored as data body but used as column names of the data.
  6. If you need to use custom HDFS configuration for the Hadoop distribution to be used, click the [...] button next to Hadoop properties to open the corresponding properties table and add the property or properties to be customized. Then at runtime, these changes will override the corresponding default properties used by the Studio for its Hadoop engine.
    Note a Parent Hadoop properties table is displayed above the current properties table you are editing. This parent table is read-only and lists the Hadoop properties that have been defined in the wizard of the parent Hadoop connection on which the current HDFS connection is based.
    For further information about the HDFS-related properties of Hadoop, see Apache Hadoop documentation, or the documentation of the Hadoop distribution you need to use. For example, this page lists some of the default HDFS-related Hadoop properties.
    For further information about how to leverage this properties table, see Setting reusable Hadoop properties.
  7. Change the default separators if necessary and click Check to verify your connection.
    A message pops up to indicate whether the connection is successful.
  8. Click Finish to validate these changes.
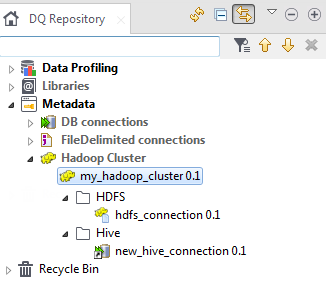
    The created HDFS connection is now available under the Hadoop cluster node in the Repository tree view.
    Note:

    This Repository view may vary depending the edition of the Studio you are using.

    If you need to use an environmental context to define the parameters of this connection, click the Export as context button to open the corresponding wizard and make the choice from the following options:
    • Create a new repository context: create this environmental context out of the current Hadoop connection, that is to say, the parameters to be set in the wizard are taken as context variables with the values you have given to these parameters.

    • Reuse an existing repository context: use the variables of a given environmental context to configure the current connection.

    If you need to cancel the implementation of the context, click Revert context. Then the values of the context variables being used are directly put in this wizard.

    For a step-by-step example about how to use this Export as context feature, see Exporting metadata as context and reusing context parameters to set up a connection.

  9. Right-click the created connection, and select Retrieve schema from the drop-down list in order to load the desired file schema from the established connection.