Available in...Big Data
Big Data Platform
Cloud Big Data
Cloud Big Data Platform
Cloud Data Fabric
Data Fabric
Real-Time Big Data Platform
Procedure
-
Expand the Hadoop cluster node under the Metadata node of the Repository tree, right-click the MapR connection to be used and
select Create MapRDB from the contextual
menu.
-
In the connection wizard that opens up, fill in the generic properties of the
connection you need create, such as Name,
Purpose and Description. The Status field
is a customized field that you can define in File >
Edit project properties.
-
Click Next to proceed to the next step, which requires
you to fill in the MapR-DB connection details. Among them, DB Type, Hadoop cluster, Distribution, MapR-DB
version and Server are automatically
pre-filled with the properties inherited from the MapR connection you selected
in the previous steps.
Note that if you choose None from the
Hadoop cluster list, you are actually
switching to a manual mode in which the inherited properties are abandoned and
instead you have to configure every property yourself, with the result that the
created connection appears under the Db
connection node only.
-
In the Port field, fill in the port number of the MapR-DB
database to be connected to. The default number is 5181, which is actually the port
to the nodes running Zookeeper services.
Note:
In order to make the host name of the MapR server recognizable by the client
and the host computers, you have to establish an IP address/hostname mapping
entry for that host name in the related hosts files of
the client and the host computers. For example, the host name of the MapR
server is myMapR, and its IP address is
192.168.x.x, then the mapping entry reads
192.168.x.x myMapR. For the Windows system, you need
to add the entry to the file
C:\WINDOWS\system32\drivers\etc\hosts (assuming
Windows is installed on drive C). For the Linux system, you need to add the
entry to the file /etc/hosts.
-
In the Column family field, enter the column
family if you want to filter columns, and click Check to check your connection
-
If the database to be used is running with Kerberos security, select the User Kerberos authentication check box, then, enter the
principal names in the displayed fields. You should be able to find the
information in the hbase-site.xml file of the
MapR cluster to be used.
If you need to use a keytab file to log in, select the Use a keytab to authenticate check box. A keytab file contains
pairs of Kerberos principals and encrypted keys. You need to enter the principal
to be used in the Principal field and in the
Keytab field, browse to the keytab file to
be used.
Note that the user that executes a keytab-enabled Job is not necessarily the
one a principal designates but must have the right to read the keytab file being
used. For example, the user name you are using to execute a Job is user1 and the principal to be used is guest; in this situation, ensure that user1 has the right to read the keytab file to be
used.
-
If the MapR cluster to be used is secured with the MapR ticket authentication
mechanism, select Force MapR Ticket authentication, in order
to set the related security configuration.
-
Select the Force MapR ticket authentication check box
to display the related parameters to be defined.
-
In the Username field, enter the username to be
authenticated and in the Password field, specify the
password used by this user.
A MapR security ticket is generated for this user by MapR and stored in the
machine where the Job you are configuring is executed.
-
If the Group field is available in this tab, you need
to enter the name of the group to which the user to be authenticated
belongs.
-
In the Cluster name field, enter the name of the MapR
cluster you want to use this username to connect to.
This cluster name can be found in the
mapr-clusters.conf file located in
/opt/mapr/conf of the cluster.
-
In the Ticket duration field, enter the length of time
(in seconds) during which the ticket is valid.
-
If you need to use custom configuration for the MapR-DB distribution to be used, click the
[...] button next to Hadoop properties to open the properties table and add the property
or properties to be customized. Then at runtime, these changes will override the
corresponding default properties used by the Studio for its Hadoop
engine.
Note a Parent Hadoop properties table is displayed above
the current properties table you are editing. This parent table is read-only and
lists the MapR properties that have been defined in the wizard of the parent
MapR connection on which the current MapR-DB connection is based.
For further information about the properties of MapR, see MapR documentation or more
general documentation from Apache Hadoop.
Because of the close relation between HBase and MapR-DB, for further information about the
properties of MapR-DB, see Apache documentation for HBase. For example, the
following page describes some of the HBase configuration properties:
http://hbase.apache.org/book.html#_configuration_files.
-
Click Finish to validate the changes.
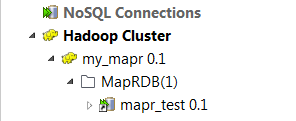
The newly created MapR connection appears under the Hadoop cluster node of
the Repository tree. In addition, as a MapR-DB
connection is a database connection, this new connection appears under the
Db connections node, too.
Results
If you need to use an environmental context to define the parameters of this connection,
click the
Export as context button to open the
corresponding wizard and make the choice from the following options:
-
Create a new repository context: create this
environmental context out of the current Hadoop connection, that is to say, the
parameters to be set in the wizard are taken as context variables with the values
you have given to these parameters.
-
Reuse an existing repository context: use the
variables of a given environmental context to configure the current
connection.
If you need to cancel the implementation of the context, click
Revert context. Then the values of the context variables being used
are directly put in this wizard.
For a step-by-step example about how to use this Export as
context feature, see Exporting metadata as context and reusing context parameters to set up a connection.