
Creating an Entity Action Process
A Runnable Process is a process designed in the Studio but can be manually launched by a business user from Talend MDM Web UI.
You can design this Process to do any task you want on master data pertaining to the entity to which the process is attached. Examples of what this Process can do are: sending an entity by email, launching a workflow to do certain modifications on master data, launching a Job to do some check or transformation on master data or launching a Job to return a specific result in a new tab in the web interface, etc.
The naming of this Process follows a specific pattern: Runnable_<entity>. However, if you want to customize the Process name or create more than one Runnable Process on the same entity, you must add a hash sign before the word you want to add to the Process name; for example Runnable_Agency#Send.
Before you begin
About this task
The below example guides you through the steps of creating a Runnable Process that launches a workflow to change the price of a product. Make sure that the workflow you want to trigger by this process has already been created and deployed on the MDM server.
For further information, see Designing a workflow using the workflow wizard and Exporting and importing workflow processes.
To create a Runnable Process that will launch a workflow every time a business user executes it from the web interface:
Procedure
-
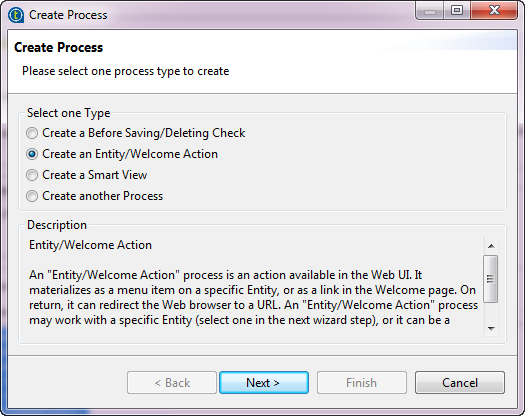
In the MDM Repository tree view, expand Event
Management and then right-click Process
and select New from the contextual menu.
The Create Process dialog box opens.
What to do next
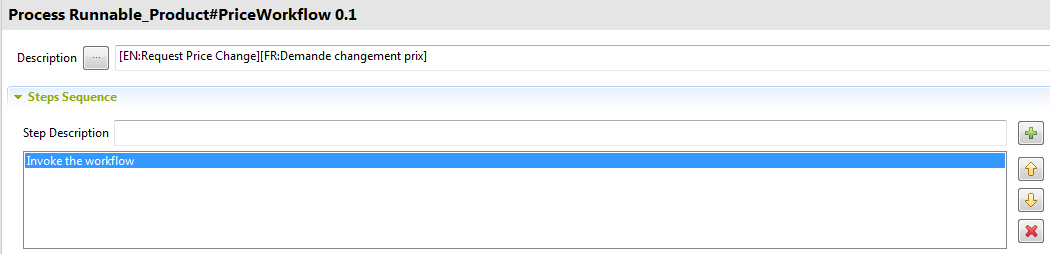
The Runnable Process you are going to create has one step that triggers a workflow using the workflowcontexttrigger plugin.
If you have a Runnable Process that has two steps, every plugin consumes data in input parameters and produces a result in the output parameters. You must define variables to hold the result of the first step. Then you send the variable to the input of the second step. Eventually, you define a "pipeline" where each step result is chained to the next step through a variable.
In this example, we assume that you have a Product data model that has an Product business entity. Many attributes have been defined for this entity including: Id, Name and Price. A workflow has also been created to validate any change in the product price.
-
In the Step Description field, enter a name for the first step you want to define in the created Process and then click the
 icon to
add the step name to the list that follows.
icon to
add the step name to the list that follows. -
Select the step to display the Step Specification view in the editor. Here you can define the step input and output variables and its parameters.
-
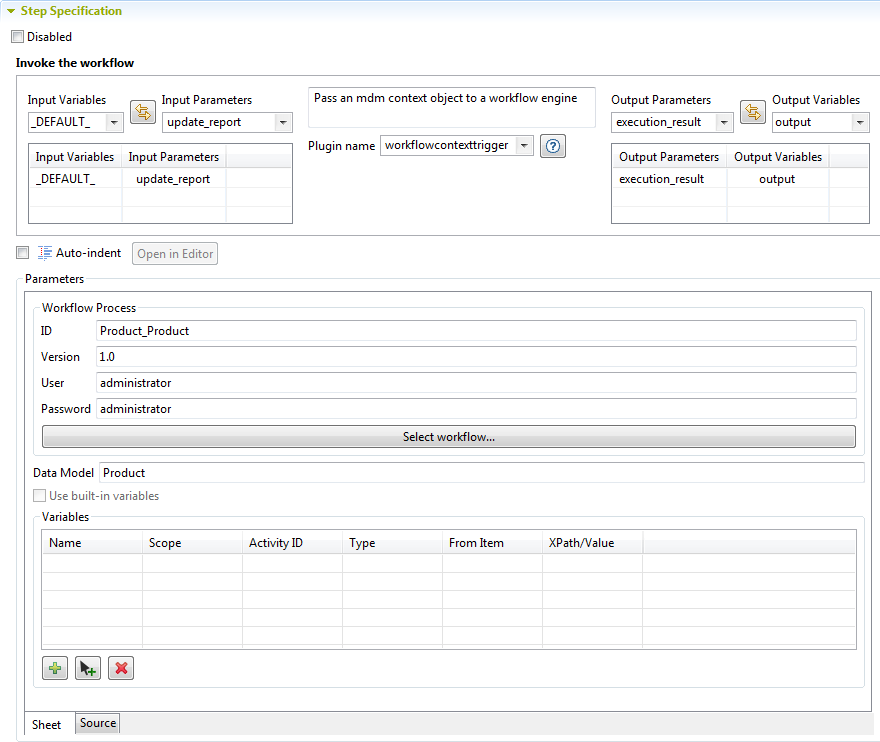
From the Plugin name list, selectworkflowcontexttrigger.
Information noteNote: The icon displays a description of the plugin and details its parameters.
 -
As the workflowcontexttrigger plugin is our first step, select the _DEFAULT_ input, select the update_report from the input parameters, and click the
 button to add them to the table.
 The MDM server starts the pipeline with a default variable called _DEFAULT_ .
Here you want to map variables to the input parameter of the plugin, and conversely map output parameter of a plugin to another variable.
-
Select the output parameter execution_result and select output from the output variables, and then click the
button to add them to the table.Information noteNote: For each step, you can select one of the by-default variables or one of the variables defined for the preceding plugin the Process you define.Information noteNote: You can disable the selected step in the editor at any time if you select the Disable check box.Information noteWarning: The text you enter in the text editor is indented by default upon saving. This may cause problems in certain cases such as the HTML formatting when creating a Smart View process. If required, clear the Auto-indent check box to disable the text indentation upon saving the process. -
In the Parameters area, complete the XSLT definition as in the above capture and save your modifications.
-
In the Parameters area, click the Select workflow... tab, and select from the list the workflow you want to trigger.
The workflow name and version display in the ID and Version fields respectively.
-
If needed, in the User and Password fields, enter the credentials for accessing the BPM server. The specified credentials here will override the default settings for the Bonita technical users in the file <$INSTALLDIR>\conf\mdm.conf where <$INSTALLDIR> specifies the path where the MDM server has been installed. For more information, see the Talend Installation and Upgrade Guide.
-
If needed, in the Variables area, use the plus button to add lines to the table and define the attributes of the Product entity on which to run the workflow.
-
Save your modifications.
The Runnable Process is listed under the Process node in the MDM Repository tree view.
This same process is accessible through Talend MDM Web UI when browsing records in the Product entity. An authorized business user can launch this Process from the web interface and trigger the workflow. For further information, see Talend MDM Web UI User Guide.
Did this page help you?
If you find any issues with this page or its content – a typo, a missing step, or a technical error – let us know how we can improve!