Defining variables - Cloud - 7.3

Talend Studio User Guide

Version
Cloud
7.3
Language
English
Product
Talend Big Data
Talend Big Data Platform
Talend Cloud
Talend Data Fabric
Talend Data Integration
Talend Data Management Platform
Talend Data Services Platform
Talend ESB
Talend MDM Platform
Talend Real-Time Big Data Platform
Module
Talend Studio
Content
Design and Development
Last publication date
2024-02-13

Procedure

  1. Click the [+] button at the bottom of the Contexts view to add lines in the table.
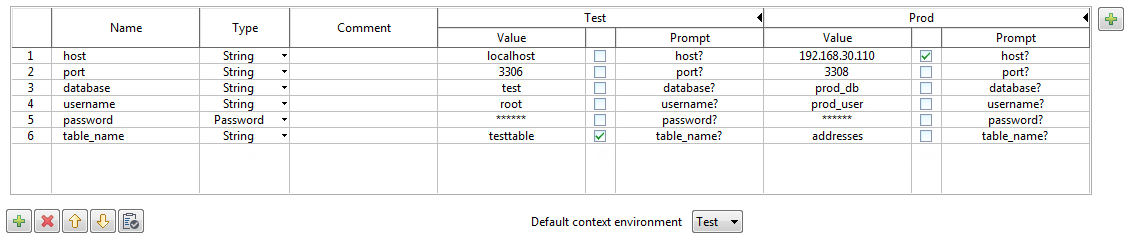
  2. Click in the Name field and enter the name of the variable you are creating.
    Name the first variable host for this example.
  3. From the Type list, select the type of the variable.
    Warning: If you change the type of a variable that has already a value, the value will be cleared and you need to set it again.
  4. If needed, click in the Comment field and enter a comment to describe the variable.
  5. Click in the Value field and enter the variable value under each context.
    For different variable types, the Value field appear slightly different when you click in it and functions differently:
    Type Value field Default value
    String (default type) Editable text field null
    Boolean Drop-down list box with two options: true and false  
    Character, Double, Integer, Long, Short, Object, BigDecimal Editable text field  
    Date Editable text field, with a button to open theSelect Date & Time dialog box.  
    File Editable text field, with a button to open the Open dialog box for file selection.  
    Directory Editable text field, with a button to open the Browse for Folder dialog box for folder selection.  
    List of Value Editable text field, with a button to open the Configure Values dialog box for list creation and configuration. (Empty)
    Password Editable text field; text entered appears encrypted.  
    Resource Editable text field, with a button to open the Select a Resource dialog box for you to select a resource defined under Resources in the Repository.

    For more information, see Using resources in Jobs.

     
  6. If needed, select the check box next to the variable of interest and enter the prompt message in the corresponding Prompt field.
    This allows you to see a prompt for the variable value and to edit it at the execution time. You can show/hide a Prompt column of the table by clicking the black right/left pointing triangle next to the relevant context name.
  7. Repeat the above steps to define all the variables for the different contexts.
    • port, type String,
    • database, type String,
    • username, type String,
    • password, type Password,
    • table_name, type String.

Results

All the variables created and their values under different contexts are displayed in the table and are ready for use in your Job. You can further edit the variables in this view if needed.

You can also add a built-in context variable to the Repository to make it reusable across different Jobs. For more information, see Adding a built-in context variable to the Repository.

Related topics: