
Rulers and Grid tab
Procedure
-
To display the Rulers & Grid tab, click
 on the
Palette, then click any empty area of the design workspace
to deselect any current selection.
on the
Palette, then click any empty area of the design workspace
to deselect any current selection.
-
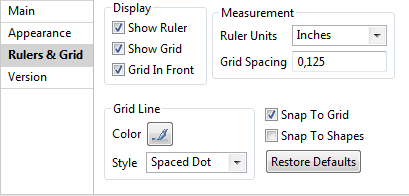
In the Measurement area, select the ruling unit among
Centimeters, Inches or
Pixels.
-
Select the Snap To Grid check box to bring the shapes into line with
the grid or the Snap To Shapes check box to bring the shapes into
line with the shapes already dropped in the Business Model.
You can also click the Restore Defaults button to restore the default settings.
Did this page help you?
If you find any issues with this page or its content – a typo, a missing step, or a technical error – let us know how we can improve!