Setting the definition and category of the custom indicator - Cloud - 7.3

Talend Studio User Guide

Version
Cloud
7.3
Language
English
Product
Talend Big Data
Talend Big Data Platform
Talend Cloud
Talend Data Fabric
Talend Data Integration
Talend Data Management Platform
Talend Data Services Platform
Talend ESB
Talend MDM Platform
Talend Real-Time Big Data Platform
Module
Talend Studio
Content
Design and Development
Last publication date
2024-02-13
Available in...

Big Data Platform

Cloud API Services Platform

Cloud Big Data Platform

Cloud Data Fabric

Cloud Data Management Platform

Data Fabric

Data Management Platform

Data Services Platform

MDM Platform

Real-Time Big Data Platform

Before you begin

You have selected the Profiling perspective.

Procedure

  1. Click Indicator Category and select from the list a category for the Java indicator.
    The selected category determines the columns expected in the result set of the analysis that uses this indicator.
    The table below explains available categories.

    Indicator category

    Description

    Expected query results

    User Defined Match

    Evaluates the number of data matching a condition.

    The result set should have one row and two columns. The first column contains the number of values that match and the second column the total count.

    User Defined Frequency

    Evaluates the frequency of records using user-defined indicators for each distinct record.

    The result set should have 0 or more rows and two columns. The first column contains a value and the second the frequency (count) of this value.

    User Defined Real Value

    Evaluates real functions of data.

    The result set should have one row and one column that contain a real value.

    User Defined Count

    Analyzes the quantity of records and returns a row count.

    The result set should have one row and one column that contain the row count.
  2. Click Indicator Definition and then click the [+] button.
  3. From the Database list, select Java.
  4. Enter the Java class in the Java Class field.
    Note: Make sure that the class name includes the package path, if this string parameter is not correctly specified, an error message will display when you try to save the Java user-defined indicator.
  5. Select the Java archive holding the Java class:
    1. Click the Edit... button. The UDI Selector dialog box opens.
    2. In the Select libraries view, select the check box of the archive holding the Java class and then select the class in the bottom panel of the wizard.
    3. Click OK.

      The dialog box is closed and the Java archive is displayed in the indicator editor.

      You can add or delete Java archives from the Manage Libraries view of this dialog box.

      For more information on creating a Java archive, see Creating a Java archive for the user-defined indicator.

  6. Click Indicator Parameters to open the view where you can define parameters to retrieve parameter values while coding the Java indicator.
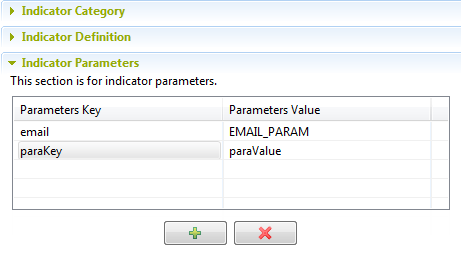
    You can retrieve parameter values with a code similar to this one that retrieves the parameter of EMAIL_PARAM:
    // Check prerequisite
            IndicatorParameters param = this.getParameters();
            if (param == null) {
                log.error("No parameter set in the user defined indicator " + this.getName()); //$NON-NLS-1$
                return false;
            }
            Domain indicatorValidDomain = param.getIndicatorValidDomain();
            if (indicatorValidDomain == null) {
                log.error("No parameter set in the user defined indicator " + this.getName()); //$NON-NLS-1$
                return false;
            }
    
            // else retrieve email from parameter
            EList<JavaUDIIndicatorParameter> javaUDIIndicatorParameter = indicatorValidDomain.getJavaUDIIndicatorParameter();
            for (JavaUDIIndicatorParameter p : javaUDIIndicatorParameter) {
                if (EMAIL_PARAM.equalsIgnoreCase(p.getKey())) {
    For a more detailed sample of the use of parameters in a Java user-defined indicator, see this documentation.
  7. Click the [+] button at the bottom of the table and define in the new line the parameter key and value.
    You can edit these default parameters or even add new parameters any time you use the indicator in a column analysis. To do this, click the indicator option icon in the analysis editor to open a dialog box where you can edit the default parameters according to your needs or add new parameters.
  8. Click the save icon on top of the editor.
    The indicator is listed under the User Defined Indicators folder in the DQ Repository tree view. You can use this indicator to analyzed columns through a simple drag-and-drop operation from the DQ Repository tree view to the columns listed in the editor.