Defining the connection to the Azure Storage account to be used in Talend Studio - Cloud - 8.0

Databricks

Version
Cloud
8.0
Language
English
Product
Talend Big Data
Talend Big Data Platform
Talend Data Fabric
Talend Real-Time Big Data Platform
Module
Talend Studio
Content
Design and Development > Designing Jobs > Hadoop distributions > Databricks
Design and Development > Designing Jobs > Serverless > Databricks
Last publication date
2024-02-20
Define the connection metadata to Azure Storage in the Repository of Talend Studio.

Before you begin

  • You have an Azure account with appropriate rights and permissions to the Azure Storage.
  • The Azure Storage account to be used has been properly created and you have the appropriate permissions to access it. For further information about Azure Storage, see Azure Storage tutorials from Azure documentation.
  • You are using one of the Talend solutions with Big Data.

Procedure

  1. Obtain the access key to the Azure Storage account to be used on https://portal.azure.com/.
    1. Click All services on the menu bar on the left of the Azure welcome page.
    2. Click Storage accounts in the STORAGE section.
    3. Click the storage account to be used.
    4. On the list that is displayed, click Access keys to open the corresponding blade.
    5. Copy and keep the key that is displayed somewhere appropriate so as to use it in the steps to come.
  2. In the Integration perspective of Talend Studio, expand the Metadata node in the Repository, right-click the Azure Storage node and from the contextual menu, select Create an Azure Storage Connection to open the wizard.
  3. Complete the fields in the wizard:
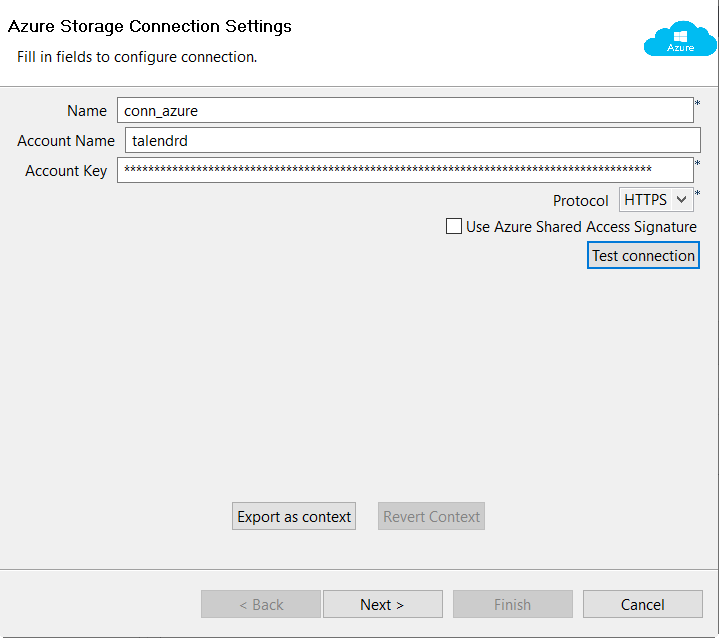
    Name Enter the name you want to use for this connection to be defined.
    Account Name Enter the name of the Azure Storage account to be connected to.
    Account Key Enter the access key you got in the previous steps.
  4. Click Test connection to verify the configuration. Once a message pops up to say that the connection is successful, the Next button is activated.
  5. Click Next to access the list of containers available on Azure under this Azure Storage account.
    This list is empty if this Azure Storage account does not contain any containers.
  6. Select the container to connect to and click Next or just click Next to skip this step. You can revise this step anytime later by coming back to this wizard.
  7. Do the same to the query list and the table list that are respectively displayed in the wizard.
  8. Click Finish to validate the creation. The connection appears under the Azure Storage node in the Repository.

Results

The Azure Storage connection has been defined in Talend Studio and ready to be used by your Jobs to work with the Azure services that are associated with this Azure Storage account.