Skip to main content Skip to complementary content

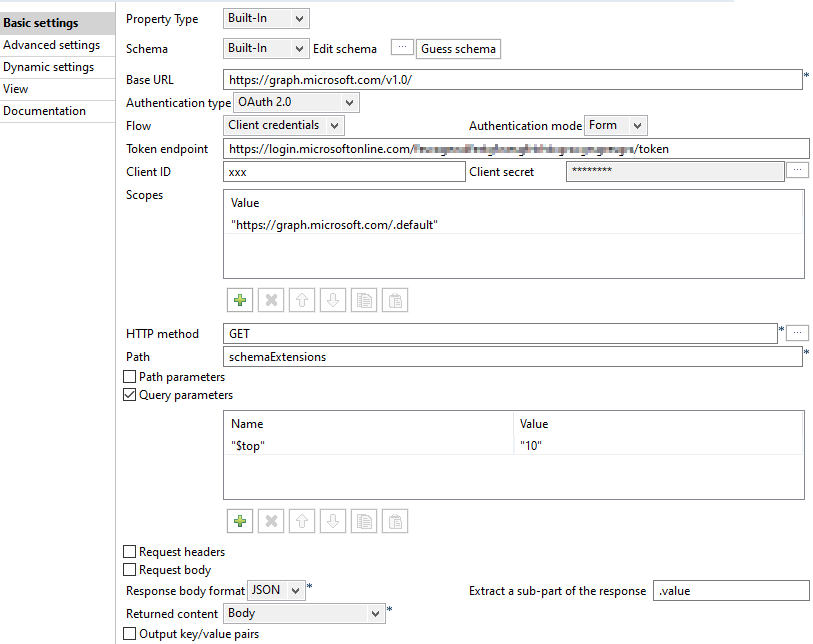
Setting up the tHTTPClient_1 component

The tHTTPClient_1 component retrieves the data of first ten schemaExtensions entities from Microsoft Azure and passes the data to the subsequent component. It uses an OAuth 2.0 token for authentication.

Procedure

  1. Double-click tHTTPClient_1 to open its Basic settings view.
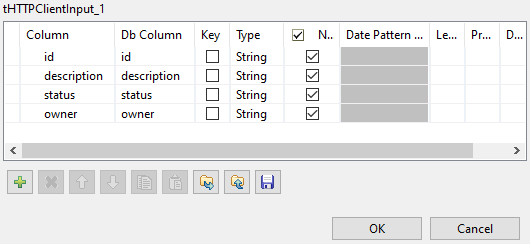
  2. Click the [...] button next to Edit schema to open the schema editor, add four columns that are of String type in the schema editor (that is, id, description, status, and owner), and click OK.
  3. Enter the base URL of the Microsoft Graph API to be called in the Base URL field (https://graph.microsoft.com/v1.0/ in this example).
  4. Select OAuth 2.0 from the Authentication type drop-down list and:
    1. Select Client credentials from the Flow drop-down list.
    2. Select Form from the Authentication mode drop-down list.
    3. Enter the token endpoint in the Token endpoint field.
    4. Enter your client ID and client secret in the Client ID and Client secret fields.

      To enter the client secret, click the [...] button next to the Client secret field to bring out the Enter a new password dialog box, enter the client secret in the text field, and click OK. Note that you can enter the client secret either in a JSON string in the pure password mode or as a Java expression in the Java mode. You can toggle between the two modes by clicking switch to Java mode or switch to pure password mode on the top of the text field.

    5. Add a row in the Scopes table and enter the scope in table.
  5. Type GET in the HTTP method field.

    You can also set the HTTP method by clicking the [...] button next to the HTTP method field and selecting GET from the dialog box that appears.

  6. Type in the API path in the Path field (schemaExtensions in this example).
  7. Select the Query parameters option, add a row in the table under the option, and type "$top" in the Name column and "10" in the Value column in the table.
  8. Select JSON from the Response body format drop-down list and:
    1. Type .value in the Extract a sub-part of the response field.
    2. Select Body from the Returned content drop-down list.
  9. Leave the other options as they are.

Did this page help you?

If you find any issues with this page or its content – a typo, a missing step, or a technical error – let us know how we can improve!