Skip to main content Skip to complementary content

Setting up the tHTTPClient_2 component

The tHTTPClient_2 component accesses the OpenAI GPT-3 model text-davinci-003 for the French translation of the description field of the received schemaExtensions entity data and passes the data to the subsequent component.

Procedure

  1. Double-click tHTTPClient_2 to open its Basic settings view.
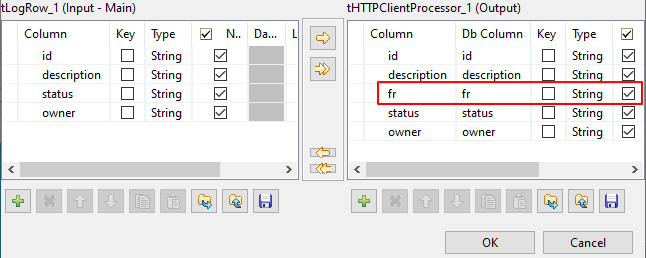
  2. Click the [...] button next to Edit schema to open the schema editor, add a column in addition to the existing four columns in the table on the right (that is, the tHTTPClient_1 (Output) table, with the column name of fr and type of String), and click OK.
  3. Enter the base URL of the OpenAI GPT-3 model text-davinci-003, that is, https://api.openai.com/v1/, in the Base URL field.
  4. Select Bearer token from the Authentication type drop-down list and enter your bearer access token in the field under the Authentication type drop-down list.
    To enter the token, click the [...] button next to the Bearer access token field to bring out the Enter a new password dialog box, enter the token in the text field, and click OK. Note that you can enter the token either in a JSON string in the pure password mode or as a Java expression in the Java mode. You can toggle between the two modes by clicking switch to Java mode or switch to pure password mode on the top of the text field.
  5. Type POST in the HTTP method field.

    You can also set the HTTP method by clicking the [...] button next to the HTTP method field and selecting POST from the dialog box that appears.

  6. Type completions in the Path field.
  7. Select the Request body option and:
    1. Select JSON from the Body type drop-down list.
    2. Enter the following lines in the JSON box.
      {
       "model": "text-davinci-003",
       "prompt": "Can you translate in french:'{.input.description}'"
      }
  8. Select JSON from the Response body format drop-down list and Body from the Returned content drop-down list.
  9. Select Output key/value pairs option and:
    1. Add a row in the table under the option.
    2. Enter "fr" in the Name column of the table.
    3. Enter "{.response.choices[0].text}" in the Value column of the table.
  10. Select the Forward input values option.
  11. Leave the other options as they are.

Did this page help you?

If you find any issues with this page or its content – a typo, a missing step, or a technical error – let us know how we can improve!