Skip to main content Skip to complementary content

Setting up the tHTTPClient_3 component

The tHTTPClient_3 component stores the received data, along with the French translation, as XML documents on GitHub.

Procedure

  1. Double-click tHTTPClient_3 to open its Basic settings view.
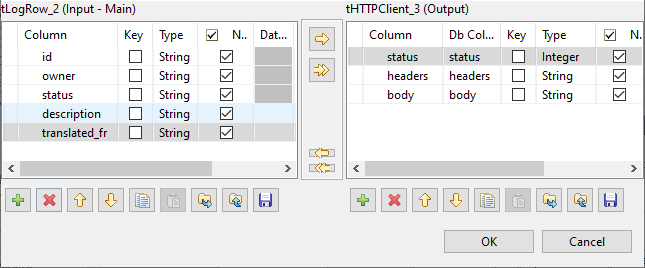
  2. Click the [...] button next to Edit schema to open the schema editor and add three columns in the table on the right (that is, the tHTTPClient_3 (Output) table): status (type Integer), headers (type String), and body (type String). Click OK when done.
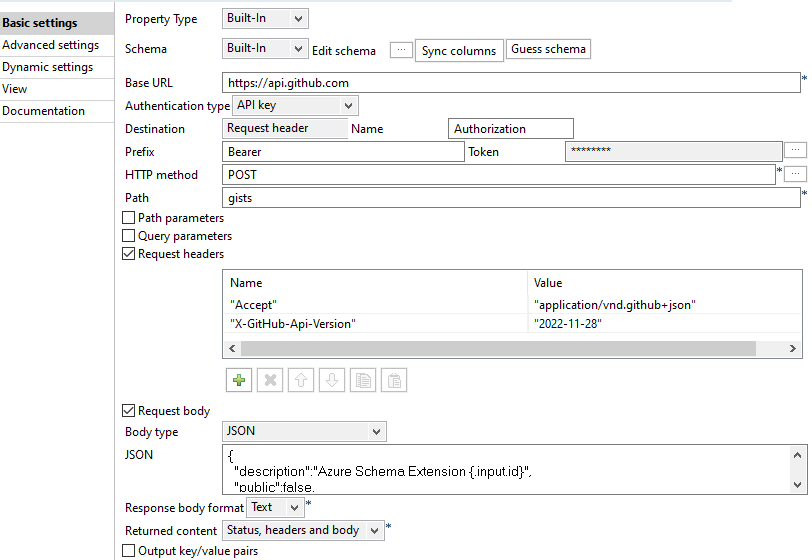
  3. Enter https://api.github.com in the Base URL field.
  4. Select API key from the Authentication type drop-down list and:
    1. Select Request header from the Destination drop-down list.
    2. Type Authorization in the Name field.
    3. Type Bearer in the Prefix field.
    4. Enter your GitHub personal access token (PAT) in the Token field.
      To enter the token, click the [...] button next to the Token field to bring out the Enter a new password dialog box, enter the token in the text field, and click OK. Note that you can enter the token either in a JSON string in the pure password mode or as a Java expression in the Java mode. You can toggle between the two modes by clicking switch to Java mode or switch to pure password mode on the top of the text field.
  5. Type POST in the HTTP method field.

    You can also set the HTTP method by clicking the [...] button next to the HTTP method field and selecting POST from the dialog box that appears.

  6. Type gists in the Path field.
  7. Select the Request headers option and:
    1. Add a row in the table under the option and type "Accept" in the Name field and "application/vnd.github+json" in the Value field.
      You can add a row in the table by clicking the plus button under the table.
    2. Add another row in the table and type "X-GitHub-Api-Version" in the Name field and "2022-11-28" in the Value field.
  8. Select the Request body option and:
    1. Select JSON from the Body type drop-down list.
    2. Enter the following lines in the JSON box.
      {
        "description":"Azure Schema Extension {.input.id}",
        "public":false,
        "files":{
           "AzureSchemaExtensions_{.input.id}.xml":{
                    "content":"<?xml version=\\"1.0\\"?>\\n<application>\\n  <id>{.input.id}</id>\\n  <owner>
      {.input.owner}</owner>\\n  <status>{.input.status}</status>\\n  <description>\\n    
      <en>{.input.description}</en>\\n    
      <fr>{.input.translated_fr}</fr></description>\\n</application>"
                }
           }
      }

      The above request body generates an XML document with the values retrieved from the input data. Values in the input data are referenced as .input.{input_field}, such as .input.id, .input.status, and so on.

  9. Select Text from the Response body format drop-down list.
    The Text option specifies to return the response payload as plain text without parsing.
  10. Select Status, headers and body from the Returned content drop-down list.
    With the Status, headers and body option selected, the content returned contains the following three fields:
    • The HTTP response status code
    • The headers of the response
    • The response payload in plain text
  11. Leave the other options as they are.

Did this page help you?

If you find any issues with this page or its content – a typo, a missing step, or a technical error – let us know how we can improve!