Skip to main content Skip to complementary content
Close announcements banner

Configuring the Talend Data Quality data mart

About this task

  • Using Talend Installer is the recommended way to connect to the Talend Data Quality data mart but you can perform a manual configuration if needed.
  • This procedure lets you define one data mart as the default one for all reports. You can change the data mart for specific reports without impacting this general setting. For more information, see Setting up a database for an individual report

Procedure

  1. Open Talend Studio.
  2. On the menu bar, click Window > Preferences.
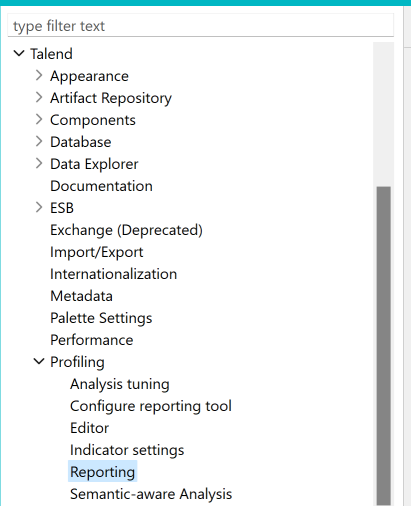
  3. In the Preferences window, do one of the following:
    • Start typing reporting and select Reporting.
    • Expand Talend > Profiling and select Reporting.
      Location of Reporting in the Preferences list.
  4. If the fields in the Reporting window are already filled in, click Apply. The Talend Data Quality data mart might be already installed and configured.
  5. If the data mart does not exist, follow the steps below.
  6. From the DB Type list, select the database in which you want to store the current report results.
    By default, Talend Studio stores reports and analysis results in an embedded HSQL database. You cannot share reports and analysis results when stored in the HSQL database.
  7. Define the connection parameters in the individual connection fields or in the Url field. When you modify any parameter in the Url field, it is modified automatically in the individual fields and vice versa.
    Database Details
    MySQL In the DB Name field, you can:
    • Enter a new database name (catalog). A catalog will be created and the required tables to store analyses and reports will be generated.
    • Use the default database name (talend_dq). In this database, you can have access to all analyses and results of generated reports.
    • Enter a database name that exists in the database.

      If there is no data mart structure in this database, it will be created.

      If the data mart structure already exists but in a lower version that the current one, the data mart structure is updated.

      If the data mart structure already exists but in an higher version that the current one, you cannot use this data mart structure.
      Information noteRemember: MySQL database names with a dot "." are allowed.
      You can connect to an Azure Database for MySQL.
    Oracle with SID

    Oracle with service name

    Oracle OCI

    • Fill the SID or the Service Name field with the name of an existing database.
    • Fill the Schema field with an Oracle schema to which the specified user in the User field has access, or leave it blank. If you leave this field blank, your reports will be written to the default schema of the defined user.
    Information noteImportant: The collation of the schema must be case sensitive. Otherwise the columns may not be analyzed and will be missing from the report. For more information, see the Oracle documentation.
    PostgreSQL
    • Fill in the connection information to the database.
      Information noteRemember: Database names with a dot "." or an hyphen "-" are allowed.
    • You can connect to an Azure Database for PostgreSQL or an Azure SQL database. When connecting to an Azure Database for PostgreSQL database, use the username@hostname syntax for the User field and leave the Additional parameters field empty.
    • You can use only the default schemas of PostgreSQL when you create the data mart on it.
    Microsoft SQL Server
    • Fill in the connection information to the database.
      Information noteRemember: Database names with a dot "." or an hyphen "-" are allowed.

      To enable writing reports to the defined database, make sure that the specified user has enough system privileges.

    • You can use only the default schemas of Microsoft SQL Server when you create the data mart on it.
    • If you want to connect using Windows authentication, leave the User and Password fields empty.

      When creating a connection to a Microsoft SQL Server database to store reports and analysis results, both Microsoft and Open source JTDS drivers are supported.

    • The collation used by the Microsoft SQL Server database must be case-insensitive, otherwise the report generation may not succeed. You may encounter the following error: java.sql.SQLException: Invalid column name 'rep_runtime'. For more information about collation rules, see Microsoft documentation.
    • For more information about setting up a connection to a Microsoft SQL Server database, see What you need to know about some databases.
  8. If you have not selected HSQL from the DB Type list, specify additional connection properties in the Additional parameters field.
    When connecting to a MySQL 8 database, configure the useSSL, requireSSL, and serverTimezone properties. Enter useSSL=false&requireSSL=false&serverTimezone=UTC for example.
    When connecting to an Azure SQL database, enter ssl=require.
  9. Enter your login information to the database in the corresponding fields.
  10. Optional: To export the data mart connection and the path of the report folder and logo as a context, click Export as context and follow the steps.
    You can click Revert Context to switch the connection back to its initial state.
  11. Click Apply.
  12. If a prompt asks you to download and install some missing modules, click Download and install all modules available. This action may take a few minutes.
    When the modules are installed, the Confirm pop-up window informs you that the data mart does not exist.
  13. Click OK to validate the changes and close the Preferences window.

Results

The data mart is configured and you can use it.

Did this page help you?

If you find any issues with this page or its content – a typo, a missing step, or a technical error – let us know how we can improve!