Creating a profiling analysis on the HDFS file via a Hive table - Cloud - 8.0

Talend Studio User Guide

Version
Cloud
8.0
Language
English
Product
Talend Big Data
Talend Big Data Platform
Talend Cloud
Talend Data Fabric
Talend Data Integration
Talend Data Management Platform
Talend Data Services Platform
Talend ESB
Talend MDM Platform
Talend Real-Time Big Data Platform
Module
Talend Studio
Content
Design and Development
Last publication date
2024-02-29
Available in...

Big Data Platform

Cloud API Services Platform

Cloud Big Data Platform

Cloud Data Fabric

Cloud Data Management Platform

Data Fabric

Data Management Platform

Data Services Platform

MDM Platform

Real-Time Big Data Platform

Before you begin

  • You have selected the Profiling perspective.
  • You have created a connection to the Hadoop distribution and the HDFS file.

About this task

You can profile files of the following formats:
  • TXT
  • CSV
  • Parquet, with a flat structure

Procedure

  1. In the DQ Repository tree view, right-click the HDFS connection to be used and select Create Simple Analysis.
    A dialog box opens listing the HDFS schemas in the connection.
    Overview of the HDFS schemas in a connection.
  2. Select the check box of the file you want to profile.
    Wait till you read Success in the Creation status column.
    Note: The Hive table you will create is based on folders and not on files. So you must not select files that have different structures.
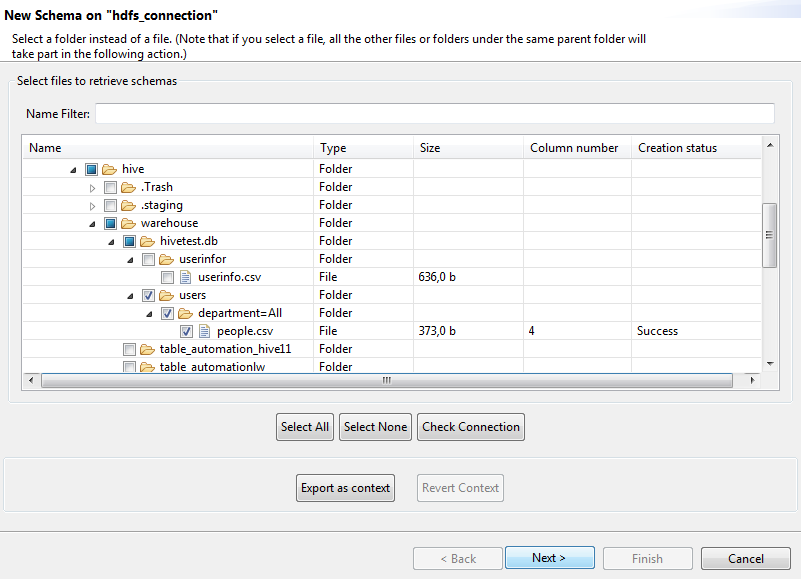
  3. Click Check Connection to verify the connection status and then click Next to go to the next step that lists the schema of the selected file.
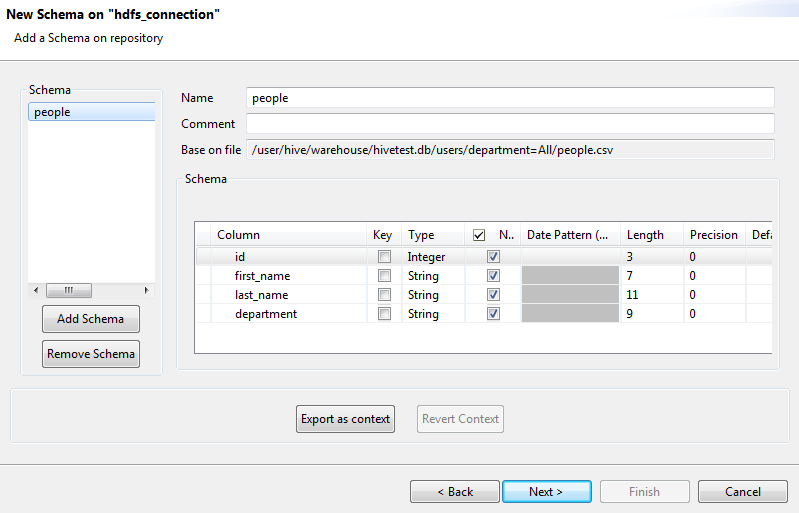
    Overview of the schema of a selected file.
  4. Modify the schema if needed.
    If there is a Date column in the schema, make sure to correctly set the date pattern, otherwise you may get null as results.
  5. Click Next to open a new view in the wizard where you can create a table with the HDFS schema on a Hive connection.
  6. Optional: If needed, enter a new name for the table. Use lower case as Hive stores tables in lower case.
    Example of a name in lower case in the New Table Name field.
  7. Either:
    • From the Select one existed Hive Connection list, select the Hive connection on which you want to create the table.

      You must have at least one Hive connection correctly configured before you can create the table. The Select one existed Hive Connection option will be disabled if you have not created at least one Hive connection.

      You can create a Hive connection if you select the Create a new Hive Connection option in this view of the wizard.

    • Select the Create a new Hive Connection option to create first a Hive connection, then to create the table on the new connection.
  8. Click Finish.
    The New Analysis wizard opens.
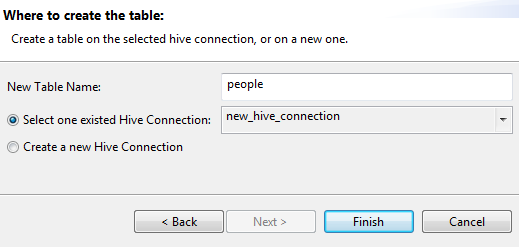
  9. Set the analysis metadata and click Finish.
    Overview of the Data Preview and the Analyzed Columns sections.

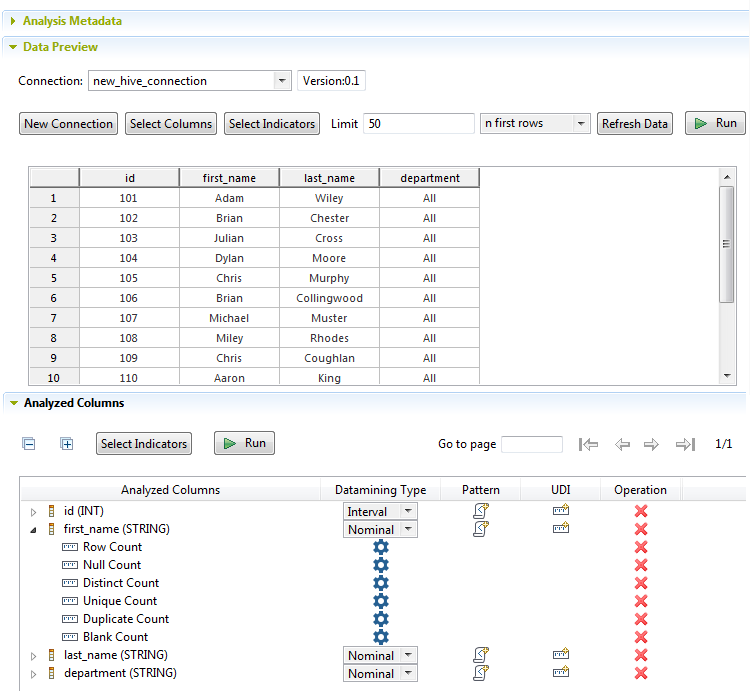
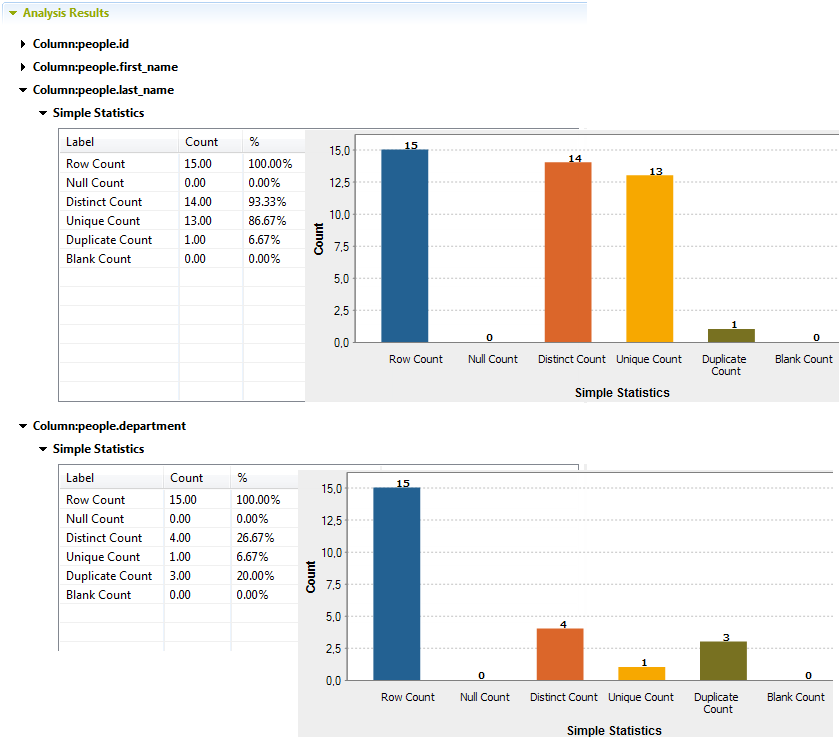
    A new analysis on the selected HDFS file is automatically created and opened in the analysis editor. Simple statistics indicators are automatically assigned for columns.

    The analysis actually applies to the Hive table, but computes statistics on the data from the HDFS by using the External table mechanism. External tables keep data in the original file outside of Hive. If the HDFS file you selected to analyze is deleted, then the analysis will not be able to run anymore.

  10. Click Refresh Data to display the column content.
    You can use the Select Columns tab to modify the columns to be analyzed.
  11. If needed, click Select Indicators to add more indicators or new patterns to the columns.
  12. Run the analysis to display the results in the Analysis Results section in the editor.
    Tables and graphics for the Simple Statistics indicator.

    For more information on column analysis, see Where to start?