
Defining the schema of your output file
About this task
Upon completion of the previous operations, the columns in the Linker Source area are automatically mapped to the corresponding ones in the Linker Target area, as indicated by blue arrow links.
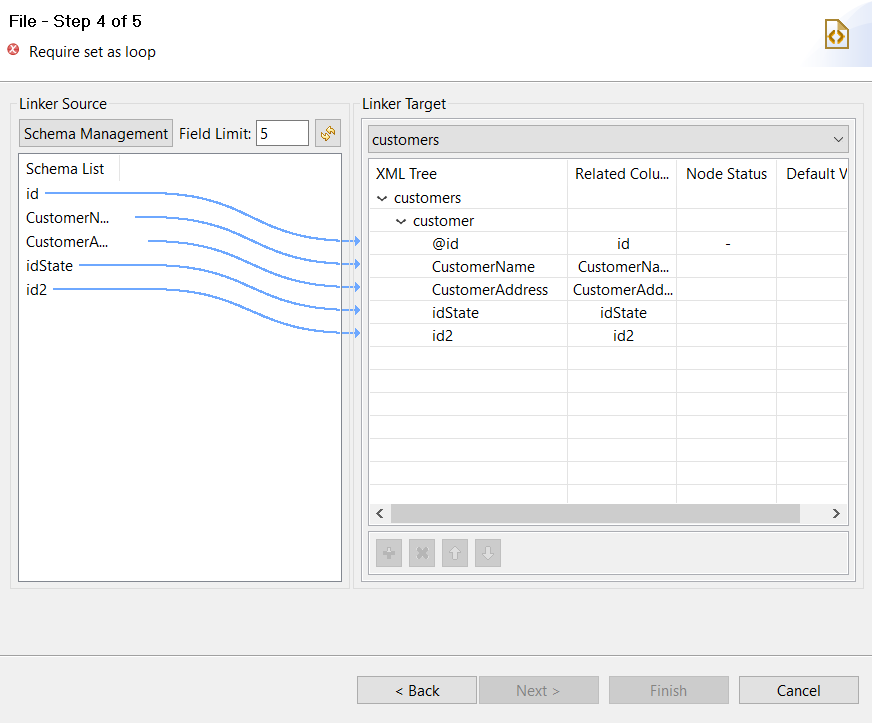
In this step, you need to define the output schema. To do so, you can perform different actions:
| Action | Instructions |
|---|---|
| Create a schema from scratch or edit the source schema columns to pass to the output schema | In the Linker Source area, click the Schema Management button to open the schema editor. |
| Specify the maximum number of columns to be displayed in the schema list | In the Field Limit field of the Linker Source area, specify the maximum number of columns you want to display if the number of columns of the source file exceeds the limit defined in the Talend Studio preference and any columns you want to pass to the output schema are not shown in the schema list. Then click the refresh button. |
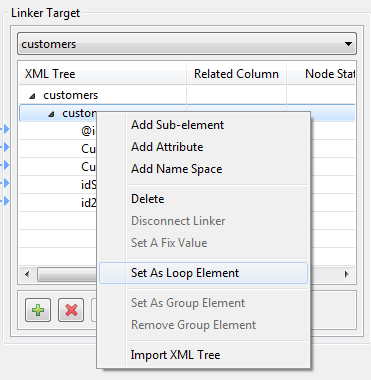
| Define a loop element | In the Linker Target area, right-click the
element of interest and select Set As Loop Element
from the contextual menu. Information noteNote: It is a mandatory operation to define an
element to run a loop on.
|
| Define a group element | In the Linker Target area, right-click the
element of interest and select Set As Group
Element from the contextual menu. Information noteNote: You can set a
parent element of the loop element as a group element on the condition
that the parent element is not the root of the XML tree.
|
| Create a child element for an element | In the Linker Target area:
|
| Create an attribute for an element | In the Linker Target area:
|
| Create a name space for an element | In the Linker Target area:
|
| Delete one or more elements, attributes, or name spaces | In the Linker Target area:
|
| Adjust the order of one or more elements | In the Linker Target area, select the elements
of interest and click the  and and  buttons. buttons. |
| Set a static value for an element/attribute/name space | In the Linker Target area, right-click the
element/attribute/name space of interest and select Set A Fix
Value from the contextual menu. Information noteNote:
|
| Create a source-target mapping | Select the column of interest in the Linker
Source area, drop it onto the node of interest in the
Linker Target area, and select
Create as sub-element of target node,
Create as attribute of target node, or
Add linker to target node according to your
need in the dialog box that appears, and click
OK. If you choose an option that is not permitted for the target node, you will see a warning message and your operation will fail. |
| Remove a source-target mapping | In the Linker Target area, right-click the node of interest and select Disconnect Linker from the contextual menu. |
| Create an XML tree from another XML or XSD file | Right-click any schema item in the Linker Target area and select Import XML Tree from the contextual menu to load another XML or XSD file. Then, you need to create source-target mappings manually and define the output schema all again. |
Information noteNote:
You can select and drop several fields at a time, using the Ctrl + Shift technique to make multiple selections, therefore making mapping faster. You can also make multiple selections for right-click operations.
Procedure
-
In the Linker Target area, right-click the
element you want to run a loop on and select Set As Loop
Element from the contextual menu.
Did this page help you?
If you find any issues with this page or its content – a typo, a missing step, or a technical error – let us know how we can improve!