Selecting the columns you want to analyze and setting analysis parameters - Cloud - 8.0

Talend Studio User Guide

Version
Cloud
8.0
Language
English
Product
Talend Big Data
Talend Big Data Platform
Talend Cloud
Talend Data Fabric
Talend Data Integration
Talend Data Management Platform
Talend Data Services Platform
Talend ESB
Talend MDM Platform
Talend Real-Time Big Data Platform
Module
Talend Studio
Content
Design and Development
Last publication date
2024-02-29
Available in...

Big Data Platform

Cloud API Services Platform

Cloud Big Data Platform

Cloud Data Fabric

Cloud Data Management Platform

Data Fabric

Data Management Platform

Data Services Platform

MDM Platform

Real-Time Big Data Platform

Procedure

  1. In the analysis editor and from the Connection list, select the database connection on which to run the analysis.
    The numerical correlation analysis is possible only on database columns for the time being. You can change your database connection by selecting another connection from the Connection list. If the analyzed columns do not exist in the new database connection you want to set, you receive a warning message that enables you to continue or cancel the operation.
  2. Click Select Columns to open the Column Selection dialog box.
  3. Browse the catalogs/schemas in your database connection to the columns you want to analyze.
    You can filter the table or column lists by typing the desired text in the Table filter or Column filter fields respectively. The lists will show only the tables/columns that correspond to the text you type in.
  4. Click the table name to list all its columns in the right-hand panel of the Column Selection dialog box.
  5. In the column list, select the check boxes of the columns you want to analyze and click OK.
    In this example, you want to compute the age average of the personnel of different enterprises located in different states. Then the columns to be analyzed are AGE, COMPANY, and STATE.
    You can drag the columns to be analyzed directly from the corresponding database connection in the DQ Repository tree view into the Analyzed Columns area.
    If you right-click any of the listed columns in the Analyzed Columns view and select Show in DQ Repository view, the selected column will be automatically located under the corresponding connection in the tree view.
    The selected columns are displayed in the Analyzed Columns section of the analysis editor.
  6. In the Indicators view, click Options icon to open a dialog box where you can set thresholds for each indicator.
    Overview of the Indicator dialog box.
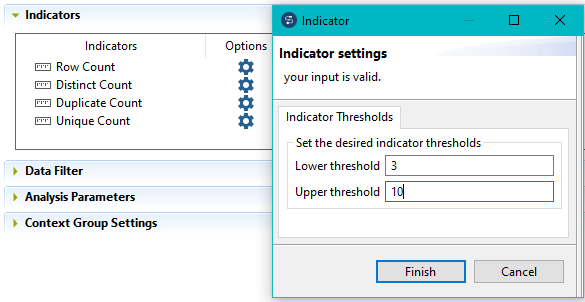
    The indicators representing the simple statistics are by-default attached to this type of analysis.
  7. In the Data Filter view, enter an SQL WHERE clause to filter the data on which to run the analysis, if required.
  8. In the Analysis Parameter view and in the Number of connections per analysis field, set the number of concurrent connections allowed per analysis to the selected database connection, if required.
    You can set this number according to the database available resources, that is the number of concurrent connections each database can support.
  9. If you have defined context variables in the Context view in the analysis editor, complete the following steps:
    1. Use the Data Filter and Analysis Parameter views to set/select context variables to filter data and to decide the number of concurrent connections per analysis respectively.
    2. In the Context Settings view, select from the list the context environment you want to use to run the analysis.
    For more information about contexts and variables, see Using context variables in analyses.
  10. Press F6 to execute the analysis.

Results

The editor switches to the Analysis Results tab showing the results.
Graphical result of the 'Average of AGE versus count'.

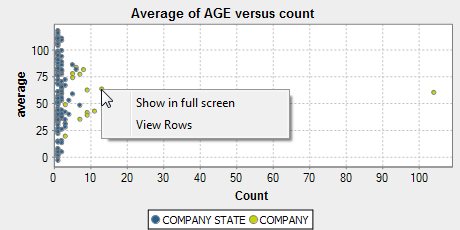
For more information about the analysis results, see Exploring the results of the numerical correlation analysis.