
Setting up the Job
Procedure
-
Double-click tWorkdayOutput to open its Basic
settings view and do the following.
-
Click the [...] button next to the
Service field and select the desired service
(Human_Resources in the example) from the list box in
the dialog box that appears.

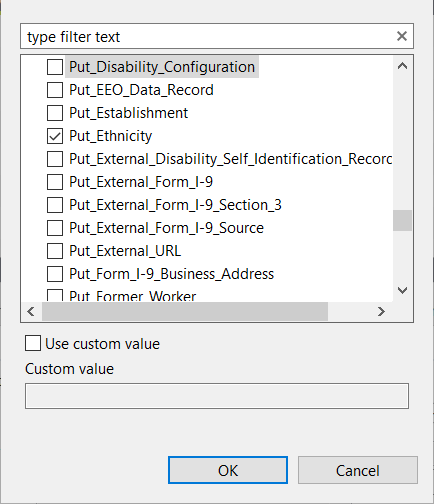
-
Click the [...] button next to the
Operation field and select the desired operation
(Put_Ethnicity in this example) from the list box in
the dialog box that appears.
 Information noteNote: Make sure that the login credentials are correct so that the desired service and the operation can appear in the list boxes.
This component adds or updates an Ethnicity object using the Human_Resources service.

-
Click the [...] button next to the
Service field and select the desired service
(Human_Resources in the example) from the list box in
the dialog box that appears.
-
Switch to the Advanced settings view of tWorkdayOutput_1 and
do the following.
-
Type
https://wd2-impl-services1.workday.com/ccx/service/${tenant}
in the Service endpoint field.
Information noteNote: You can also enter the endpoint by clicking the [...] button next to the Service endpoint field and select the endpoint from the list box in the dialog box that appears.

-
Click the [...] button next to the Request
link field, select the link corresponding to your operation in
the list box, and click OK.
The request link appears in the Request link field.


-
Type
https://wd2-impl-services1.workday.com/ccx/service/${tenant}
in the Service endpoint field.
-
Edit the request string by doing the following.
-
Paste the request link string in the address bar of a web browser and press
Enter.
The request string appears in the web browser.

-
Paste the request link string in the address bar of a web browser and press
Enter.
-
Double-click tFixedFlowInput to open its Basic
settings view and do the following.
- Open the schema editor by clicking the [...] button next to Edit schema and add a column of String type in the schema editor.
- Select Use Inline Content(delimited file) and enter the request string modified in the previous step in the Content field.
- Leave the other options as they are.
This component sends the request string to the tWorkdayOutput component.

-
Double-click tWorkdayInput to open its Basic
settings view and do the following.
-
Click the [...] button next to the
Service field and select the desired service
(Human_Resources in the example) from the list box in
the dialog box that appears.
-
Click the [...] button next to the
Operation field and select the desired operation
(Get_Ethnicity in this example) from the list box in
the dialog box that appears.
 Information noteNote: Make sure that the login credentials are correct so that the desired service and the operation can appear in the list boxes.
This component extracts data from the Workday client and passes the data to the subsequent component.

-
Click the [...] button next to the
Service field and select the desired service
(Human_Resources in the example) from the list box in
the dialog box that appears.
-
Switch to the Advanced settings view of tWorkdayInput_1 and
type https://wd2-impl-services1.workday.com/ccx/service/${tenant} in
the Service endpoint field.
Information noteNote: You can also enter the endpoint by clicking the [...] button next to the Service endpoint field and select the endpoint from the list box in the dialog box that appears.
Did this page help you?
If you find any issues with this page or its content – a typo, a missing step, or a technical error – let us know how we can improve!