Skip to main content Skip to complementary content
Close announcements banner

Appending records to the XML file generated

Procedure

  1. Drop a second tFixedFlowInput and a second tAdvancedFileOutputXML (named as tFixedFlwInput_2 and tAdvancedFileOutputXML_2 by default) from the palette onto the design workspace. Connect the two components using a Row > Main link.
  2. Connect tFixedFlowInput_1 to tFixedFlowInput_2 with a Trigger > OnSubjobOk link.
  3. Double-click tFixedFlowInput_2 to display its Basic settings view and select the Use Inline Content (delimited file). In the Content field, add the following.
    1;1;item1
    1;2;item2
    2;1;item3
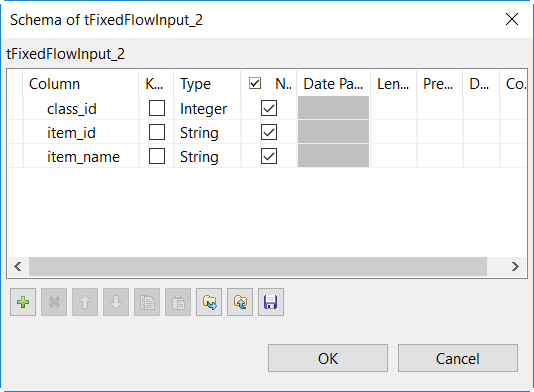
  4. Click the Edit Schema button and create the three columns shown in the following figure.
  5. When prompted, click OK to propagate the schema to the subsequent component (that is, the tAdvancedFileOutputXML_2 component). You can also achieve this by clicking the Sync columns button in the Basic settings view of the tAdvancedFileOutputXML_2 component.
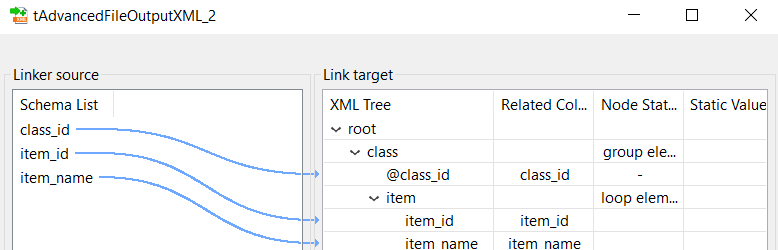
  6. In the Basic settings view of the tAdvancedFileOutputXML_2 component, click the Configure XML tree button to configure it as below. Follow the procedure used for the first subJob to set item as a loop element and set class as a group element.
  7. Select the Append the source xml file option.
  8. In the File Name field of the Basic settings view, enter the file path to the XML file specified in the first subJob ("D:/out.xml" in this example).
  9. Execute the Job and check if the file "D:/out.xml" generated corresponds to the xml file presented at the beginning of this document. As expected, the xml source file is appended with various loop elements.

Did this page help you?

If you find any issues with this page or its content – a typo, a missing step, or a technical error – let us know how we can improve!