Centralizing File LDIF metadata - Cloud - 8.0

Talend Studio User Guide

Version
Cloud
8.0
Language
English
Product
Talend Big Data
Talend Big Data Platform
Talend Cloud
Talend Data Fabric
Talend Data Integration
Talend Data Management Platform
Talend Data Services Platform
Talend ESB
Talend MDM Platform
Talend Real-Time Big Data Platform
Module
Talend Studio
Content
Design and Development
Last publication date
2024-02-29

About this task

LDIF files are directory files described by attributes. If you often need to read certain LDIF files, you may want to centralize the connections to these LDIF-type files and their attribute descriptions in the Repository for easy reuse. This way you will not have to define the metadata details manually in the relevant components each time you use the files.

You can centralize an LDIF file connection either from an existing LDIF file, or from the LDIF file property settings defined in a Job.

To centralize an LDIF connection and its schema from an LDIF file, expand Metadata in the Repository tree view, right-click File ldif and select Create file ldif from the contextual menu to open the file metadata setup wizard.

To centralize a file connection and its schema you have already defined in a Job, click the icon in the Basic settings view of the relevant component, with its Property Type set to Built-in, to open the file metadata setup wizard.

Then complete these steps following the wizard:

Procedure

  1. Fill in the general information in the relevant fields to identify the LDIF file metadata, including Name, Purpose and Description.
    The Name field is required, and the information you provide in the Description field will appear as a tooltip when you move your mouse pointer over the file connection.
  2. If needed, set the version and status in the Version and Status fields respectively. You can also manage the version and status of a repository item in the Project Settings dialog box. For more information, see Upgrading the version of project items and Status management respectively.
  3. If needed, click the Select button next to the Path field to select a folder under the File ldif node to hold your newly created file connection.
    Click Next to proceed with file settings.
  4. Specify the full path of the source file in the File field, or click the Browse... button to browse to the file.
    Note: The Universal Naming Convention (UNC) path notation is not supported. If your source file is on a LAN host, you can first map the network folder into a local drive.
    Skip this step if you are saving an LDIF file connection defined in a component because the file path is already filled in the File field.
  5. Check the first 50 rows of the file in the File Viewer area and click Next to continue.
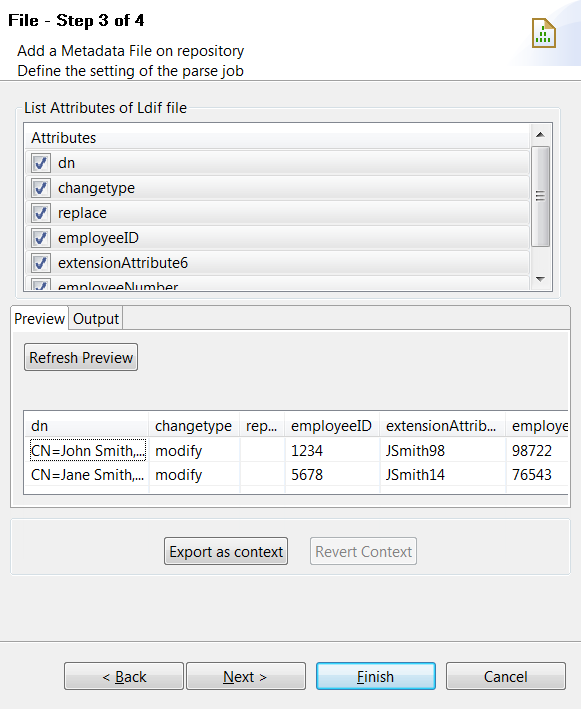
  6. From the list of attributes of the loaded file, select the attributes you want to include the file schema, and click Refresh Preview to preview the selected attributes.
    Then click Next to proceed with schema finalization.
  7. If needed, customize the generated schema:
    • Rename the schema (by default, metadata) and leave a comment.

    • Add, remove or move schema columns, export the schema to an XML file, or replace the schema by importing an schema definition XML file using the tool bar.
    Make sure the data type in the Type column is correctly defined.
    For more information regarding Java data types, including date pattern, see Java API Specification.
    Below are the commonly used Talend data types:
    • Object: a generic Talend data type that allows processing data without regard to its content, for example, a data file not otherwise supported can be processed with a tFileInputRaw component by specifying that it has a data type of Object.

    • List: a space-separated list of primitive type elements in an XML Schema definition, defined using the xsd:list element.

    • Dynamic: a data type that can be set for a single column at the end of a schema to allow processing fields as VARCHAR(100) columns named either as ‘Column<X>’ or, if the input includes a header, from the column names appearing in the header. For more information, see Dynamic schema.

    • Document: a data type that allows processing an entire XML document without regarding to its content.

  8. If the LDIF file on which the schema is based has been changed, click the Guess button to generate the schema again. Note that if you have customized the schema, the Guess feature does not retain these changes.
  9. Click Finish. The new schema is displayed under the relevant Ldif file connection node in the Repository tree view.

Results

Now you can drag and drop the file connection or the schema of it from the Repository tree view onto the design workspace as a new component or onto an existing component to reuse the metadata. For further information about how to use the centralized metadata in a Job, see Using centralized metadata in a Job and Setting a repository schema in a Job.

To modify an existing file connection, right-click it from the Repository tree view, and select Edit file ldif to open the file metadata setup wizard.

To add a new schema to an existing file connection, right-click the connection from the Repository tree view and select Retrieve Schema from the contextual menu.

To edit an existing file schema, right-click the schema from the Repository tree view and select Edit Schema from the contextual menu.