
Centralizing Salesforce metadata
Procedure
-
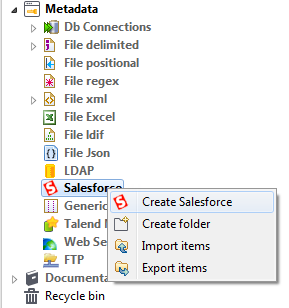
In the Repository tree view, expand the
Metadata node, right-click the
Salesforce tree node, and select Create
Salesforce from the contextual menu to open the
Salesforce wizard.
-
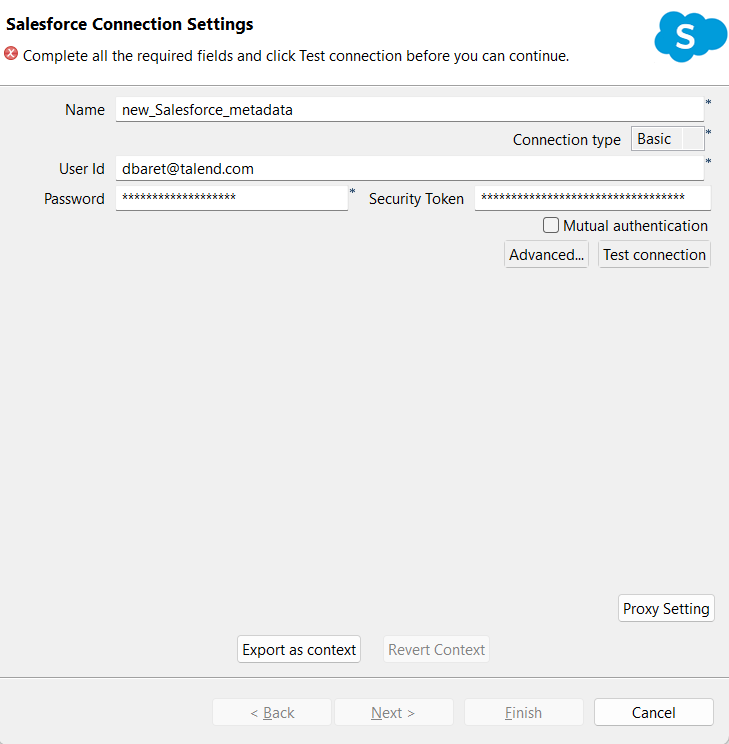
Enter a name for your connection in the Name field, select Basic or
OAuth from the Connection
type list, and provide the connection details according to the
connection type you selected.
-
With the Basic option selected, you need to specify the following details:
-
User Id: the ID of the user in Salesforce.
-
Password: the password associated with the user ID.
-
Security Key: the security token.
-
-
With the OAuth option selected, you need to specify the following details:
-
Client Id and Client Secret: the OAuth consumer key and consumer secret, which are available in the OAuth Settings area of the Connected App that you have created at Salesforce.com.
-
Callback Host and Callback Port: the OAuth authentication callback URL. This URL (both host and port) is defined during the creation of a Connected App and will be shown in the OAuth Settings area of the Connected App.
-
Token File: the path to the token file that stores the refresh token used to get the access token without authorization.
-
-
-
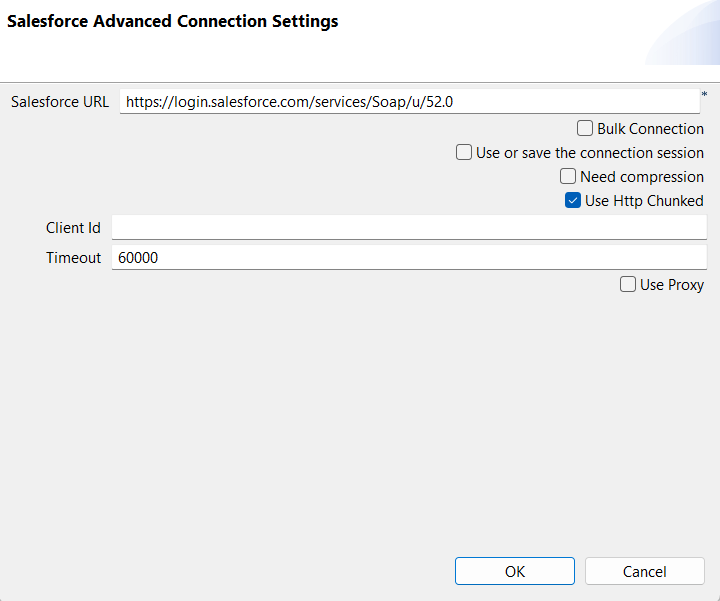
If needed, click Advanced... to open the
Salesforce Advanced Connection Settings dialog box, do
the following and then click OK:
-
enter the Salesforce Webservice URL required to connect to the Salesforce system.
-
select the Bulk Connection check box if you need to use bulk data processing function.
-
select the Use or save the connection session check box and in the Session directory field displayed, specify the path to the connection session file to be saved or used.
This session file can be shared by different Jobs to retrieve a connection session as long as the correct user ID is provided by the component. This way, you do not need to connect to the server to retrieve the session.
When an expired session is detected, if the correct connection information (the user ID, password, and security key) is provided, the component will connect to the server to retrieve the new session information and update the connection session file.
This check box is available only when Basic is selected from the Connection type drop-down list.
-
select the Need compression check box to activate SOAP message compression, which can result in increased performance levels.
-
select the Trace HTTP message check box to output the HTTP interactions on the console.
This option is available if the Bulk Connection check box is selected.
-
select the Use HTTP Chunked check box to use the HTTP chunked data transfer mechanism.
This option is not available if the Bulk Connection check box is selected.
-
enter the ID of the real user in the Client Id field to differentiate between those who use the same account and password to access the Salesforce website.
-
fill the Timeout field with the Salesforce connection timeout value, in milliseconds.
- If needed, select the Use Proxy check box to set the SOCKS type proxy and enter the corresponding setting details. Note that you can also set the HTTP type proxy via .
-
-
Select the check boxes for the modules of interest and click Finish to retrieve the schemas of the selected
modules.
You can type in filter text to narrow down your selection.
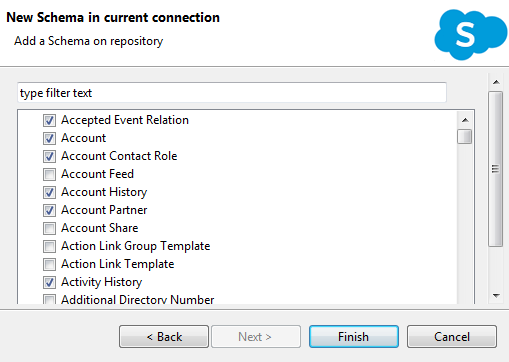
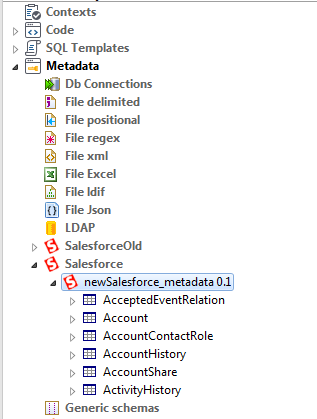
The newly created Salesforce connection is displayed under the Salesforce node in the Repository tree view, along with the schemas of the selected modules.
Results
You can now drag and drop the Salesforce connection or any schema of it from the Repository onto the design workspace, and from the dialog box that opens choose a Salesforce component to use in your Job. You can also drop the Salesforce connection or a schema of it onto an existing component to reuse the connection or metadata details in the component. For more information about dropping component metadata in the design workspace, see Using centralized metadata in a Job.
To modify the Salesforce metadata entry, right-click it from the Repository tree view, and select Edit Salesforce to open the file metadata setup wizard.
To edit an existing Salesforce schema, right-click the schema from the Repository tree view and select Edit Schema from the contextual menu.
Did this page help you?
If you find any issues with this page or its content – a typo, a missing step, or a technical error – let us know how we can improve!