Skip to main content Skip to complementary content
Close announcements banner

Building a Data Service Job as a Microservice

About this task

Information noteNote: This feature is available only if you have installed the R2024-02 Talend Studio Monthly update or a later one delivered by Talend. For more information, check with your administrator.
Information noteWarning: Only Jobs that include the tRESTRequest component can be built as a Microservice.

To build a Job to a Microservice, complete the following:

Procedure

  1. Click Project Settings on the Talend Studio tool bar, or select File > Edit Project Properties from the menu bar to open the Project Settings dialog box.
    Default configuration of Microservices
  2. In the tree diagram to the left of the dialog box, select Build > Standalone microservices > Default configuration to display the corresponding view and customize the Microservice configuration as needed.
    Configuration is not applied when running Microservices in the Studio. For example, custom servlet context path is not used and management endpoints are not available.
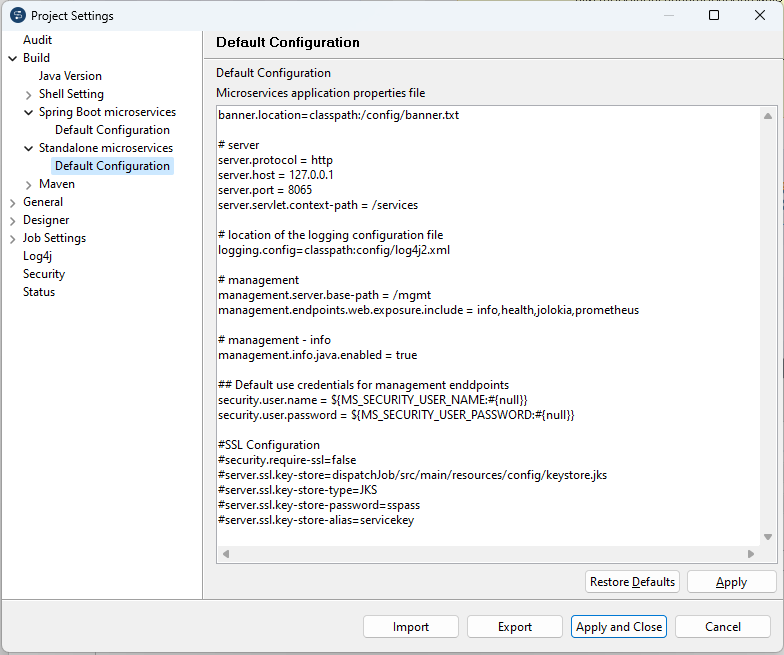
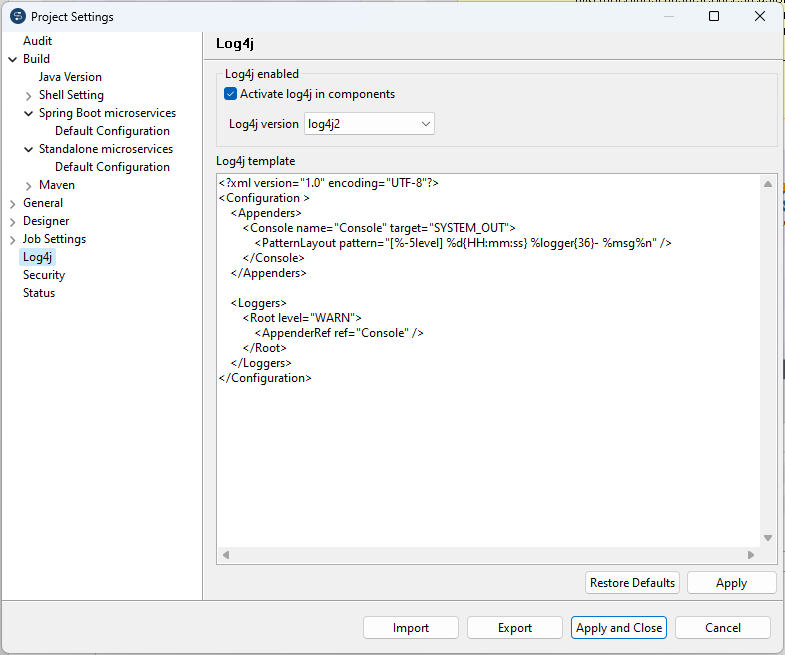
  3. In the tree diagram to the left of the dialog box, select Log4j to display the corresponding view.
    Log4j configuration
  4. Customize the Log4j configuration as needed. The default Log4j XML instructions only output the WARN logs to the console. For more information on the log4j parameters, see Log4jXmlFormat.
    A sample Log4j configuration is shown below which will also provide a tesb.log file when the Microservice is started. Note that the Log4j configuration is the same for Talend Studio and the Microservice. Nevertheless a log4j.xml file can also be placed into an external configuration folder of the Microservice at runtime to provide a specific Log4j configuration for production deployment.
    <?xml version="1.0" encoding="UTF-8" ?>
    <!DOCTYPE log4j:configuration SYSTEM "log4j.dtd">
    <log4j:configuration xmlns:log4j="http://jakarta.apache.org/log4j/">
        <appender name="stdout" class="org.apache.log4j.ConsoleAppender">
            <layout class="org.apache.log4j.PatternLayout">
                <param name="ConversionPattern" value="%d | %-5.5p | %-16.16t | %-32.32C %4L | %m%n"/>
            </layout>
        </appender>
        <appender name="rollingFile" class="org.apache.log4j.RollingFileAppender">
            <param name="file" value="tesb.log"/>
            <param name="MaxFileSize" value="1024KB"/>
            <param name="MaxBackupIndex" value="10"/>
            <layout class="org.apache.log4j.PatternLayout">
                <param name="ConversionPattern" value="%d | %-5.5p | %-16.16t | %-32.32C %4L | %m%n"/>
            </layout>
        </appender>
        <root>
            <priority value="info"/>
            <appender-ref ref="stdout"/>
            <appender-ref ref="rollingFile"/>
        </root>
    </log4j:configuration>
  5. In the tRESTRequest component of the Job, you need to use relative endpoint URL instead of absolute URL. The REST service runs in the default port defined in the Default configuration. If you want to override the default port, either use the --server.port option in the command or configure it in the application.properties file in the /config folder inside the Microservice.
    Environment variables to use for Basic Authentication are MS_SECURITY_USER_NAME and MS_SECURITY_USER_PASSWORD.
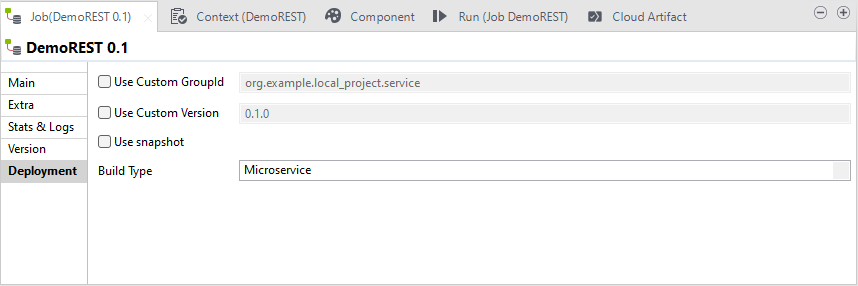
  6. Open the Job in the design workspace. In the Deployment view of the Job tab, select Microservice in the Build Type list. Save the Job.
    Select the Microservice build type.
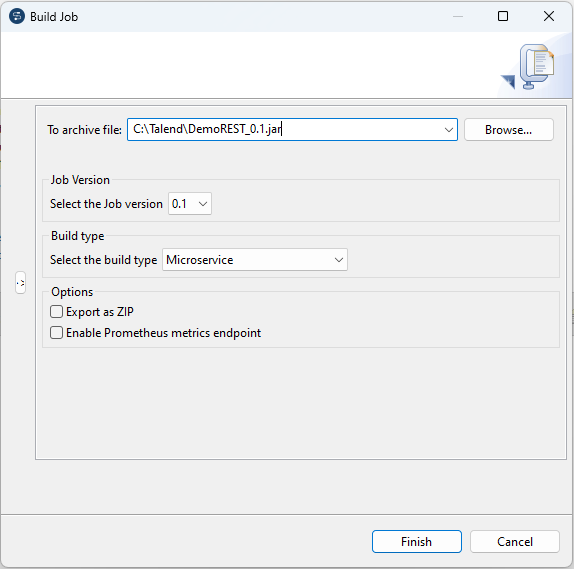
  7. In the Repository tree view, right-click the Job you want to build, and select Build Job to open the dialog box.
    Build the Job as a Microservice.
  8. In the To archive file field, browse to the directory where you want to save your built Job.
  9. In the Job Version area, select the version number of the Job you want to build if you have created more than one version of the Job.
  10. In the Build type area, select Microservice.
  11. In the options area, select:
    • The Export as ZIP option to export the Job to a .zip file, which provides an external config folder and start scripts to start the Microservice with the external config folder for Linux (.sh) and Windows (.bat). If this option is not selected, the Job is exported as a .jar file by default.

    • The Enable Prometheus metrics endpoint check box to build the Prometheus metrics endpoint into the Microservice to monitor the execution of Jobs, JVM memory, CPU consumption, and so on. By default, this feature bridges all the JMX attributes and values into Prometheus. For more information about Prometheus, see the Prometheus documentation. This option is applicable from 8.0.1-R2024-04.
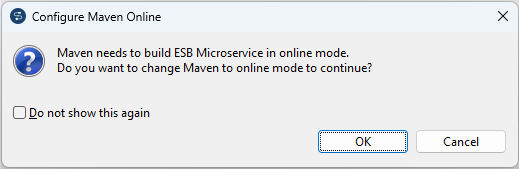
  12. Click Finish to validate your changes, complete the export operation and close the dialog box. A pop up window appears prompting you that Maven needs to be set to online to build the ESB Microservice, as some libraries have to be downloaded from the remote Maven repository. Talend Studio requires Internet access when you use the ESB Microservice feature. Talend Studio does not provide a pure offline mode for the ESB Microservice build operation. Click Yes to change Maven to online mode.
    Configure Maven Online.
    If the Finish operation leads to an error, you can find more information in the Talend Studio log file <Studio_Home>\workspace\.metadata\.log.

Results

A .jar or .zip file for the Job is created in the defined place. You can run it independent of Talend Studio in standalone mode.

Did this page help you?

If you find any issues with this page or its content – a typo, a missing step, or a technical error – let us know how we can improve!