
Configuring the tJavaFlex component
Procedure
-
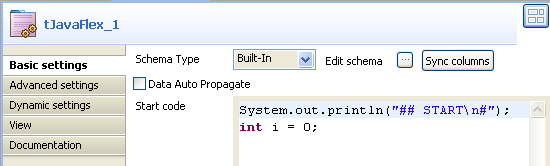
Double-click tJavaFlex to display its
Basic settings view and define the
components properties.
-
In the Main code field, enter the code to
be applied on each line of data.
In this example, we want to show the number of each line starting from 0 and then the number and the random text transformed to upper case and finally the random date set in the editor of tRowGenerator. Then, we create a condition to show if the status is true or false and we increment the number of the line:
System.out.print(" row" + i + ":");
System.out.print("# number:" + row1.number);
System.out.print (" | txt:" + row1.txt.toUpperCase());
System.out.print(" | date:" + row1.date);
if(row1.flag) System.out.println(" | flag: true");
else  System.out.println(" | flag: false");

i++;
Information noteWarning:
In the Main code field, "row1" corresponds to the name of the link that connects to tJavaFlex. If you rename this link, you have to modify the code.
-
In the End code field, enter the code
that will be executed in the closing phase.
In this example, the code indicates the end of the execution of tJavaFlex by displaying the END message:
System.out.println("#\n## END");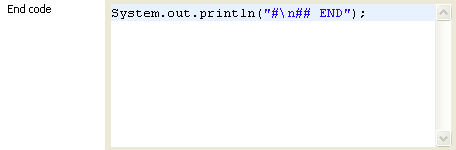
Did this page help you?
If you find any issues with this page or its content – a typo, a missing step, or a technical error – let us know how we can improve!