Skip to main content Skip to complementary content

Configuring the components

Procedure

  1. In the tLDAPInput Component view, set the connection details to the LDAP directory server as well as the filter as described in Displaying LDAP directory's filtered content.
    Change the schema to make it simpler, by removing the unused fields: dc, ou, objectclass.
  2. Then open the mapper to set the edit to be carried out.
    Drag & drop the uid column from the input table to the output as no change is required on this column.
  3. In the Expression field of the dn column (output), fill in with the exact expression expected by the LDAP server to reach the target tree leaf and allow directory writing only if you haven't set it already in the Base DN field of the tLDAPOutput component.
  4. In this use case, the GetResultName global variable is used to retrieve this path automatically. Press Ctrl+Space bar to access the variable list and select tLDAPInput_1_RESULT_NAME.
  5. In the mail column's expression field, type in the new email that will overwrite the current data in the LDAP directory. In this example, we change to Pierre.Dupont@talend.com.
    Click OK to validate the changes.
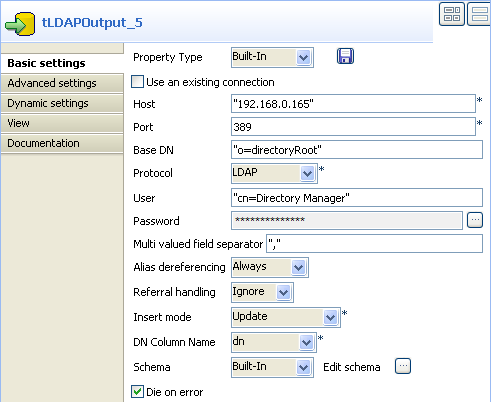
  6. Then select the tLDAPOutput component to set the directory writing properties.
  7. Set the Port and Host details manually if they aren't stored in the Repository.
  8. In Base DN field, set the highest tree leaf you have the rights to access. If you have not set previously the exact and full path of the target DN you want to access, then fill in it here. In this use case, the full DN is provided by the dn output from the tMap component, therefore only the highest accessible leaf is given: o=directoryRoot.
  9. Select the relevant protocol to be used: LDAP for this example.
    Fill in the User and Password as expected by the LDAP directory.
    Fill in Multi-valued field separator with a comma as some fields may hold more than one value, separated by a comma.
  10. Use the default setting of Alias Dereferencing and Referral Handling fields, respectively Always and Ignore.
    The Insert mode for this use case is Update (the email address).
    The schema was provided by the previous component through the propagation operation.
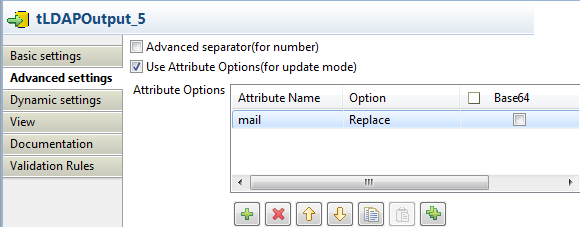
  11. In the Advanced settings view, select the Use Attribute Options (for update mode) check box to show the Attribute Options table.
    Select the attribute mail under the Attribute Name part and the choose Replace under the Option part.

Did this page help you?

If you find any issues with this page or its content – a typo, a missing step, or a technical error – let us know how we can improve!