Skip to main content Skip to complementary content

Inserting Salesforce Contact records upon Account external IDs

Procedure

  1. Double-click the third tSalesforceOutput component to open its Basic settings view on the Component tab.
  2. Select the component that will create the Salesforce connection from the Connection Component drop-down list, tSalesforceConnection_1 in this example.
  3. Click the [...] button next to the Module Name field and in the pop-up dialog box, select the object into which data will be inserted, Contact in this example. The schema of the Contact object will be automatically filled. When done, click OK to save the changes and in the pop-up dialog box, click Yes to propagate the schema to the next two tLogRow components.
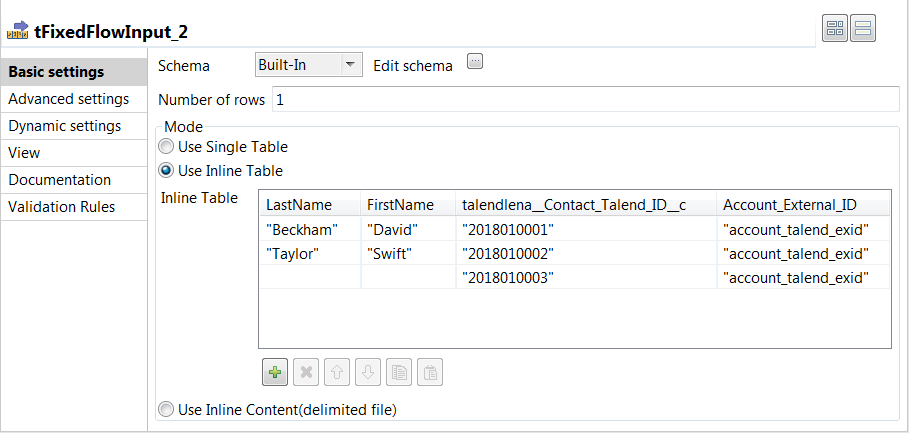
  4. Click the [...] button next to Edit schema and in the pop-up dialog box, remove all schema columns except the three columns LastName, FirstName, and talendlena__Contact_Talend_ID__c. Then add another column Account_External_ID of String type and copy these four columns to the second tFixedFlowInput component. When done, click OK to close the dialog box and in the pop-up dialog box, click Yes to propagate the schema to the next two tLogRow components.
  5. Select UPSERT from the Output Action drop-down list and talendlena__Contact_Talend_ID__c from the Upsert Key Column drop-down list displayed.
  6. Go to the Advanced settings view and in the Relationship mapping for upsert table, specify the relationship mapping for the column Account_External_ID by adding one row and setting the value for each table column. In this example, the column Account_External_ID is mapped with the external ID field talendlena__Account_External_ID__c of the Account object, so the value for Column name of Talend Schema is Account_External_ID, the value for Lookup relationship field name and Module name is Account, and the value for External id name is talendlena__Account_External_ID__c.
  7. Clear the Extend Insert and Die on Error check boxes so that erroneous data can be gathered via the Row > Reject connection.
  8. Double-click the second tFixedFlowInput component to open its Basic settings view on the Component tab.
  9. In the Mode area, select Use Inline Table and in the table displayed, enter the data to be inserted into the Salesforce Contact object. In this example, the input data is as follows.
    Beckham;David;2018010001;account_talend_exid
    Taylor;Swift;2018010002;account_talend_exid
    ;;2018010003;account_talend_exid

    You can also select Use Inline Content, and then copy and paste the input data into the Content field displayed.

  10. Double-click the first tLogRow component and on its Basic settings view, select Table in the Mode area to display the result in a table.
  11. Do the same to configure the second tLogRow component.

Did this page help you?

If you find any issues with this page or its content – a typo, a missing step, or a technical error – let us know how we can improve!