Skip to main content Skip to complementary content

Using a map in a Data Integration Job

Create a Job to convert a JSON file into a CSV.

About this task

In this example, you have a JSON file containing customer information, including arrays of different types of phone numbers. The goal is to convert it into a simple CSV file with a column for each piece of information. You can use the following JSON sample as input:
{
   "customers":[
      {
         "firstName":"John",
         "lastName":"Smith",
         "age":25,
         "address":{
            "streetAddress":"21 2nd Street",
            "city":"New York",
            "state":"NY",
            "postalCode":"10021"
         },
         "phoneNumber":[
            {
               "type":"home",
               "number":"202-555-0109"
            },
            {
               "type":"mobile",
               "number":"202-555-0181"
            }
         ]
      },
      {
         "firstName":"Jane",
         "lastName":"Doe",
         "age":31,
         "address":{
            "streetAddress":"19 4th Street",
            "city":"New York",
            "state":"NY",
            "postalCode":"10021"
         },
         "phoneNumber":[
            {
               "type":"home",
               "number":"202-555-0178"
            },
            {
               "type":"mobile",
               "number":"202-555-0123"
            },
            {
               "type":"work",
               "number":"202-555-0163"
            }
         ]
      }
   ]
}

Creating the input structure for your Data Integration Job

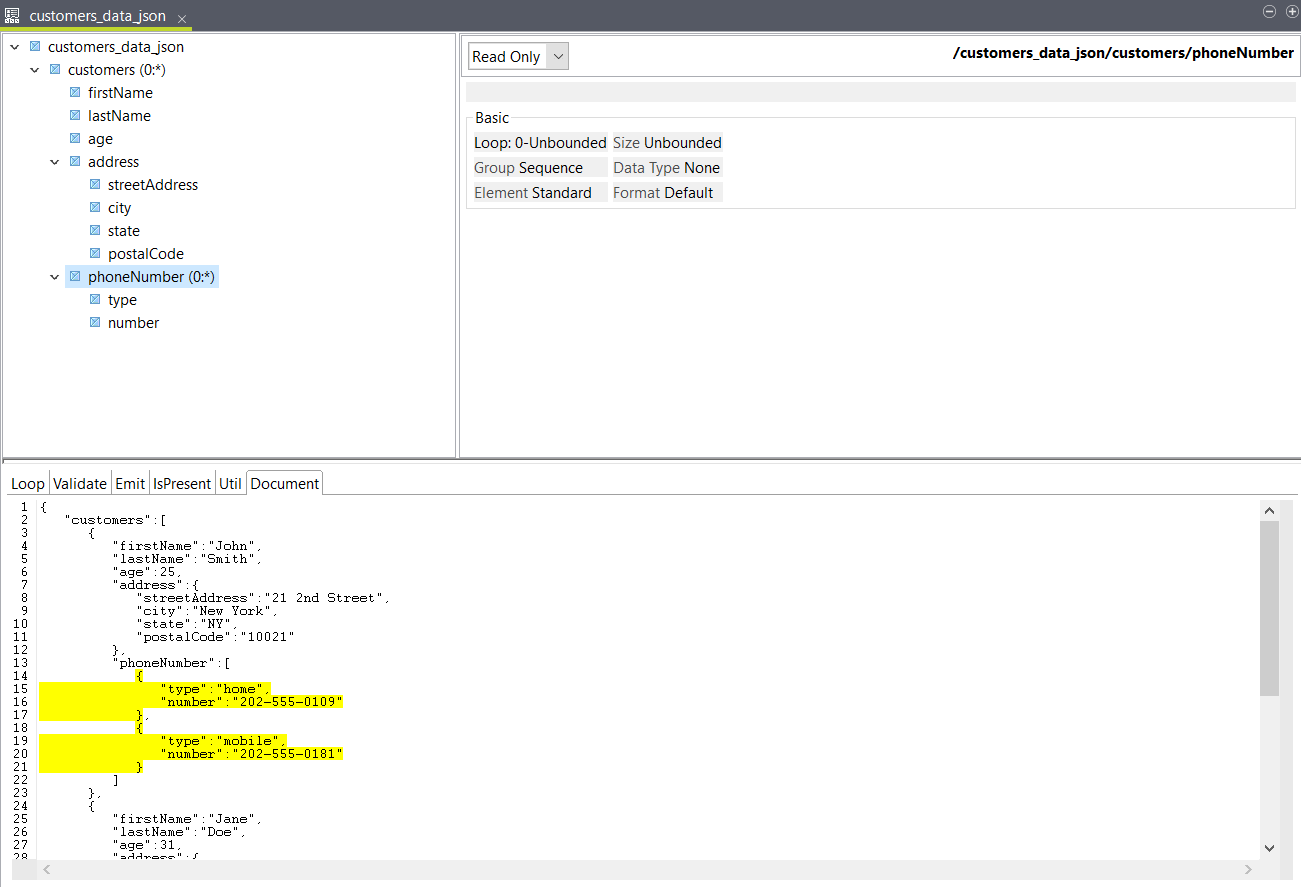
Create a JSON structure based on a sample document to use as input for your mapping.

Before you begin

You have a JSON file to use as input. You can use the sample provided above.

About this task

Creating structures in the Hierarchical Mapper is especially useful when handling files with multiple nested levels. You can create them directly from the Metadata node in your Repository in the Integration perspective, or from the Data Mapper tab in the Mapping perspective.

For more information, see Working with structures.

Procedure

  1. Expand the Hierarchical Mapper node and right-click Structure, then click New > Structure.
  2. In the wizard that opens, select Import a structure definition and click Next.
  3. Select JSON Sample Document and click Next.
  4. Select the file to use:
    • Select an existing resource in your workspace.
    • Import a local file.
    • Enter the URL to the file.
  5. Click Next.
  6. Select a folder and enter a name for your structure, then click Next.
  7. Click Finish.

Results

Your structure is created and opens in the editor. In the Document tab, you can see your sample data. The different elements are highlighted when you click them in the structure.
"customers_data_json" structure with "phoneNumber" element highlighted.

Creating the Data Integration Job

Create a simple Job with a tFileInputRaw, a tHMap and a tFileOutputDelimited.

Procedure

  1. In the Integration perspective, right-click the Job Designs node and click Create Standard Job.
  2. Enter a name, purpose and description for your Job, then click Finish.
  3. Add the following components to your design workspace and link them with Row > Main connections:
    • A tFileInputRaw
    • A tHMap
    • A tFileOutputDelimited
    Your Job should look like this:
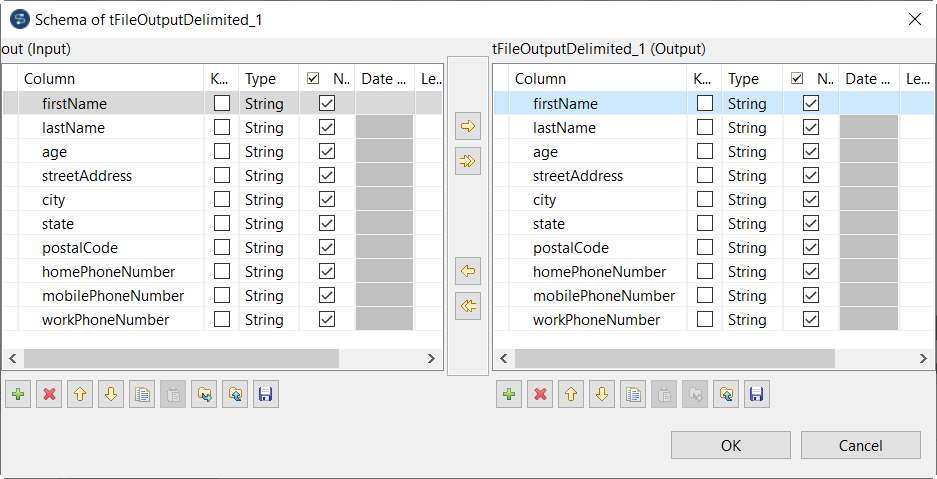
    Standard Job in the design workspace.
  4. Double-click the tFileInputRaw to open its properties and click the ... button to the left of the Filename field to select your input JSON file.
  5. Double-click the tFileOutputDelimited and enter the path to the output file in the File Name field.
  6. Optional: Edit other properties as needed.
  7. Click the ... button to the right of Edit schema to create the schema for your output file.
  8. In the Input schema, click the + button to add the following columns:
    • firstName
    • lastName
    • age
    • streetAddress
    • city
    • state
    • postalCode
    • homePhoneNumber
    • mobilePhoneNumber
    • workPhoneNumber
  9. Click the Copy all of the columns from input schema to output schema button to copy the columns to the Output schema, then click OK.
    Schema of tFileOutputDelimited.
  10. Click OK to close the schema editor.
  11. Double-click the tHMap and follow the wizard to generate the map.
    1. In the first step, select Select an existing hierarchical mapper structure and click Next.
    2. Select the structure you created in Creating the input structure for your Data Integration Job and click Next, then click Next again.
    3. In the second step, select Generate hierarchical mapper structure based on the schema and click Next.
    4. Click Finish.

Results

The map is generated, it uses the input structure previously created and generated an output structure from the schema defined in the tFileOutputDelimited. You can now map the elements.

Mapping the elements for your Data Integration Job

Configure the map generated in the previous procedure.

Procedure

  1. Drag the input customers element on the output row element.

    The firstName, lastName and age elements are automatically mapped, and a SimpleLoop function with a reference to the input customers element is added to the Loop tab of the output row element.

    This looping expression indicates that the map should produce one row in the output for each iteration of the customers element in the input. For more information, see Loop expressions.
    Looping expressions from the input to the output.
  2. Drag and drop the input streetAddress, city, state and postalCode elements on the corresponding output elements.
  3. Drag and drop an AgConcat expression on the output homePhoneNumber element.
  4. Drag the input number element on the AgConcat function.
    This is required because there are several number elements for each customers, and you need to create a single output from them.
    A looping expression using the input phoneNumber loop is generated.
  5. Drag and drop an Equal function on the Filter argument of the SimpleLoop function.
  6. Drag the input type element on the First Value argument.
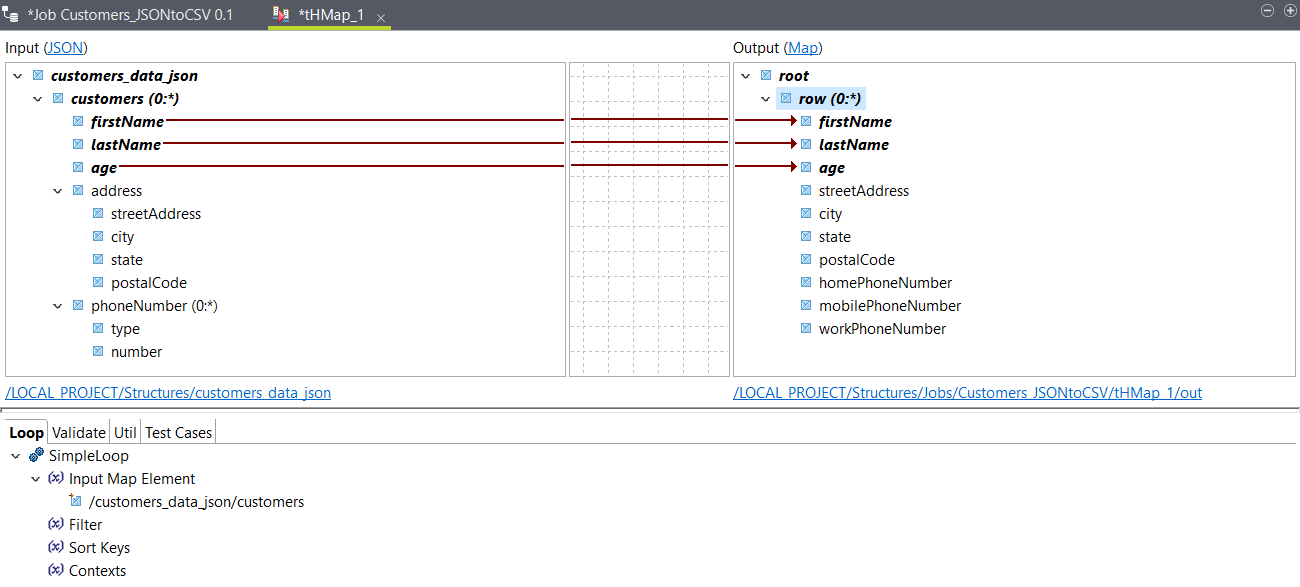
  7. Drag and drop a Constant function on the Second Value argument, then double-click it, enter home in the Value field and click OK.
    This filter allows you to specify that the homePhoneNumber element should return the value of the input number element in the iterations where the value of type is equal to home.
  8. Right-click the AgConcat function and click Copy to copy the entire expression.
  9. Right-click the output mobilePhoneNumber and click Paste.
    The AgConcat expression is copied to the Value tab of the mobilePhoneNumber element.
  10. Right-click AgConcat and click Expand All to see the whole expression, then double-click the Constant function and change the value to mobile.
  11. Repeat the previous steps to copy the AgConcat expression to the output workPhoneNumber element and change the value of the Constant expression to work.
  12. Save your map.

Results

Your elements are now mapped.
You can use the Test Run option to test the output, and go back to your Job to run it. The output should look like this with the sample input data:
John,Smith,25,21 2nd Street,New York,NY,10021,202-555-0109,202-555-0181,
Jane,Doe,31,19 4th Street,New York,NY,10021,202-555-0178,202-555-0123,202-555-0163

Did this page help you?

If you find any issues with this page or its content – a typo, a missing step, or a technical error – please let us know!