Skip to main content Skip to complementary content

Calculating the number of days since users activated their accounts

A pipeline with a test source, a Type converter processor, a Dates processor, and a database destination.

Before you begin

  • You have previously added the dataset holding your source data.

    Download and extract the file: dates-customers.zip. It contains a dataset with a list of customer leads including first names, last names, emails, addresses, etc.

  • You also have created the connection and the related dataset that will hold the processed data.

    Here, a file stored in a MySQL database.
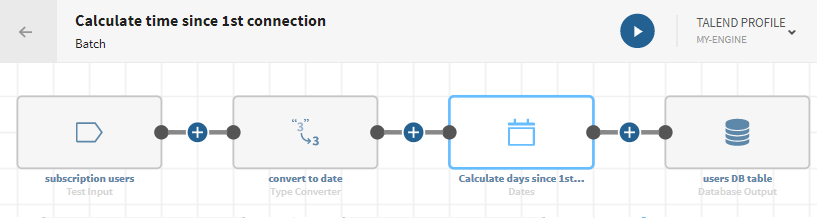
Procedure

  1. Click Add pipeline on the Pipelines page. Your new pipeline opens.
  2. Click ADD SOURCE to open the panel allowing you to select your source data, here subscription user data entered manually as a test dataset.
  3. Select your dataset and click Select in order to add it to the pipeline.
    Rename it if needed.
  4. Click Plus and add a Type converter processor to the pipeline. The configuration panel opens.
  5. Give a meaningful name to the processor.

    Example

    convert to date
  6. In the Converters area, add a new element.
  7. Select .ActivationDate in the Field path list and Date in the Output type list, as you want to convert the ActivationDate field, corresponding to the date users activates their accounts, to a Date type field.
  8. Click Save to save your configuration.
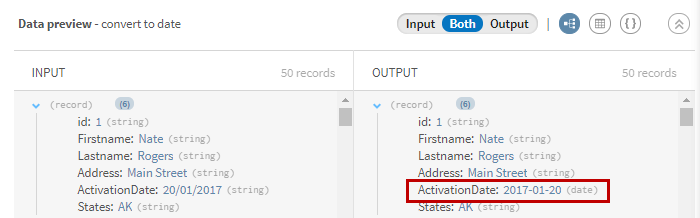
    (Optional) Look at the preview of the processor to compare your data before and after the type conversion.
    Preview of the Type converter processor after converting String records to Date records.
  9. Click Plus and add a Dates processor to the pipeline. The configuration panel opens.
  10. Give a meaningful name to the processor.

    Example

    calculate days since activation
  11. Configure the processor:
    1. Select Calculate time since in the Function name list, as you want to calculate the numbers of days since the user activated his account for the first time.
    2. Select .ActivationDate in the Fields to process field.
    3. Enable the Create new column option as you want the result to be displayed in a new field.
    4. Select Days in the Time unit list, select Now in the Until field and enter dd/MM/yyyy in the Set the date pattern field.
    5. Click Save to save your configuration.
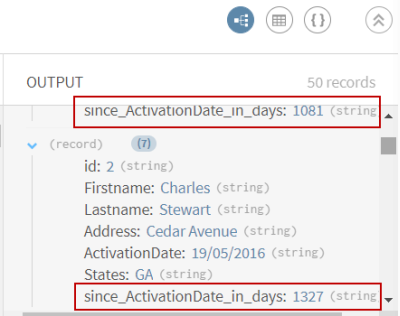
  12. (Optional) Look at the preview of the Dates processor to see your data after the calculation operation.
    Preview of the Dates processor after calculating the number of days.
  13. Click ADD DESTINATION and select the dataset that will hold your output data.
    Rename it if needed.
  14. On the top toolbar of Talend Cloud Pipeline Designer, click the Run button to open the panel allowing you to select your run profile.
  15. Select your run profile in the list (for more information, see Run profiles), then click Run to run your pipeline.

Results

Your pipeline is being executed, the user data has been processed, dates have been converted and the number of days since user activation has been calculated and sent to the target system you have indicated.

Did this page help you?

If you find any issues with this page or its content – a typo, a missing step, or a technical error – let us know how we can improve!