Skip to main content Skip to complementary content

Processing streaming aircraft data

A pipeline with a Kafka source, a Window processor, an Aggregate processor, a Field selector processor, a Python 3 processor, and a MySQL destination.

Before you begin

  • You have previously created a connection to the system storing your source data.

  • You have previously added the dataset holding your source data.

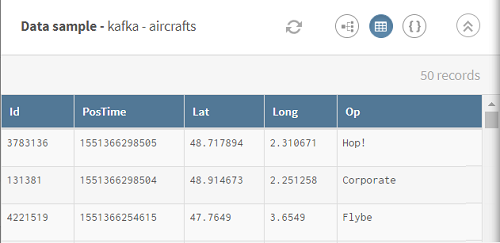
    Here, streaming aircraft data including aircraft IDs, position, and timestamp.

    To help you understand this scenario, here is the AVRO schema of the streaming data used in this scenario:
    {
      "type": "record",
      "name": "aircrafts",
      "fields": [
      {"name": "Id", "type": "int"},
      {"name": "PosTime", "type": "long"},
      {"name": "Lat", "type": "double"},
      {"name": "Long", "type": "double"},
      {"name": "Op", "type": "string"}
      ]
    }

    where Id corresponds to Aircraft identifiers, PosTime corresponds to the Timestamp of the position, Lat/Long correspond to the aircraft latitude/longitude and Op corresponds to Airline companies.

  • You also have created the connection and the related dataset that will hold the processed data.

    Here, a MySQL table.

Procedure

  1. Click Add pipeline on the Pipelines page. Your new pipeline opens.
  2. Give the pipeline a meaningful name.

    Example

    Process streaming aircraft data
  3. Click ADD SOURCE to open the panel allowing you to select your source data, here the aircraft topic on kafka.
    Preview of a data sample with aircraft records.
  4. Select your dataset and click Select in order to add it to the pipeline.
    Rename it if needed.
  5. Click Plus and add a Window processor to the pipeline. The configuration panel opens.
  6. Give a meaningful name to the processor.

    Example

    5sec window
  7. In the Configuration area:
    1. Enable the Use Window session toggle.
    2. Type in 5000 as the window duration in order to capture data every 5 seconds.
  8. Click Plus and add an Aggregate processor to the pipeline. The configuration panel opens.
  9. Give a meaningful name to the processor.

    Example

    group by aircraft
  10. In the Group by area, select the fields you want to use for your aggregation set: here .customerId.
    1. Select .Id in the Field list to group by aircraft identifiers.
    2. Add a New element and select .Op in the Field list to group by airline companies.
  11. In the Operations area:
    1. Select .PosTime in the Field list and Maximum in the Operation list.
    2. Name the generated field (Output field), date for example.
    3. Click the + sign to add a new element, select .Lat in the Field list and List in the Operation list.
    4. Name the generated field, lat for example.
    5. Click the + sign to add a new element, select .Long in the Field list and List in the Operation list.
    6. Name the generated field, lon for example.
  12. Click Save to save your configuration.
  13. Click Plus and add a Field Selector processor to the pipeline. The configuration panel opens.
  14. Give a meaningful name to the processor.

    Example

    select latest position
  15. In the Selectors area of the Advanced mode:
    1. Enter id in the Output list and .id in the Input list, as you want to select the id field while keeping it at the same location.
    2. Click the + sign to add a new element and enter airlines in the Output list and .Op in the Input list, as you want to select and rename the Op field.
    3. Click the + sign to add a new element and enter date in the Output list and .date in the Input list, as you want to select the date field while keeping it at the same location.
    4. Click the + sign to add a new element and enter lat in the Output list and type .lat[-1] in the Input list, as you want to select the lat field of the original location and move it to a lower level level in the schema.
    5. Click the + sign to add a new element and enter lon in the Output list and type .lon[-1] in the Input list, as you want to select the lon field of the original location and move it to a lower level level in the schema.

      You can use the avpath syntax in this area.

  16. Click Save to save your configuration.
  17. Click Plus and add a Python 3 processor to the pipeline. The configuration panel opens.
  18. Give a meaningful name to the processor.

    Example

    compute geohash
  19. In the Python 3 code area, type in:
    def encode(latitude, longitude, precision=12):
      
        __base32 = '0123456789bcdefghjkmnpqrstuvwxyz'
        __decodemap = { }
        for i in range(len(__base32)):
            __decodemap[__base32[i]] = i
        del i
    
        lat_interval, lon_interval = (-90.0, 90.0), (-180.0, 180.0)
        geohash = []
        bits = [ 16, 8, 4, 2, 1 ]
        bit = 0
        ch = 0
        even = True
        while len(geohash) < precision:
            if even:
                mid = (lon_interval[0] + lon_interval[1]) / 2
                if longitude > mid:
                    ch |= bits[bit]
                    lon_interval = (mid, lon_interval[1])
                else:
                    lon_interval = (lon_interval[0], mid)
            else:
                mid = (lat_interval[0] + lat_interval[1]) / 2
                if latitude > mid:
                    ch |= bits[bit]
                    lat_interval = (mid, lat_interval[1])
                else:
                    lat_interval = (lat_interval[0], mid)
            even = not even
            if bit < 4:
                bit += 1
            else:
                geohash += __base32[ch]
                bit = 0
                ch = 0
        return ''.join(geohash)
    
    output = json.loads("{}")
    output['id'] = input['id']
    output['airlines'] = input['airlines']
    output['date'] = input['date']
    output['location'] = encode(input['lat'], input['lon'])
    
    output.append(output)

    This code allows you to calculate Geohashes (a string indication geographic location resulting from the latitude and longitude).

  20. Click Save to save your configuration.
  21. Click ADD DESTINATION and select the dataset that will hold your processed data.
    Rename it if needed.
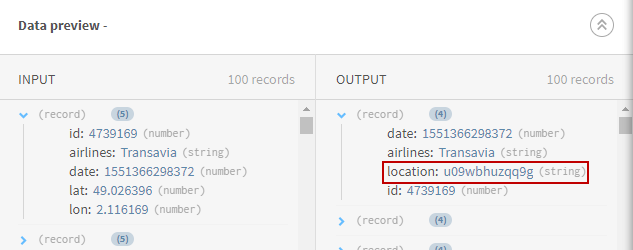
  22. (Optional) Look at the preview of the Python 3 processor to preview your data.
    Preview of the Python 3 processor after calculating geohash information.
  23. On the top toolbar of Talend Cloud Pipeline Designer, click the Run button to open the panel allowing you to select your run profile.
  24. Select your run profile in the list (for more information, see Run profiles), then click Run to run your pipeline.

Results

Your streaming pipeline is being executed and will run until you decide to terminate it. The aircraft data is modified and the calculated geohash information is sent to the target system you have indicated.

Did this page help you?

If you find any issues with this page or its content – a typo, a missing step, or a technical error – let us know how we can improve!