
Work with Amazon Relational Database Services (RDS)
- Launch an Amazon RDS MySQL database.
- Create Amazon MySQL database metadata.
- Write data to an Amazon MySQL table.
- Read data from an Amazon MySQL table.
This example uses these licensed products provided by Amazon:
- Amazon EC2
- Amazon RDS
- From the Amazon AWS home page, click RDS :

- If it’s the first time you have launched an Amazon RDS database, click Get Started Now .
- Select MySQL in the left menu and click Select :
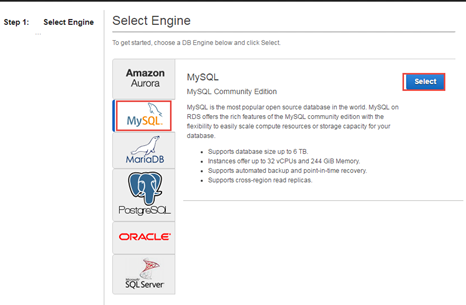
Although Amazon Aurora is recommended (and supported by the Talend Studio), for test purposes, a MySQL database will be used in this article.
- In the Dev/Test table, select MySQL :

- Configure your database Instance Specifications. Recommended settings :
- DB Instance Class: db.t2.micro – 1 vCPU, 1GiB RAM
- Multi-AZ Deployment: No
- Storage Type: General Purpose SSD
- Allocated Storage: 5 GiB
- Specify your DB Instance Identifier , Master Username and Master Password :

- Click Next Step . In the Network & Security table, you will be able to choose the security group you
created previously:

- Double-check the other configurations and click Launch DB Instance at the bottom of the page:
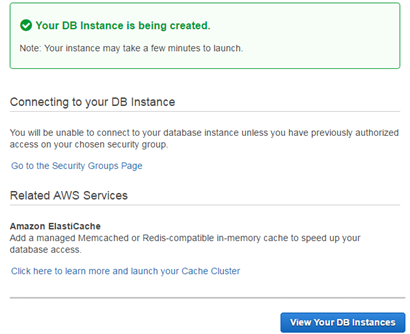
- To view the database list, click View Your DB Instances . When your database becomes available, the Status will change from creating to available .
- To get details on your database, click the black arrow. Once ready, the
database will be attributed an endpoint:

- Before using the database from the Talend Studio, it’s necessary to create a schema in your database. To achieve this, one option is to use MySQL Workbench to connect to your database using the endpoint and the credentials you provided to launch the database. Once connected, create a new schema. In the current example, the new schema is named Training. You will need the name of the schema to create the database connection metadata.
If you want to know more about Amazon RDS, please refer to Getting Started with Amazon RDS .
Create Amazon MySQL database metadata- In the Repository, right-click Db Connections and click Create connection .
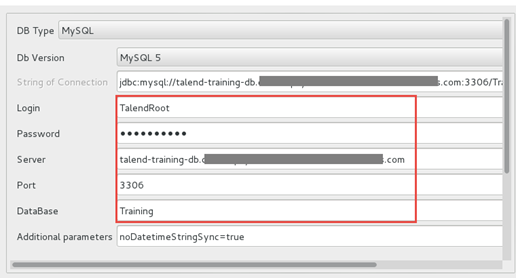
- In the DB Type list, select MySQL . In the Login and Password fields, enter the credentials used to launch the database.
- In the Server field, enter the database endpoint .
-
In the DataBase field, enter the name of the schema you created:
- To verify your connection, click Check :

The metadata appears in the Repository under Metadata>Db Connections.
Trooubleshooting tips
If you can’t get connected to your database, first, check your connection information in the Wizard. If the configuration is correct, the connection can still fail because of your instance firewall or because of the security group’s inbound and outbound rules. You can configure them to allow this specific connection by adding a new security group rule like the following:

For more information about setting up security group rules, please refer to the Security Groups documentation.
Write Data to an Amazon MySQL table- Create a new Standard Job and provide Name, Purpose and Description.
- Click the Amazon MySQL database metadata in the Repository and drag to
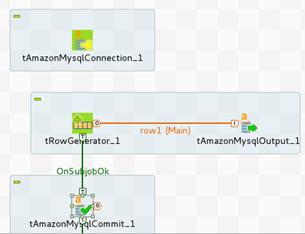
the Designer. In the Component list, select tAmazonMysqlConnection:

- To find connection information, double-click the component:

This component will centralize the connection information. Input and Output components that use this will not require further configuration to connect to the database.
- Generate sample data. In this example, the tRowGenerator component is used to generate some data.
- To write the generated data into your database, click the database metadata in the Repository and drag it to the Designer.
- In the Component list, select the tAmazonMysqlOutput component.
- Open the Component view and check the Use an existing connection option. Provide a Table name and select
the Action on Table and Action on data in
the drop-down lists:

- Your changes must be committed, so, click the database metadata and
drag it to the designer. In the Component list, select a tAmazonMysqlCommit component. You can optionally check the Close Connection option
in the Component view:

- The tAmazonMysqlCommit component should be connected with an OnSubjobOk trigger to the tRowGenerator component:
- Run your Job:

In this example, 1000 rows have been sent to the MySQL database.
The following instructions describe how to add more components to the Job in the previous example, to read the data and display it in the Console.
- Drag the database metadata to the Designer and select a tAmazonMySQLInput component.
- Connect it to the tAmazonMysqlCommit component with an OnSubjobOk trigger. In the Component view, check the Use an existing connection option. Specify the Table Name and edit the schema.
- In this example, the schema can be copied and pasted from the tRowGenerator component or from the tAmazonMysqlOutput component.
- Click Guess Query . The SQL query will be created based on the table name and the provided schema.
- Right-click tAmazonMysqlInput in the Designer and click Data viewer :

In the Preview, you can verify that you wrote data into the database.
- To display the rows in the Console, add a tLogRow component and connect it to the tAmazonMysqlInput component. Configure tLogRow so that the data are displayed in a table.
- Close your connection with a tAmazonMysqlClose component, connecting it to tAmazonMysqlInput with an OnSubjobOk trigger.
- Run your Job. The data will be displayed in the Console:
