
How to add a task-based notification
Before you begin
Before configuring a notification message, you must configure the SMTP protocol of your email server. For more information on how to configure the SMTP protocol, see Setting up an SMTP protocol.
Procedure
-
On the Notifications page, click
Add on the toolbar to create a new
notification.
Example
-
On the Notification panel to the right, set the
following information:
Field
Description
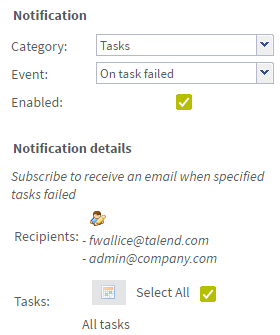
Category
Select the Tasks category from the drop-down list.
Event
Select the type of the event for which to send the notification:
Tasks
Select On task failed from the drop-down list to send an alert when the task monitored encounters an error.
Enabled
Select this check box to activate the notification service.
Recipients
Click
 to add a new recipient of the
notification messages.
to add a new recipient of the
notification messages.Tasks
Click
 to add one by one the tasks to
monitor, or click the Select All
button to send an email when any of the tasks fail.
to add one by one the tasks to
monitor, or click the Select All
button to send an email when any of the tasks fail. -
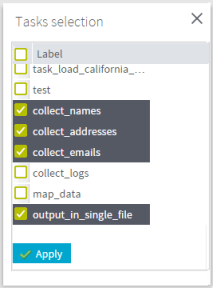
Click to show the Mails Selection dialog
box.
-
If you click the
button, select the check box(es) corresponding to the tasks to be monitored on
the Tasks Selection list that pops up.
Example
 If you click the Select All button, an email is sent when any of the tasks fail.
Did this page help you?
If you find any issues with this page or its content – a typo, a missing step, or a technical error – let us know how we can improve!