
Run the execution plan manually
About this task
This procedure explains how to run an execution plan manually. For more information on how to schedule it with triggers, see Scheduling an execution plan.
Procedure
-
Click Run on the toolbar to execute the tasks
according to the order and conditions set in the hierarchical view.
Information noteNote: You can add triggers to any plan to schedule its execution based on time or event, using time triggers or file triggers respectively. For further information, see Scheduling an execution plan.
Example
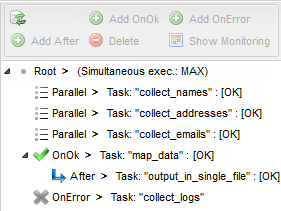 Upon completion of the execution, the preceding icons at respective nodes light up if their tasks have been launched. Meanwhile, the status of the executed tasks will appear in the square brackets on the right.The table below explains these icons:
Icon
Description

The OnOk node's task has been launched. The status of execution is given in the square brackets on the right.

The OnError node's task has been launched. The status of execution is given in the square brackets on the right.

The After node's task has been launched. The status of execution is given in the square brackets on the right.
Once the plan has been executed, you can also visualize its execution details (logs, history, advanced information) by clicking the corresponding icons in the Actions column of the Execution Plan page. To display the execution details of a specific task, select it in the central panel, right-click and select Display last execution details. For more information, see Monitoring task executions in the Monitoring node.
Did this page help you?
If you find any issues with this page or its content – a typo, a missing step, or a technical error – let us know how we can improve!