Defining the parsing parameters of your Regex file - Cloud - 8.0

Talend Studio User Guide

Version
Cloud
8.0
Language
English
Product
Talend Big Data
Talend Big Data Platform
Talend Cloud
Talend Data Fabric
Talend Data Integration
Talend Data Management Platform
Talend Data Services Platform
Talend ESB
Talend MDM Platform
Talend Real-Time Big Data Platform
Module
Talend Studio
Content
Design and Development
Last publication date
2024-02-29

About this task

On this view, you define the file parsing parameters so that the file schema can be properly retrieved.

Procedure

  1. Set the Field and Row separators in the File Settings area.
    • If needed, change the figures in the Field Separator field to specify the column lengths precisely.

    • If the row separator of your file is not the standard EOL, select Custom String from the Row Separator list and specify the character string in the Corresponding Character field.

  2. In the Regular Expression settings panel, enter the regular expression to be used to delimit the file.
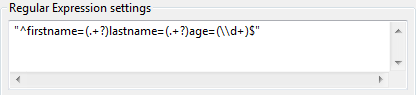
    Regular Expression settings window.
    Warning:

    Make sure to include the Regex code in single or double quotes accordingly.

  3. If your file has any header rows to be excluded from the data content, select the Header check box in the Rows To Skip area and define the number of rows to be ignored in the corresponding field. Also, if you know that the file contains footer information, select the Footer check box and set the number of rows to be ignored.
  4. The Limit of Rows allows you to restrict the extend of the file being parsed. If needed, select the Limit check box and set or select the desired number of rows.
  5. If the file contains column labels, select the Set heading row as column names check box to transform the first parsed row to labels for schema columns. Note that the number of header rows to be skipped is then incremented by 1.
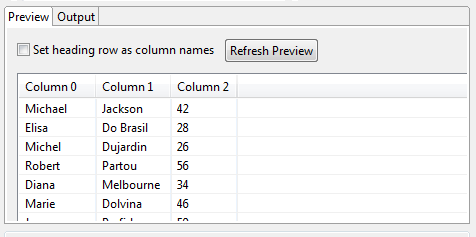
  6. Then click Refresh preview to take the changes into account. The button changes to Stop until the preview is refreshed.
    Preview tab.
  7. Click Next to proceed to the next view where you can check and customize the generated Regex File schema.