Skip to main content Skip to complementary content
Close announcements banner

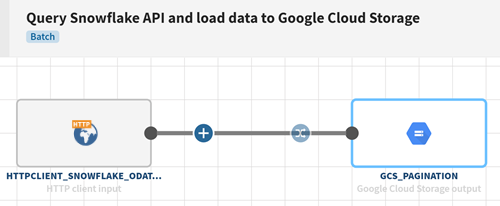
Querying the Snowflake API and sending the data to Google Cloud Storage

Before you begin

You have previously generated an ODATA API over the Snowflake dataset and copied the endpoint parameters.

Procedure

  1. Click Connections > Add connection.
  2. In the panel that opens, select the type of connection you want to create.
    Here, select HTTP Client.
  3. Select your engine in the Engine list.
  4. Fill in the connection properties and URL address of the API to be invoked as described in HTTP Client properties:
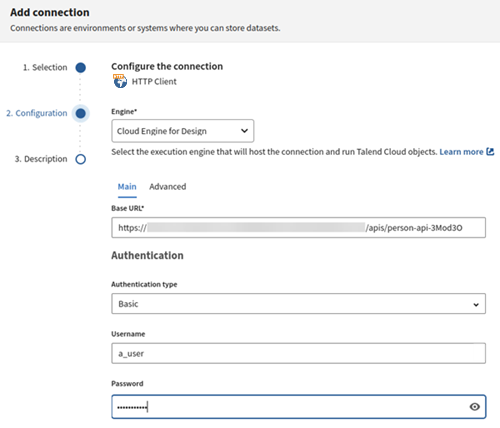
    1. Base URL: copy-paste the Base URL provided in the Snowflake API summary.
    2. Authentication type: Select Basic.
    3. Enter the credentials (username and password) necessary to connect to the API.
    4. Check the connection and click Next.
  5. Enter a description (optional) and a display name (required) for the HTTP Client connection, and click Validate.
  6. Click Add dataset to create the corresponding dataset.
  7. In the Add a new dataset panel, name your dataset.
  8. Configure the Main parameters:
    1. Type: Select Batch as you want to invoke the service only once.
    2. HTTP method: Select GET.
    3. Path: Enter the entity name you have previously set when creating the API.
    4. Disable the Parameters, Query parameters, Request headers and Request body options.
    5. Response body format: Select JSON.
    6. Returned content: select Body.
  9. Configure the Advanced parameters:
    1. Enable the Accept redirections option, with a maximum number of 3 redirections.
    2. Enable the Pagination option.
    3. Preset: Select ODATA and click Load selected preset.
    4. Value of the offset: Enter 10.
    5. Value of the limit: Enter 5.
    6. Returned content: select Body.
  10. Click Validate to save your dataset.
  11. Click Connections > Add connection.
  12. In the panel that opens, select the type of connection you want to create.
    Here, select Google Cloud Storage.
  13. Select your engine in the Engine list.
  14. Fill in the connection properties (Google credentials) as described in Google Cloud Storage properties, check the connection and click Next.
  15. Enter a description (optional) and a display name (required) for the Google Cloud Storage connection, and click Validate.
  16. Click Add dataset to create the corresponding dataset.
  17. Name your dataset, and fill in the required properties to create your Google Cloud Storage blob in your existing bucket:
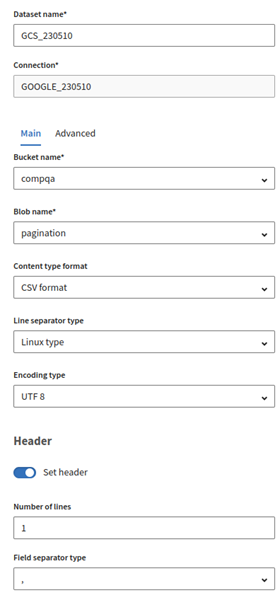
    1. Bucket name: select an existing bucket name.
    2. Blob name: enter a name that does not exist yet.
    3. Content type format: select CSV format.
    4. Line separator type: select Linux type.
    5. Encoding type: select UTF-8.
    6. Enable the Set header option, and enter 1 in Number of lines and , in Field separator type.
  18. Click Validate to save your dataset.
  19. Click Add pipeline on the Pipelines page. Your new pipeline opens.
  20. Give the pipeline a meaningful name.

    Example

    Query Snowflake API and load data to Google Cloud Storage
  21. Click ADD SOURCE and select your source dataset, the HTTP Client dataset, in the panel that opens.
  22. Click the ADD DESTINATION item and select the destination dataset, the Google Cloud Storage dataset, in the panel that opens.
  23. On the top toolbar of Talend Cloud Pipeline Designer, click the Run button to open the panel allowing you to select your run profile.
  24. Select your run profile in the list (for more information, see Run profiles), then click Run to run your pipeline.

Results

Your pipeline is being executed. All rows from the 11th row of the Snowflake table are copied into a file in Google Cloud Storage, and rows are retrieved 5 by 5 through the ODATA API.

Did this page help you?

If you find any issues with this page or its content – a typo, a missing step, or a technical error – let us know how we can improve!