Skip to main content Skip to complementary content

Writing data to a cloud data warehouse (Snowflake)

Before you begin

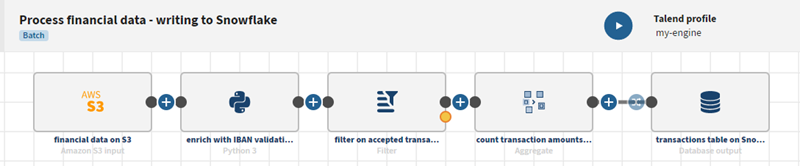
  • You have downloaded the financial_transactions.avro file and you have uploaded it to your Amazon S3 bucket.

  • You have reproduced and duplicated the pipeline described in Writing data to a cloud storage (S3) and you will be working on this duplicated pipeline.
  • You have created a Remote Engine Gen2 and its run profile from Talend Management Console.

    The Cloud Engine for Design and its corresponding run profile come embedded by default in Talend Management Console to help users quickly get started with the app, but it is recommended to install the secure Remote Engine Gen2 for advanced processing of data.

Procedure

  1. On the Home page of Talend Cloud Pipeline Designer, click Connections > Add connection.
  2. In the panel that opens, select Snowflake, then click Next.
  3. Select your Remote Engine Gen2 in the Engine list.
  4. Enter your database JDBC URL and credentials.
  5. Check your connection if needed and click Next.
  6. Give a name to your connection, Snowflake connection for example, then click Validate.
  7. Click Add dataset, and fill in the connection information to your Snowflake table:
    1. Give a display name to your dataset, financial data on Snowflake for example.
    2. In the Type list, select Table or view name.
    3. In the Table name list, select or type the name of your Snowflake table.
    4. In the Column selection field, select the specific table columns you want to retrieve, or click Select all to retrieve all the existing ones. In this example, 2 fields are selected: transaction_amount and transaction_code.
  8. Click View sample to check that your data is valid and can be previewed.
    Preview of the Snowflake data sample.
  9. Click Validate to save your dataset. On the Datasets page, the new dataset is added to the list and can be used as a destination dataset in your pipeline.
    A pipeline with an S3 source, a Python 3 processor, a Filter processor, an Aggregate processor, and a Snowflake destination.
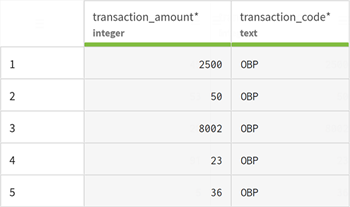
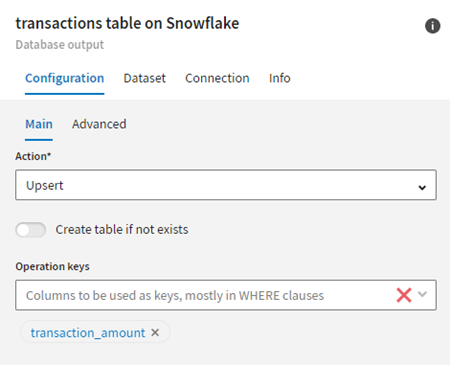
  10. Before executing this pipeline, select Upsert in the configuration tab of the Snowflake dataset to update and insert the new data in the Snowflake table. Define the transaction_amount field as the operation key.
    The Snowflake destination configuration panel shows the Upsert action selected.
  11. On the top toolbar of Talend Cloud Pipeline Designer, click the Run button to open the panel allowing you to select your run profile.
  12. Select your run profile in the list (for more information, see Run profiles), then click Run to run your pipeline.

Results

Once your pipeline is executed, the updated data will be visible in the Snowflake database table.

Did this page help you?

If you find any issues with this page or its content – a typo, a missing step, or a technical error – let us know how we can improve!