Skip to main content Skip to complementary content
Close announcements banner

Dropping and linking Spark components

You orchestrate the Spark Batch components in the Job workspace in order to design a data transformation process that runs in the Apache Spark Batch framework.

Before you begin

  • You have launched Talend Studio and opened the Integration perspective.

  • An empty Job has been created as described in Creating the Spark Batch Job and is open in the workspace.

Procedure

  1. In the Job, enter the name of the component to be used and select this component from the list that appears. In this scenario, the components are two tFileInputDelimited components, a tMap component, two tFileOutputParquet components and a tAzureFSConfiguration component.
    • The tFileInputDelimited components are used to load the movie data and the director data, respectively, from the DBFS file system of your Databricks Big Data platform into the data flow of the current Job.

    • The tMap component is used to transform the input data.

    • The tFileOutputParquet components write the results in a directory in your Azure Data Lake Storage system.

    • The tAzureFSConfiguration component provides the necessary information to connect to your Azure Data Lake Storage system.
  2. Double-click one of the two tFileInputDelimited component to make this label editable and then enter movie to change the label of this component.
  3. Do the same to label the other tFileInputDelimited to director.
  4. Right click the tFileInputDelimited component that is labeled movie, then from the contextual menu, select Row > Main and click tMap to connect it to tMap. This is the main link through which the movie data is sent to tMap.
  5. Do the same to connect the director tFileInputDelimited component to tMap using the Row > Main link. This is the Lookup link through which the director data is sent to tMap as lookup data.
  6. Do the same to connect the tMap component to one of the tFileOutputParquet using the Row > Main link, then in the pop-up wizard, name this link to out1 and click OK to validate this change.
  7. Repeat these operations to connect the tMap component to the other tFileOutputParquet component using the Row > Main link and name it to reject.

Results

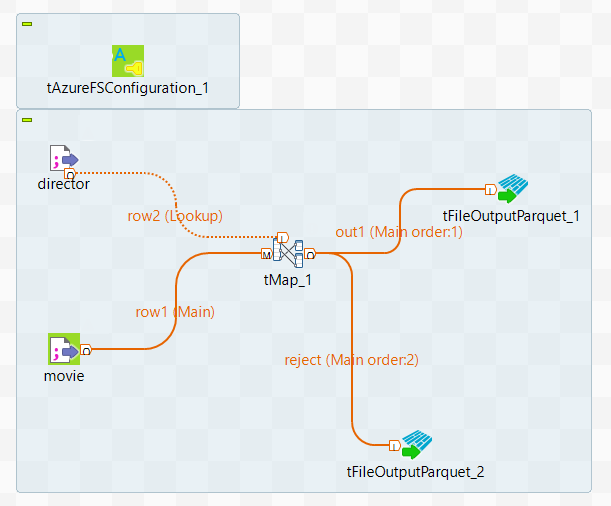
In the workspace, the whole Job looks like this:

Did this page help you?

If you find any issues with this page or its content – a typo, a missing step, or a technical error – let us know how we can improve!