Skip to main content Skip to complementary content

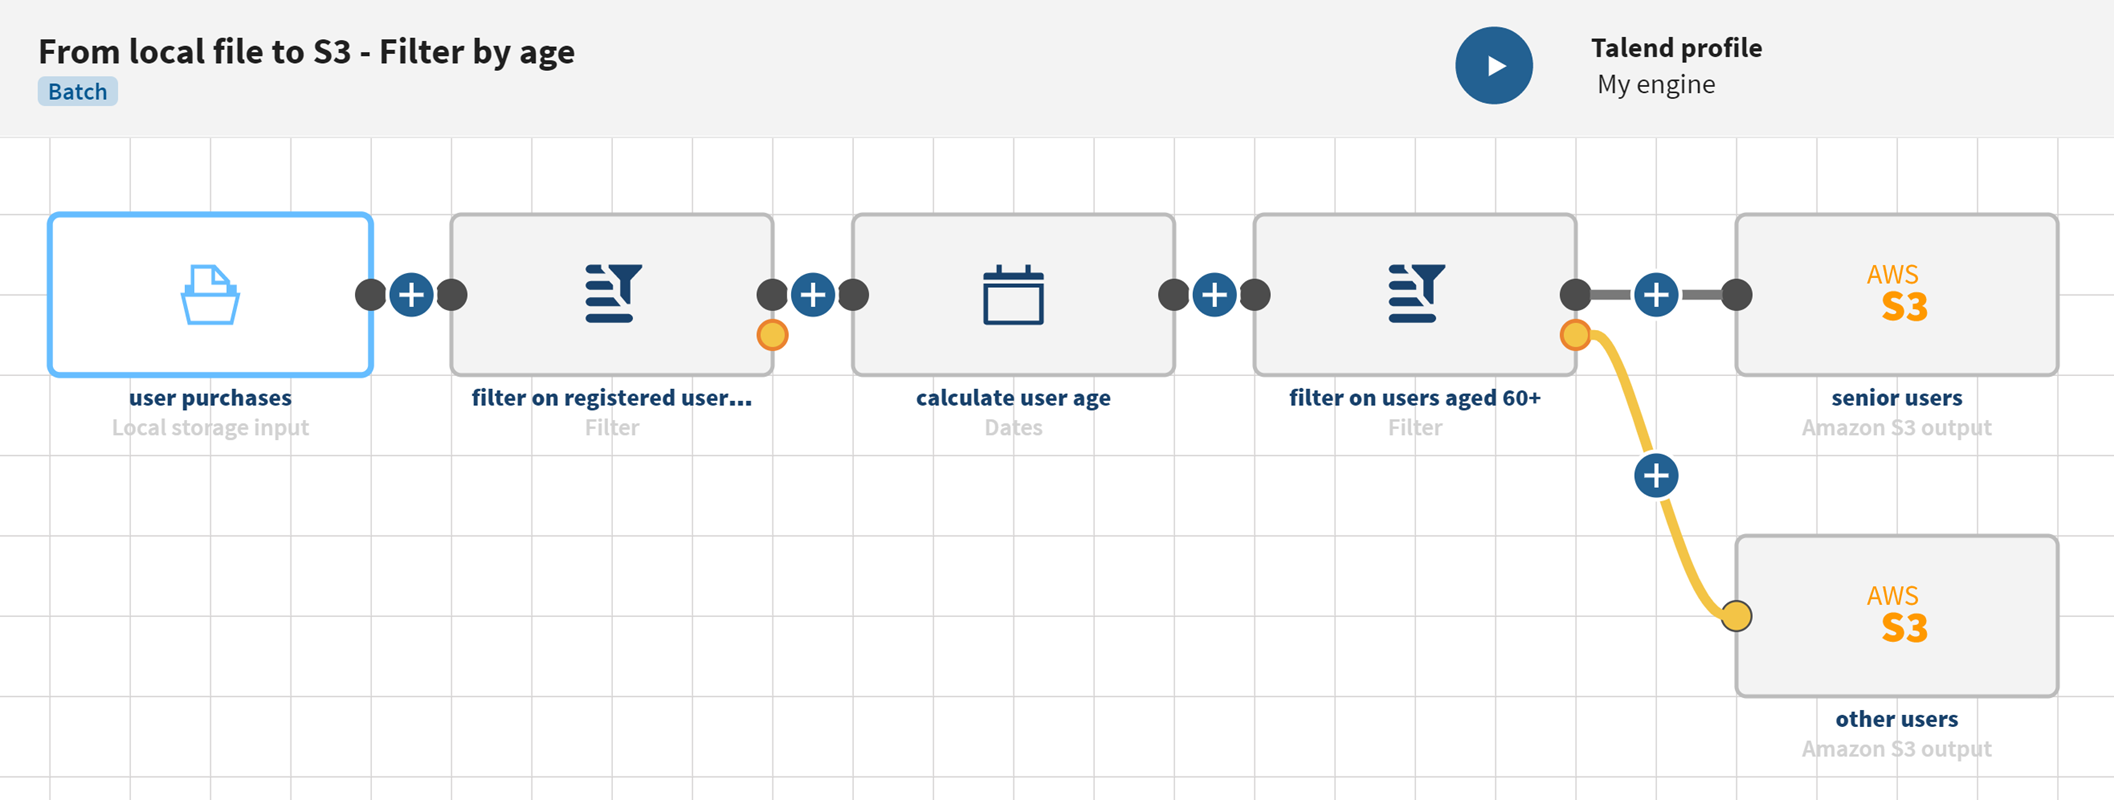
Filtering data from a local file and splitting it into two Amazon S3 outputs

This scenario aims at helping you set up and use connectors in a pipeline. You are advised to adapt it to your environment and use case.

Before you begin

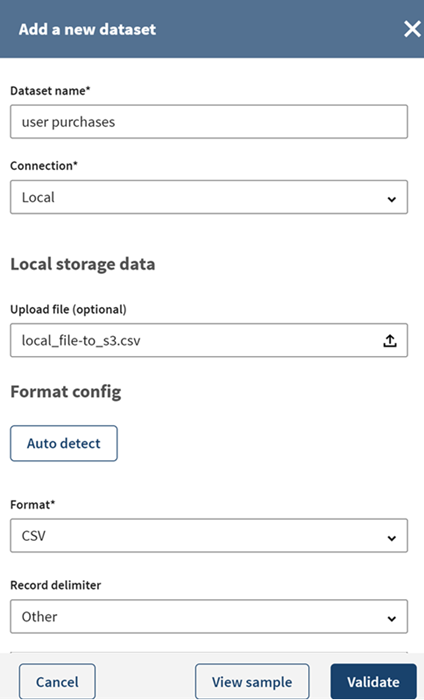
  • If you want to reproduce this scenario, download and extract the file: local_file-to_s3.zip . The file contains data about the user purchases with data about registration, purchase price, date of birth, etc.

Procedure

  1. Click Connections > Add connection.
  2. In the panel that opens, select the type of connection you want to create.

    Example

    Local connection
  3. Select your engine in the Engine list.
    Information noteNote:
    • It is recommended to use the Remote Engine Gen2 rather than the Cloud Engine for Design for advanced processing of data.
    • If no Remote Engine Gen2 has been created from Talend Management Console or if it exists but appears as unavailable which means it is not up and running, you will not be able to select a Connection type in the list nor to save the new connection.
    • The list of available connection types depends on the engine you have selected.
  4. Select the type of connection you want to create.
    Here, select Local connection.
  5. Fill in the connection properties and click ADD DATASET.
  6. In the Add a new dataset panel, name your dataset user purchases.
  7. Click the icon to browse and select the local_file-to_s3.csv file located on your machine, click Auto detect to automatically fill the file format information then click View sample to see a preview of your dataset sample.
  8. Click Validate to save your dataset.
  9. Do the same to add the Amazon S3 connection and S3 outputs that will be used as Destinations in your pipeline. Fill in the connection properties as described in Amazon S3 properties.
  10. Click Add pipeline on the Pipelines page. Your new pipeline opens.
  11. Give the pipeline a meaningful name.

    Example

    From local file to S3 - Filter by age
  12. Click ADD SOURCE and select your source dataset, user purchases in the panel that opens.
  13. Click and add a Filter processor to the pipeline in order to filter user data and give them a meaningful name. The configuration panel opens.
  14. Give a meaningful name to the processor.

    Example

    filter on registered users
  15. In the Filters area:
    1. Select .registered in the Input list as you want user registration to be the filtering criteria.
    2. Select None in the Optionally select a function to apply list as you do not want to apply a function while filtering data.
    3. Select == in the Operator list and type TRUE in the Value field as you want to filter on registered users.
  16. Click Save to save your configuration.
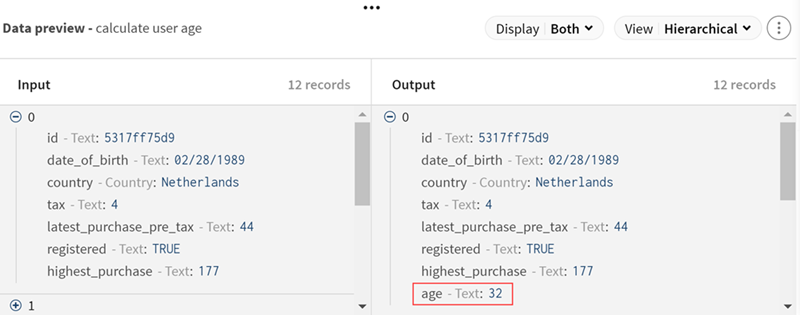
  17. Click and add a Date processor to the pipeline in order to calculate the age of users based on their date of birth. The configuration panel opens.
  18. Give a meaningful name to the processor.

    Example

    calculate user age
  19. Configure the processor:
    1. Select Calculate time since in the Function name list, as you want to calculate the user age based on their birth date.
    2. Select .date_of_birth in the Fields to process field.
    3. Enable the Create new column option as you want the result to be displayed in a new field and name the field age.
    4. Select Years in the Time unit list, select Now in the Until field and enter MM/dd/yyyy in the Set the date pattern field as you want to calculate the number of years until the current date in the format month/day/year.
  20. Click Save to save your configuration.
  21. (Optional) Look at the preview of the processor to see the calculated ages.
  22. Click and add another Filter processor to the pipeline. The configuration panel opens.
  23. Give a meaningful name to the processor.

    Example

    filter on users aged 60+
  24. In the Filters area:
    1. Select .age in the Input list as you want user ages to be the filtering criteria.
    2. Select None in the Optionally select a function to apply list as you do not want to apply a function while filtering data.
    3. Select >= in the Operator list and type 60 in the Value field as you want to filter on users who are at least 60 years old.
  25. Click Save to save your configuration.
  26. Click the ADD DESTINATION item on the pipeline to open the panel allowing to select the first dataset that will hold the output data that matches your filter (S3).
  27. Give a meaningful name to this destination; older users for example.
  28. Click Save to save your configuration.
  29. Click on the Filter processor to add another destination and open the panel allowing to select the second dataset that will hold the output data that does not match your filter (S3).
  30. Give a meaningful name to this destination; other users for example.
  31. (Optional) Look at the Filter processor to preview the data after the filtering operation: all registered users that are 60 years old or older.
  32. On the top toolbar of Talend Cloud Pipeline Designer, click the Run button to open the panel allowing you to select your run profile.
  33. Select your run profile in the list (for more information, see Run profiles), then click Run to run your pipeline.

Results

Your pipeline is being executed, the user information that was stored on your local file has been filtered, the user ages have been calculated and the output flows are sent to the S3 bucket you have defined. These different outputs can now be used for separate targeted marketing campaigns for example.

Did this page help you?

If you find any issues with this page or its content – a typo, a missing step, or a technical error – let us know how we can improve!