
Edit a Query Mapping
When defining a query mapping, the target classifier may come from any data store model defined in the configuration limited to the Model scope for the DESTINATION. Sources too may come from any data store model(s) limited to the Model scope for the SOURCE, and as you may have many source classifiers, they could come from multiple source models in the same mapping.
In addition to defining mapping specifications, the data mapping allows you to define all the physical data integration constructs, including joins, filters, transformation operations, etc., which may even be forward engineered into data integration tools.
Steps
Ensure proper permissions
- Sign in as a user with at least the Metadata Editing capability object role assignmenton the Data Mapping you are going to edit.
Navigate to the mapping to edit
- Navigate to the object page for the data mapping model and navigate to the folder if necessary.
- Click the Query Mappings tab.
- Create the query mapping (if necessary).
- Click to open the query mapping.
- Click START EDITING.
Assign the source(s)
- Click + Add Source to include a source table.
- Specify as many source tables as needed.
- Specify a filter to narrow down the features to choose from:
- All
- Mapped
- Unmapped.
Map Using the Target Panel
- Click the Detect Links magic wand to automatically match tables and columns.
- Click the Joins tab to edit joins.
- Click the Detect Joins magic want to automatically define joins for the source tables.
- Click the Filter tab to edit filters.
- Click the Order By tab to edit the order of the data movement.
- Click the Group By tab to edit the grouping in the data movement.
- Edit the Operation for a target column, including using the functions editor.
Map Using Both Panels
- Drag a specific source column to target column to map all the columns.
- Drag another source column into an already mapped target column to include the new column in the existing mapping and operation.
Additional columns will be appended with a plus sign (“+”) in the operation. Thus, invalid operations could result which must be corrected.
Other
- Expand the Details panel to see details (overview tab from the object page) for any selected object.
- Click Save.
You may click on the search in the header of either the source or target side to locate specific columns/fields.
Example
Add Sources
Click the query mapping (VendorPayment) to open it.
Click START EDITING.

Click + Add Source.

In the Browse tab, pick the Adj and AdjType tables. Click OK.
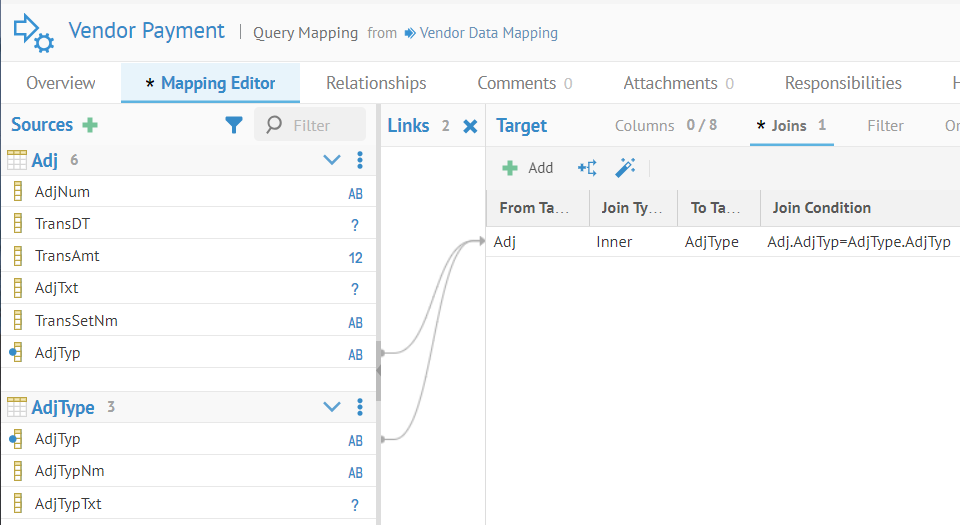
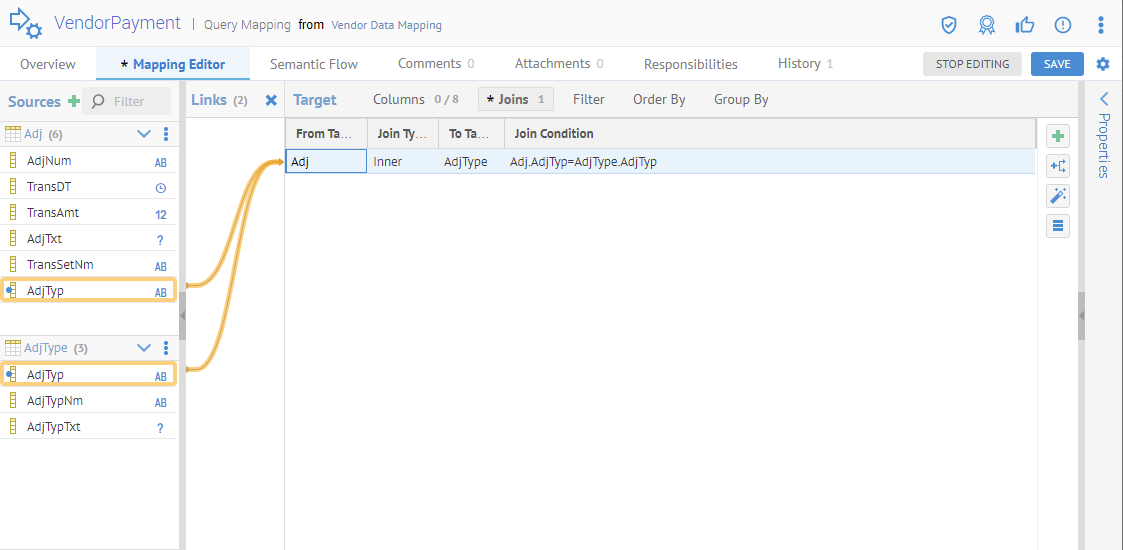
Define Joins
Click the Joins tab. Click the Detect Joins magic wand. Click OK to accept the suggestion.
Define Filters
Click the Filters tab. Drag AdjTyp to the expression.

Type “= 'VV'” in the expression.
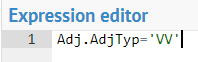
Talend Data Catalog validates the expression as you type, thus, the line disappears until you have a valid expression (finish the last single quote mark).
You may also click go to the Details tab on the left and look at the Profiling information for information about what values are valid, the data types, etc.
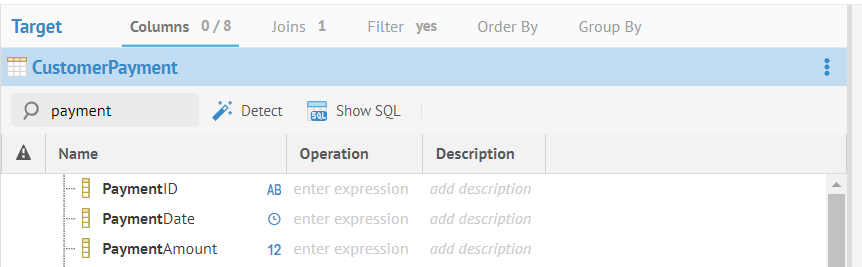
Define mappings
Click the Columns tab.
Search for the PaymentAmount column by entering “payment” into the search box in the top right of the Target panel:
Drag the Adj.TransAmt column to the PaymentAmount column.

Select both the Adj.AdjTyp and Adj.AdjTxt columns and drag them to the PaymentDescription column. Click on the expression and expand the Functions panel at the bottom right.
You may also click the Adj.AdjTyp column and drag it first, then click the Adj.AdjTxt column and drag it into the same target and you would obtain the same result.
Click the target column.

In order to read longer Descriptions and Operations, you may resize the column headers and thus the column contents.
Expand the Functions panel on the lower right, select String and then double-click on CONCAT. Edit the expression to be “CONCAT(Adj.AdjTxt, Adj.AdjTyp)”.

Again, the mapping lines disappear while the expression is invalid and only reappear when the expression is complete and valid.
Click on the Operation next to CheckNumber. Enter “'Adjustment'” in the expression text below.
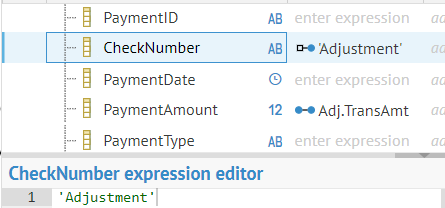
Fixed values. In this case the value “Adjustment” are allowed also.
Click SAVE.
Complex Expressions
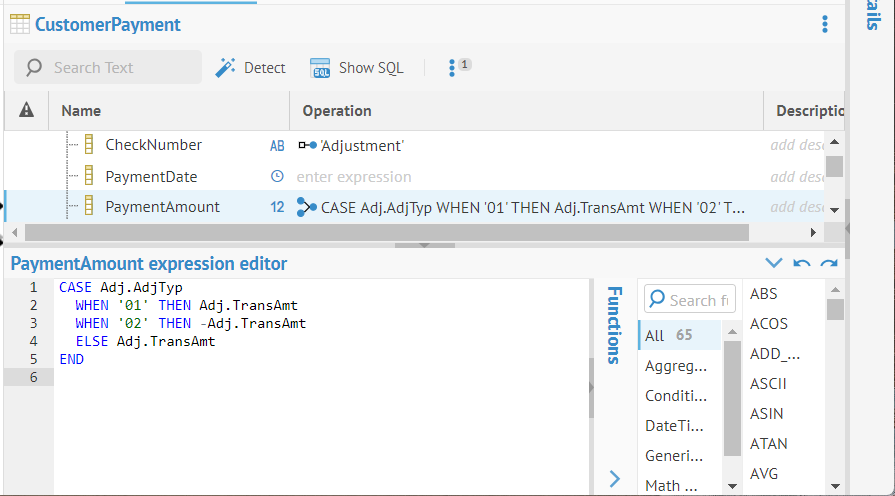
You may also simply type in complex expressions, such as CASE.
Enter the following for the PaymentAmount Operation:
CASE Adj.AdjTyp
WHEN '01' THEN Adj.TransAmt
WHEN '02' THEN -Adj.TransAmt
ELSE Adj.TransAmt
END
Other Functions
You may also enter other functions, even if they are not in the pick list.
Select Preferences > Unknown functions.
Enter the following for the PaymentAmountOperation
CONCAT2(Adj.TransSetNm, CONCAT(Adj.AdjNum, Adj.TransDT))

There is a warning about the unknown function, but SAVE is still enabled, and lineage is still produced.
Did this page help you?
If you find any issues with this page or its content – a typo, a missing step, or a technical error – let us know how we can improve!