
Creating a pipeline
How to create a pipeline from scratch.
Procedure
-
Click the
 icon to select one or more processing components according to your needs:
filtering, cleansing, aggregating, etc.
From the [Add a processor] panel, you can either select a processor in the main list or enter its name or description in the text box.
icon to select one or more processing components according to your needs:
filtering, cleansing, aggregating, etc.
From the [Add a processor] panel, you can either select a processor in the main list or enter its name or description in the text box. -
Select the destination dataset:
- If you have already created a dataset, select it from the list in the [Select a destination] panel and click Select.
- If not, add a new dataset by clicking Add dataset as described in Creating a dataset from scratch.
Example of pipeline consuming data from an S3 Input, processing, and filtering data to send some selected data to an another S3 destination.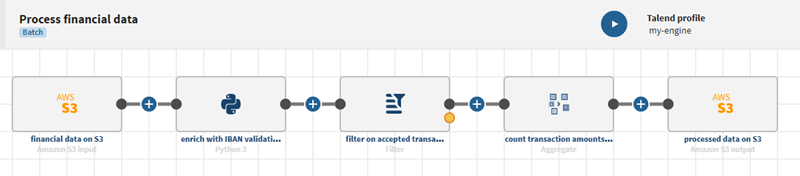
Note that, before executing your pipeline, you can see a preview of your data at each step of the design process.
Did this page help you?
If you find any issues with this page or its content – a typo, a missing step, or a technical error – let us know how we can improve!