Mapping the output data flow - 7.3

SAP

Version
7.3
Language
English
Product
Talend Big Data
Talend Big Data Platform
Talend Data Fabric
Talend Data Integration
Talend Data Management Platform
Talend Data Services Platform
Talend ESB
Talend MDM Platform
Talend Open Studio for Big Data
Talend Open Studio for Data Integration
Talend Open Studio for ESB
Talend Real-Time Big Data Platform
Module
Talend Studio
Content
Data Governance > Third-party systems > Business applications > SAP components
Data Quality and Preparation > Third-party systems > Business applications > SAP components
Design and Development > Third-party systems > Business applications > SAP components
Last publication date
2023-06-12

Procedure

  1. Right-click the second tXMLMap, select Row > *New Output* (Main) from the contextual menu and click the first tLogRow. In the pop-up dialog box, enter DATA and then click OK. The second tXMLMap will be connected to the first tLogRow using a connection named DATA (Main order:1).
  2. Do the same to connect the second tXMLMap to the second tLogRow using a connection named FIELDS (Main order:2), and to the third tLogRow using a connection named OPTIONS (Main order:3).
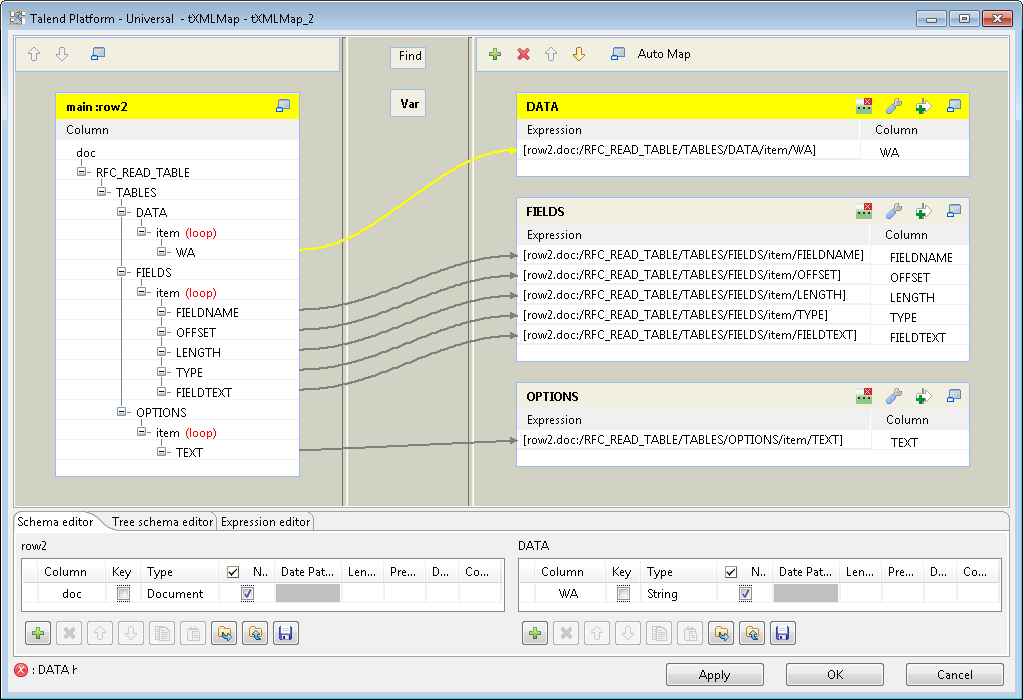
  3. Double-click the second tXMLMap to open its map editor. In the main:row2 table on the left side, right-click the node doc and select Import From Repository from the contextual menu. In the pop-up Metadata dialog box, select Output_Schema in the folder RFC_READ_TABLE and click OK to close the dialog box. The schema is added to the XML tree.
  4. Drag and drop the node WA under the DATA element in the input table main:row2 on the left side into the DATA table on the right side.
  5. Do the same to drag and drop the nodes FIELDNAME, OFFSET, LENGTH, TYPE, and FIELDTEXT under the FIELDS element in the input table main:row2 on the left side into the FIELDS table on the right side, and drag and drop the node TEXT under the OPTIONS element in the input table main:row2 on the left side into the OPTIONS table on the right side.
  6. Right-click the item node under the DATA node and select As loop element from the contextual menu to set it as the loop element.
  7. Do the same to set the item nodes under the FIELDS and OPTIONS nodes as the loop element.
  8. Click the set Loop Function button on the upper-right corner in the DATA table to configure the source loop.
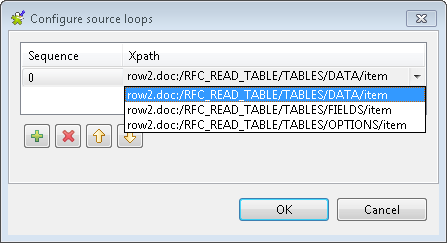
    Click the [+] button to add a row, and then click in the Xpath field and select the source loop row2.doc:/RFC_READ_TABLE/TABLES/DATA/item from the drop-down list. When done, click OK to close the dialog box.
  9. Do the same to set the source loop for the FIELDS and OPTIONS tables to row2.doc:/RFC_READ_TABLE/TABLES/FIELDS/item and row2.doc:/RFC_READ_TABLE/TABLES/OPTIONS/item respectively.
  10. Click OK to close the map editor.