Skip to main content Skip to complementary content
Close announcements banner

Configuring the process of standardizing the unstructured data

About this task

To do this, proceed as follows:

Procedure

  1. Connect the tFixedFlowInput component to the tStandardizeRow component with a Row > Main link.
  2. Double-click the tStandardizeRow component to display its Basic settings view.
    The advanced rule types are always executed after the ANTLR specific rules regardless of rule order.
  3. In the Column to parse list, select input.
  4. Select the Standardize this field check box.
  5. In the Conversion rules table, click six times on the [+] button to add six columns. Name them and configure them as shown in the capture. For "StreetName" rule:
    1. Select the Index type in the Type field.
    2. Enter the path to your index in the Value field.
      Set the file path as follows:
      • In local mode:
        • Apache Spark 3.1 and earlier: prefix://file path or file:///file path.
        • Apache Spark 3.2 and later: file:///file path.
      • In Standalone and Yarn modes: prefix://file path.
      • If the index is on a cluster: hdfs://hdpnameservice1/file path.
    3. Select Match exact as the search mode from the Search mode list.
      By using the Match exact mode, you will extract from the input flow only the strings that exactly match the street name indexes. For further information about available search modes, see Search modes for Index rules
    Then the other rules are:

    Name

    Type

    Value

    "Zip"

    Format

    " DIGIT DIGIT DIGIT DIGIT DIGIT "

    "City" Enumeration

    " 'Paris' | 'Paris' | 'PARIS' | 'Bagnolet' "

    "SpecialStreetNumber" Format

    " (INT ('bis'|'ter')) | ( INT '-' INT) "

    "INT" Shape

    "<SpecialStreetNumber>"

    "Address" Shape

    " <INT> <StreetName> <Zip> <City> "

    As advanced rule types are always executed after the ANTLR specific rules, the basic rules "Zip", "City" and "SpecialStreetNumber" are executed first followed by "INT" and "Address", the advanced rules.

  6. Click the Generate parser code in Routines button in order to generate the code in the Routines.
    If you do not click on this button, the Job will not be executed.
  7. In the Advanced settings view, leave the options selected by default in the Output format area as they are.
    The Max edits for fuzzy match is set to 1 by default.
  8. In the design workspace, right-click the tStandardizeRow component to connect it to the tLogRow below with a Row > Reject link.
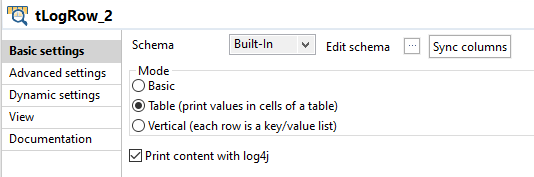
  9. Double-click the tLogRow component linked to the tStandardizeRow component to display its Basic settings view.
  10. In the Mode area, select the Table (print values in cells of a table) option.

Results

Then continue to configure the process of filtering and extracting the data of interest.

Did this page help you?

If you find any issues with this page or its content – a typo, a missing step, or a technical error – let us know how we can improve!