
Scheduling pipeline tasks
Define how frequently you want to run your pipeline task.
Note that schedule updates that are made within three minutes prior to the scheduled execution time immediately impact the execution. For this reason, avoid making schedule changes when an execution is about to be triggered.
Before you begin
- You must have the Execute permission on the workspace where the task is located to configure the Schedule steps when creating or editing a task.
- If parallel run is not allowed for the task, for an optimized design you should leave at least a one minute margin between the end of the first run and the beginning of the next one.
About this task
You can define multiple time triggers for the same Pipeline task.
You can have 15 triggers including Once, Daily, Weekly, Monthly and Cron types for each task.
Triggers must be separated by at least five minutes.
Procedure
-
If you are editing your task after it has been created,
go to its details page, then click the
 icon next to Trigger.
-
Configure the execution times by typing in the time then
clicking on it in the drop-down list.
Example
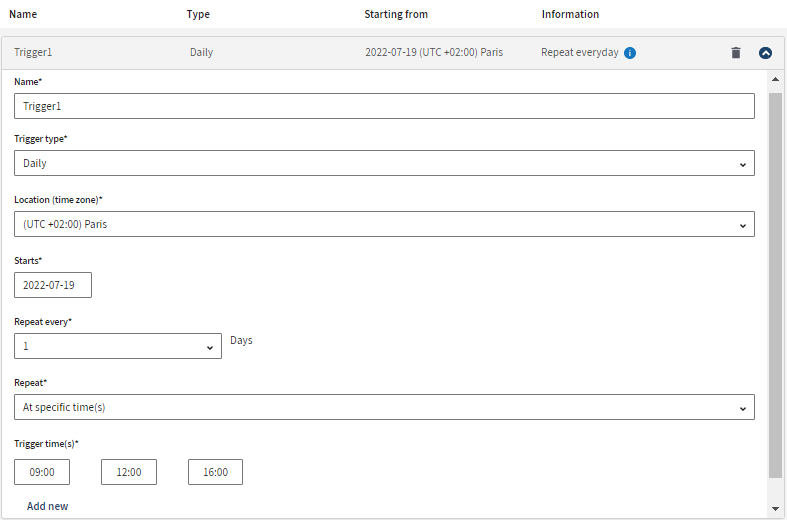 The task will run at 09:00, 12:00, and 16:00 every day.
 -
To run the task at intervals, select
Specific intervals from the
Repeat drop-down list.
- Set the interval time in minutes in the Repeat every field.
- Enter the start time for the execution in the Repeat from field.
- Enter the end of executions in the Repeat to field.
 The execution will happen every 10 minutes every day between 06:00 and 18:00.
Results
A confirmation message is displayed at the top of the page. You are redirected to the task details page. The schedule you have defined appears under .
You can also view the schedule in the Tasks tab. Click the Triggers and plans icon.
Did this page help you?
If you find any issues with this page or its content – a typo, a missing step, or a technical error – let us know how we can improve!