Skip to main content Skip to complementary content

Configuring SSH GIT in Talend Administration Center

Before you begin

Procedure

  1. Go to your /.ssh directory, for example /home/<username>/.ssh for Linux and C:\Users\<username>\.ssh for Windows.
    Create the folder if it does not exist.
    $ cd /.ssh
  2. Execute the command ssh-keygen to generate authentication keys for SSH.
    The ssh-keygen command is used to generate, manage, and convert authentication keys for SSH.
    The specific command ssh-keygen -t rsa-sha2-512 -m includes options to generate an RSA key with a SHA-2 512-bit signature and specify the key format. You can
    1. Open a Terminal.

      To use ssh-keygen, you need to have a terminal or command-line interface open. This can be on a Unix-based system (Linux, macOS) or on Windows using Git Bash or Windows Subsystem for Linux (WSL).

    2. Execute the following command to generate the key:
      $ ssh-keygen -t rsa-sha2-512 -m PEM

      ssh-keygen allows to generate SSH keys.

      -t rsa-sha2-512 specifies the type of key to create. In this case, it is an RSA key with SHA-2 512-bit signature. rsa is the correct option for specifying an RSA key type. rsa-sha2-512 specifies the signature algorithm, which is used during the authentication.

      -m PEM specifies the key format. PEM stands for Privacy-Enhanced Mail, a base64 encoded format with header and footer lines.

    3. Save the key by pressing Enter to accept the default location (/home/your_username/.ssh/id_rsa), or providing a custom path.
      Enter file in which to save the key (/c/Users/emmap1/.ssh/id_rsa):
      Created directory '/c/Users/emmap1/.ssh'.
    4. For the passphrase, keep it empty by pressing Enter.
      Enter passphrase (empty for no passphrase):
      Enter same passphrase again:
    5. You can see two files after completion.
      Your identification has been saved in /c/Users/emmap1/.ssh/id_rsa.
      Your public key has been saved in /c/users/emmap1/.ssh/id_rsa.pub.
      The key fingerprint is: e7:94:d1:a3:02:ee:38:6e:a4:5e:26:a3:a9:f4:95

      For the private key, the file you saved (id_rsa by default) contains your private key.

      For the public key, the file with the same name but with a .pub extension (id_rsa.pub by default) contains your public key.

      If you save the public/private keys with other name, such as gitkey/gitkey.pub, you need to use and configure the SSH config file.

      Location of the SSH Config File: The SSH configuration file is typically located at ~/.ssh/config. If this file does not exist, you can create it.

      File Permissions: Ensure that the config file has the correct permissions. It should be readable and writable only by the owner:
      $ chmod 600 ~/.ssh/config
      Basic Structure of the SSH Config File: The SSH config file uses a simple syntax to define settings for each host. Here is an example of what the file might look like:
      Host github.com (https://github.com)
       IdentityFile ~/.ssh/gitkey

      where Host github.com is the actual hostname or IP address of the server you are connecting to and IdentityFile ~/.ssh/gitkey is the path to the private key file to use for authentication.

      Information noteNote: The space before and after IdentityFile is required, do not delete this.
  3. Access https://dev.azure.com/ to create your account, then click SSH public keys on the right top of page.
  4. Click the New Key button to set your public key.
  5. Copy/paste the public key content from the previous file generation, by default id_rsa.pub for example.
  6. Go back to your Azure repository page.
  7. Copy the SSH URL using the ssh-keyscan command utility to add your SSH host keys to your ~/.ssh/known_hosts file.
    $ ssh-keyscan -H ssh.dev.azure.com >> known_hosts
    Where -H means hash all hostnames and addresses in the output.
    This can help to prevent from attacks by ensuring that you are connecting to the correct server.
  8. Copy/paste the SSH URL into the Git server url field in the Configuration page of TAC, for example ssh://git@dev.azure.com:v3/account/my-repo1.
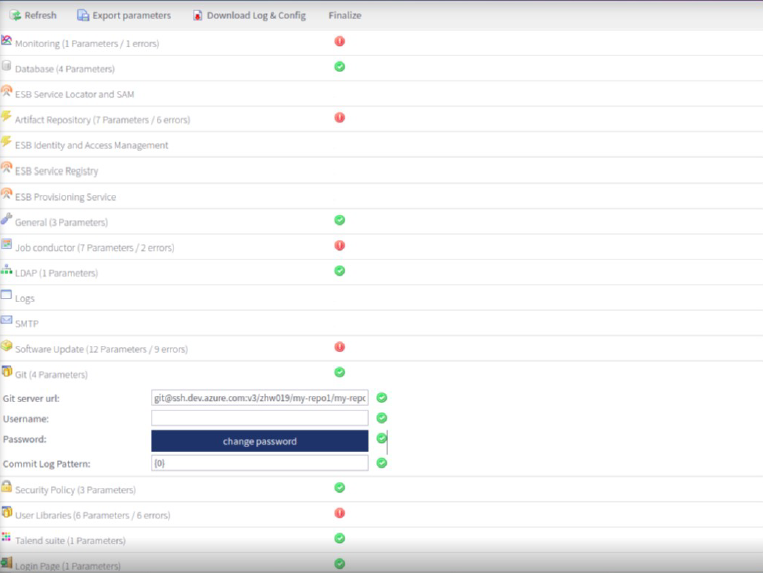
    Keep the username and password fields empty.
    You can see a green check when it is successful.

Did this page help you?

If you find any issues with this page or its content – a typo, a missing step, or a technical error – please let us know!