
Stitching Models Together for Data Flow Tracing
Some external metadata Models may contain data movement source specifications and data movement rules. These are in turn imported into Talend Data Catalog . In many cases, these data movement source specifications may match up with another external metadata Model which was imported separately. Such data movement specification Models may then be added to a configuration and may be “stitched” together with that second Model, where one Model is the complete representation of a source that is defined in another with data movement specifications.
This is a mostly automated process which you perform once per new ETL/DI/BI model, in that Talend Data Catalog will propose the best connection matches it can find and identify the level of confidence (completeness of the match for stitching).
Connection names, those names used within a data integration (DI/ETL) or a business intelligence (BI) tool to reference data stores, are often not the same as the names for those same data stored as harvested in the repository. Because of this difference, you will see a different presentation in the lineage overview of the model with connection names, versus what you see in a data flow trace after stitching the connections to their data stores. This data connection name resolution is performed automatically as part of the stitching process and will even present the “proper” schema names (those from the data stare harvest) in the data lineage trace view.
Steps
Ensure proper permissions
- Sign in as a user with at least the Metadata Managementcapability object role assignment on the Configuration you are in.
View the configuration architecture
- Go to the MANAGE > Configuration in the banner.
- Click Diagram.
You can do the same steps below right in the MANAGE > Configuration page, but it is generally easier to identify the connection issues and especially the (as of yet) unconnected models that should be a part of a stitching when viewing the architecture diagram.
View the configuration list
- Go to MANAGE > Configuration in the banner.
Identify stitching candidates
The models in the configuration require stitching when they have a warning symbol.
- Select any model in the configuration with a warning and go to the Connections tab.
Stitch the connections
- In the Connections tab, click the magic wand icon to Propose resolutions.
- If necessary, double-click the row with a warning to resolve any ambiguities in the harvested connection definition.
If you choose manually from the list of possible models to stitch to, Talend Data Catalog will compare the schemas with the connection definition, table by table, and suggest a match.
- If necessary, double-click a row and specify Select Manually to connect specific catalogs and schemas as defined in the data process model connection (model with a warning) and how that schema is defined in the data store selected.
Edits to the connection stitching are immediate. There is no need to commit them afterwards.
If you wish to simply ignore a connection so that {MIMM] will not present a warning that it is not stitched, then double-click the row and select Ignored.
- Repeat for all other connections with a warning.
You may also use the magic wand icon in the Configuration Manager header to Propose resolutions for all the unapproved connections.
- Click Build.
Build validates the stitching in the configuration and then builds indexes for lineage traces.
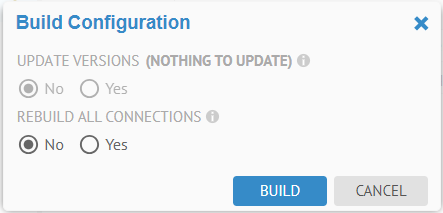
There are various options in the Build dialog.
UPDATE VERSIONS will update the configuration to ensure that they default or latest version of the contained models are the versions included in this configuration version. This insures that the newly imported model versions are included before rebuilding connections
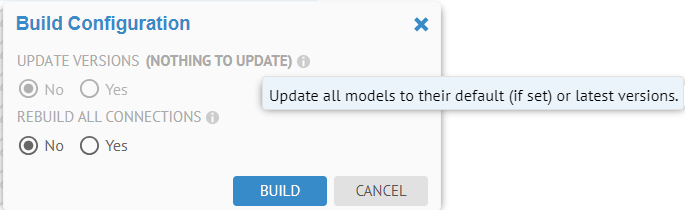
Note, this option is grayed out in this example as there are no model versions to update.
REBUILD ALL CONNECTIONS option to rebuild all connections, even those already successfully resolved.

Example
You sign in as a user with at least the Metadata Managementcapability object role assignment on the Configuration you are in and go to the MANAGE > Configuration in the banner.
The configuration management feature is quite intelligent and already knows how to stitch the existing models together. Thus, we will need to begin with an clean configuration in a clean database to be sure it does not remember how to stitch and we can demonstrate the proposal and build process.
Import a Staging to Dimensional, Staging DW and Dimensional DW model.
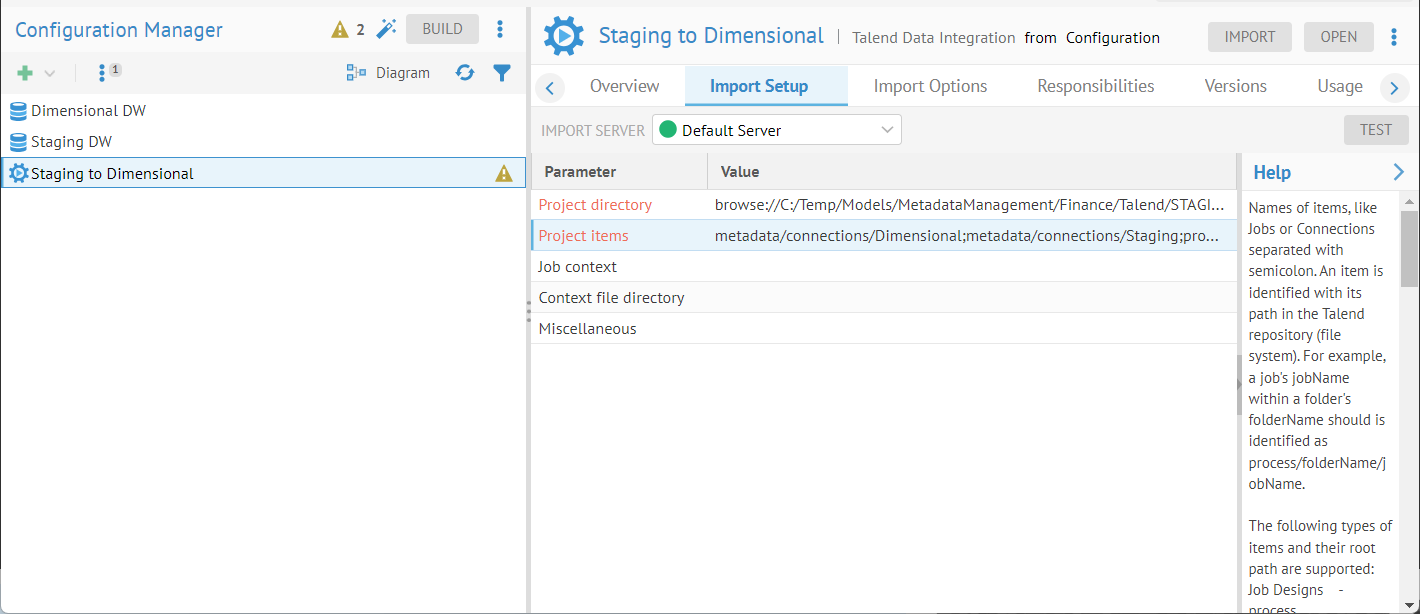
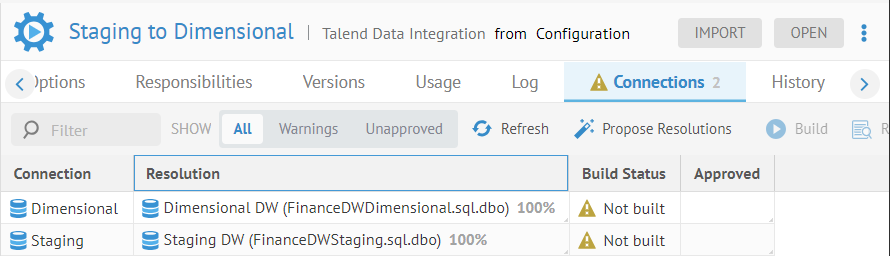
The Staging to Dimensional model in the list on the left has a warning icon. It shows
- Connection Dimensional is not connected.
- Connection Staging is not connected.
These are the connections defined in the Talend DI model, the destination and the source. The goal of the configuration management process is to resolve these connections, otherwise referred to as stitching, so that lineage may be computed and presented. Just as in the actual DI tool and databases, the connections in Talend must match what is in the database exactly.
Refresh the browser to clear the caching information about what models are available and the Connections tab will then show (as the UI now understands that this is a DI model). Go to the Connections tab.
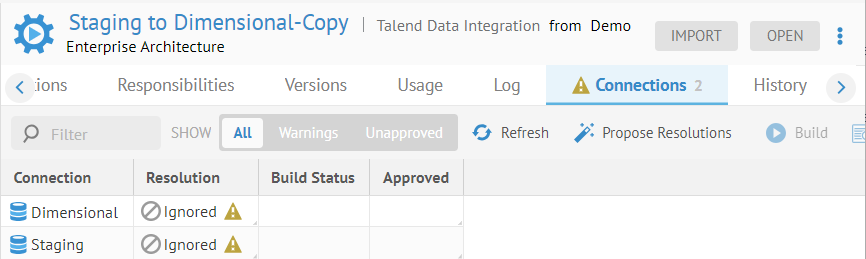
There are warnings next to the connections in the list and next to the Connections tab.
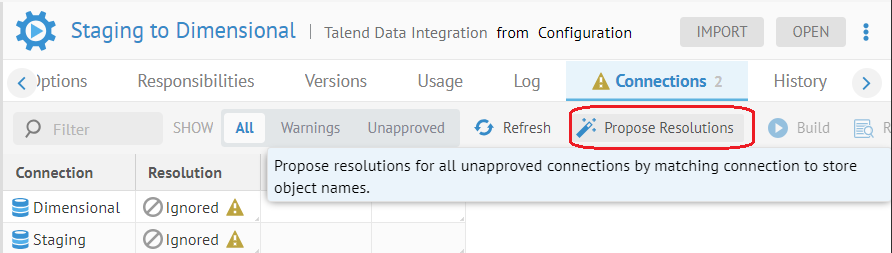
Then click on the magic wand icon for Propose Resolutions.
The configuration manager picks the dbo schemas in each of the two database as the best match. In fact, they match up at 100%.
At this point, the proposals are simply connection resolution rules, but they have not been computed. In order to do so, click BUILD.
The build action may include two steps:
-Update the version of a model contained in the current version of the configuration you are in so that it is using latest version of that model
-Attempt to commit the stitching or connection resolution by matching on position or name (depending upon the type of data store being connected to).
In this case, there is only one version of each of these models, so the UPDATE VERSIONS option is moot. However, click Yes for REBUILD ALL CONNECTIONS. Then click BUILD and refresh the browser.
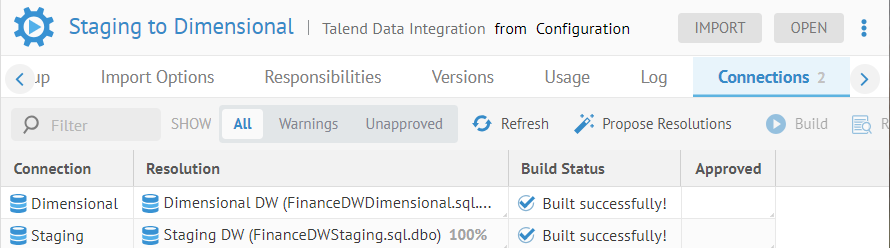
The connections are resolved and lineage is indexed. However, the connection definitions are still merely proposals, even though built.
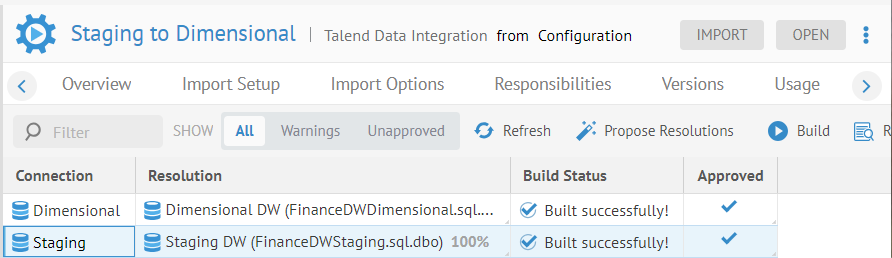
Double-click the cell for each connection under the Approved header and they will be approved.
Explore Further
View Log
View Log presents the Log Message dialog for the selected connection. You may see any connection errors documented as log messages.
Stitching Report
Stitching Report presents a complete report on what was and was not stitched between the connection and the data store. It is presented as a flat list that you may drill down in (e.g., schema > table > column)
Stitching Connection Name Resolution
Connection names, those names used within a data integration (DI/ETL) or a business intelligence (BI) tool to reference data stores, are often not the same as the names for those same data stored as harvested in the repository. Because of this difference, you will see a different presentation in the lineage overview of the model with connection names, versus what you see in a data flow trace after stitching the connections to their data stores. This data connection name resolution is performed automatically as part of the stitching process and will even present the “proper” schema names (those from the data stare harvest) in the data lineage trace view.
Example
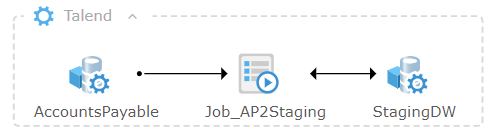
Go to the object page for the AP to Staging ETL process.

There are two database connections. Note, their names are shortened versions (spaces missing, etc.) of the data stores.
Click on the StagingDW connection:
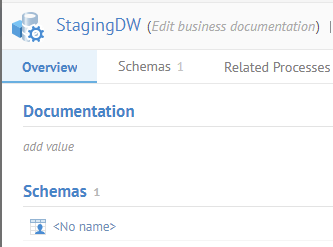
<No name> is presented.
The schema name is not known, as it was never specified in the ETL design. This works because the database will simply use the default schema.
Now, go back up to the level of the entire ETL model and then click the Data Flow tab:
Again, you see the shortened names.
Because we went to the Data Flow tab with the entire ETL model open, rather than from a particular object in a database, we are presented with the Lineage Overview, rather than a Lineage Trace. With the lineage overview, you only what is in the ETL model, not the full end-to-end lineage trace.
However, since we have stitched this model to the two data stores, and have the complete (proper) names for the database and schemas, we see these in the lineage trace. Go back to the Staging DW connection and navigate to the Vendor table object page and go to the Data Flow tab.
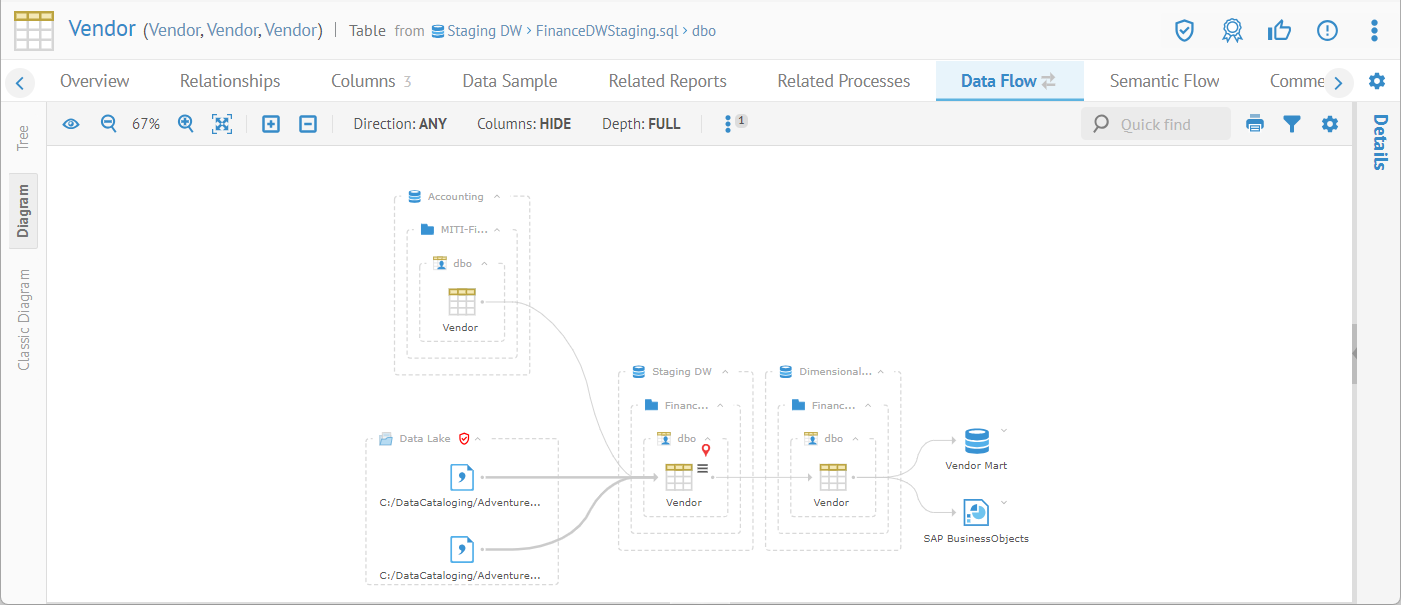
The proper names from the data store models are presented in the lineage trace because the lineage trace is not limited to only what is in the ETL model, unlike the lineage overview.
Did this page help you?
If you find any issues with this page or its content – a typo, a missing step, or a technical error – let us know how we can improve!