
Create a Model and Import Metadata
Steps
Ensure proper permissions
- Sign in as a user with at least the Metadata Managementcapability object role assignment on the Configuration you are in.
You will be presented with the MANAGE > Configuration menu if any of the following are true:
-Manager of the folder the configuration is in
-Manager of the configuration
-Manager of the version of the configuration
-Editor of the configuration version
-Manager of at least one model in the configuration version
-Security Administration global capability
Create the configuration (as needed)
One may create, harvest and analyze metadata (models) from the MANAGE > Repository tree. However, generally it is best to create a configuration to work in (and to define the scope of analysis and search) and then go to MANAGE > Configuration and create and harvest there.
Create the model
- Go to the MANAGE > Configuration in the banner.
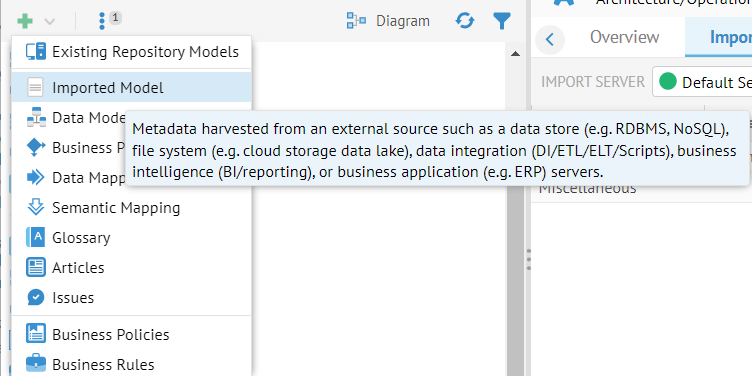
- Click the plus sign under Manage Configuration and select Imported Model.
- Provide a NAME for the model and pick the IMPORT BRIDGE (source technology / format to import from).
- Pick an IMPORT SERVER to use for the import.
The list of available bridges will be quite long. However, you may use the search to find text in the name of the bridge, not just the beginning. In addition, you may click on Vendor or Category to filter to specific groupings of bridges.
You may always harvest using a remote harvesting server by specifying it here under IMPORT SERVER.
- Click OK.
- In the Overview tab you may again enter a name (upper left) and may enter a Definition for the model.
- You may associate Labels with the model here.
- Check the checkbox for Propagate Documentation as needed.
Propagate Documentation is a property on the model that allows you to control the propagation of data documentation from the latest version only (by default) or from any older version when set to true. This only applies to documentation: diagrams, join relationships, business names and descriptions, as well as custom attributes.
- If you make any changes, click SAVE.
Configure the import bridge parameters
- Click the Import Setup tab.
- Pick an IMPORT SERVER to use for the import.
You may always harvest using a remote harvesting server by specifying it here under IMPORT SERVER.
- Here there will be a set of parameters which are unique to each import bridge. For each Parameter, click in the Value column and enter the appropriate value.
Each bridge parameter is extensively documented in the UI. Click the caret ( ) above Help on the right hand side of the parameter list. Click a parameter to see the tool tip for that parameter. Click the Bridge name to see the tool tip for the bridge as a whole.
- Be sure to click SAVE if you make any changes.
It is imperative that you read these “tool tips” when using a new bridge or diagnosing an issue with the import.
You may click in the empty space below the list of bridge parameters to return to the tool tip for the bridge as a whole.
You may click the TEST button in the upper right to attempt a connection to the source metadata tool.
Configure the import options
- Click the Import Options tab.
- Click all other Version Management import options that apply:
- Set new versions as default: ensures that each new version when harvested will be designated as the default version.
- Create new versions only when new import has changes: means that a new version will not be created after the import if no changes are detected on the new metadata. This option applies to all bridges independently of the incremental harvesting capability of some bridges.
- Copy model description to model: in this case, as a model is harvested and a new version is stored, the description given internally for the model (from the source metadata) is also applied to the model version itself.
Special version management options will be presented in the multi-version editions of Talend Data Catalog . Please see version management for details.
Some bridges are capable of incremental harvesting as they can detect what has changed in the source technology and therefore only harvest what has changed (updated or new. Enabling this feature offers much faster subsequent harvesting, and much less space used. in produced new versions has it can reuse everything that has not changed. This is primarily available in bridges from repositories of business intelligence tools (e.g. IBM Cognos, SAP BusinessObects, Tableau) and data modeling tools (Erwin mart, ER/Studio repository, based on the repository API. This is also available in data lake crawlers (e.g. File Systems, Amazon S3, Microsoft Azure Data Lake, Hadoop HDFS) based on directory/file date changes combined with other criteria specific to those technologies.
- Under Data Management you may check the Data sample, profile and classify after metadata import according to the Data Setup tab option. The data profiling and sampling will not been executed automatically with import of the model otherwise.
Specifying data sampling and profiling options does NOT cause data profiling and/or sampling on every import of the model. Instead, these settings define the parameters defining how the sampling and profiling should be performed.
You may use the Data sample and profile after metadata import checkbox and MQL Statement to cause the profiling and sampling to occur every time the model is imported. However, that is not the best practice, as sampling and profiling large databases could take orders of magnitude more time than the metadata import.
Instead, you may:
-Schedule the sampling and profiling separately using the Data sampling and profiling operation. This process will also only sample and profile what is specified in the MQL STATEMENT.
-Sample and profile on demand via the user interface at any subset of the model you wish to specify.
Data Setup
- Click the Data Setup tab.
- Specify data sampling and data profiling options, as desired.
Import (a Version) of the model
- Be sure to click SAVE if you make any changes.
- Click IMPORT.
- Check the Yesradio button for theFULL SOURCE IMPORT INSTEAD OF INCREMENTAL options and click IMPORT if you wish to clear any cached metadata and thus force a complete re-harvest.
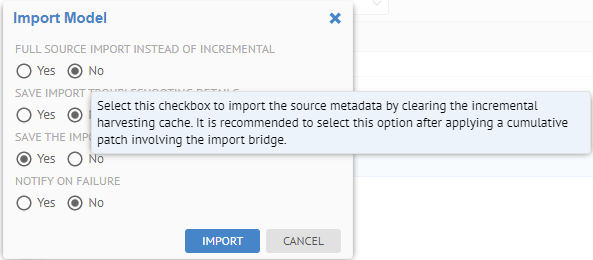
The Full source import instead of incremental option is a necessary choice for full re-harvesting (without any incremental harvesting reuse of the cache)
-after deploying a new bridge (MIMB cumulative patch)
-changing the bridge parameters (e.g. moving the source from dev to prod)
Because of this option, all Incremental import parameters of any import bridge have been hidden, in order to simplify the user experience.
Therefore, any scheduled import is always using incremental harvesting on multi models.
Generally, imports are scheduled and thus watchers and managers are notified on import failure. If performing the import manually, as here, it is assumed you will simply wait for the process to complete and thus would not need notification of failure. However, you may use NOTIFY ON FAILURE to send messages out to watchers and users who have the metadata management capability on the model.
- Check the Yesradio button for the SAVE THE IMPORTED MODEL TO THE DATABASE option.

This is not a common selection, but can be handy when testing bridges in terms of their logs but not wishing to actually load the model into the repository.
In some cases, you will see in the resulting log that the process ran out of memory. Please be sure to set the appropriate amount of memory using the bridge Miscellaneous option (see the bridge tool tip) or the conf.properties file (more details may be found in the deployment guide). There are two places to increate memory, potentially, though. In addition to the bridge requires (above), the Application Server will also need to have at least the same amount of memory available, but whatever is needed to produce the UI.
Example
Sign in as Administrator.
Create the folder and configuration (as needed).
Go to the MANAGE > Configuration. Click the plus sign to create an Imported Model.

Named the model “New Model” and choose the Microsoft SQL Server Database SQL DDL bridge.
The list of available bridges will be quite long. However, you may use the search to find text in the name of the bridge, not just the beginning. In addition, you may click on Vendor or Category to filter to specific groupings of bridges.
In this case, click Vendor then scroll to Microsoft.
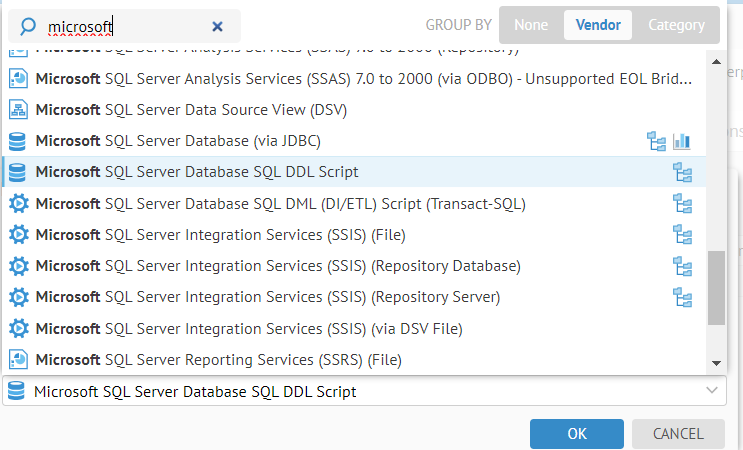
It is still a bit long, so type “DDL” into the Search box and note the list only includes those bridges.

Click OK
Enter a description in the Overview tab and click SAVE.

In the Import Setup tab, use the Browse icon to navigate to C:\Temp\Models\MetadataManagement\Finance\DatabaseDDL\. Select the FinanceDWStaging.SQL file. Specify “dbo” as the Default Schema. Be sure to click Save.
If you cannot find the location using the Browse function you must configure (as part of the installation) the available paths to present to users. More details may be found in the deployment guide.

You may use the text Browse box to quickly find a file or folder you are looking for.

The File parameter shows an unusual path. This is because the product hides application drives, like C:\Temp\Models\..., and presents them with the browse:// prefix.
Click to edit the Miscellaneous bridge parameter and click Browse (magnifying glass icon).

You are presented with the multi-line Miscellaneous bridge parameter editor.
The tool tip with options is provide below, but also you may select the options from the pull-down.
Click Add Parameter and enter the following in the Miscellaneous bridge options:

Click OK.
Enter “dbo” in the Default schema bridge parameter.
Click TEST in the upper right.
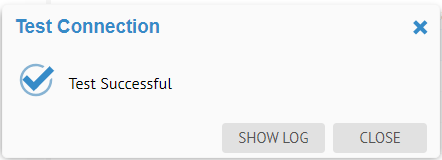
If the test connection was unsuccessful, when you click on SHOW LOG you are presented with the log at the location of the first error.
Click CLOSE.
Required bridge parameters are shown in red and have an asterisk (*) appended to the parameter name.
Click SAVE. Click IMPORT.
Leave the Full source import instead of incremental set to No.

Click IMPORT.
Also, there is an indicator in the upper right banner showing an active operation

Click on the active operation.

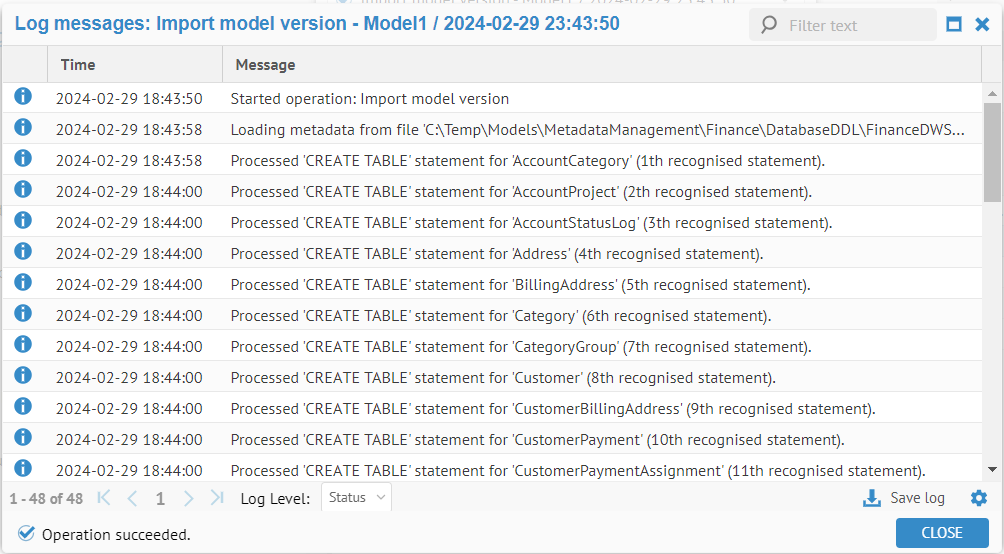
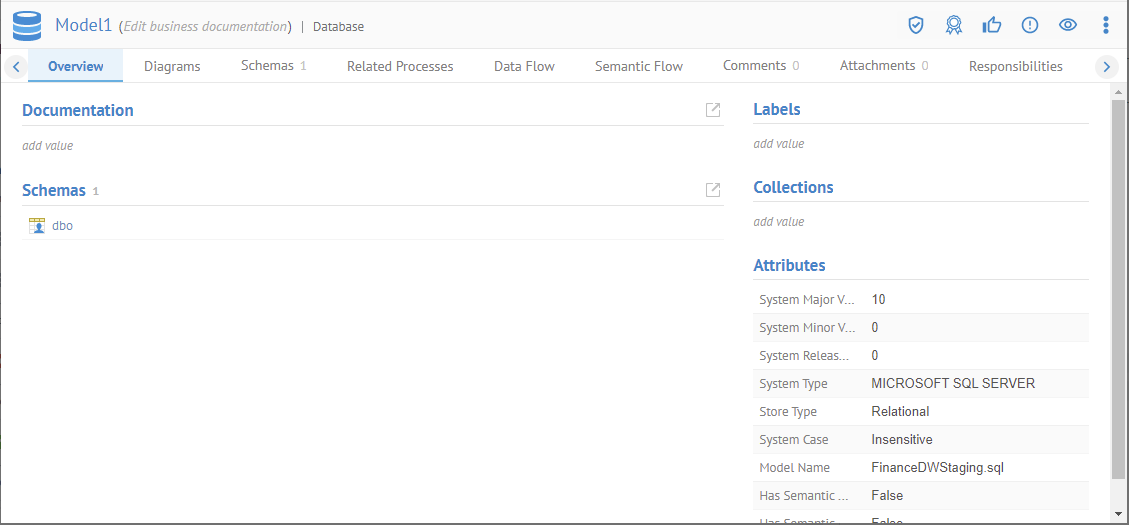
Refresh until you see the Operationsucceeded check mark, you have a successful import. So, select the New Model in the Configuration Manager panel and click OPEN to open the model’s object page, or navigate to the model or its contents.
Explore Further
Did this page help you?
If you find any issues with this page or its content – a typo, a missing step, or a technical error – let us know how we can improve!