
Edit (Customize) a Dashboard
Whether editing a saved dashboard or simply working with a search result that is presented as a dashboard, this is the common environment for filtering and manipulating that dashboard.
Steps
- For a new dashboard, specify the Name, Layout, Sharing and Description.
- For an existing dashboard go to More Actions > Customize to start editing.
- From here you may:
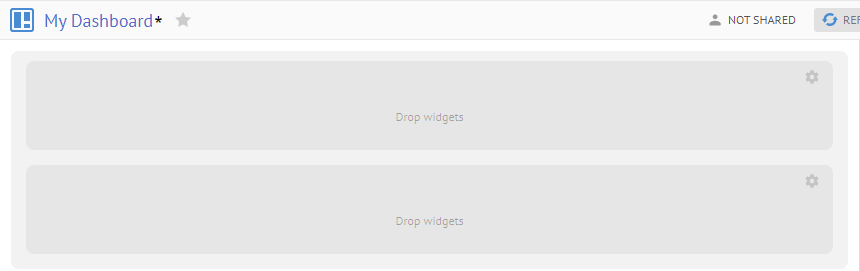
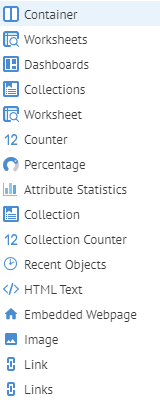
- Populate cells: Drag any widget from the right panel into the left portion of the dashboard and then click CONFIGURE.
- Add a container:
- Rename a dashboard
- Save
- Save as a new dashboard
- Edit Configuration assignments.
Examples
Click DASHBOARDS >Explore and pick My Dashboard.
Go to More Actions > Customize.
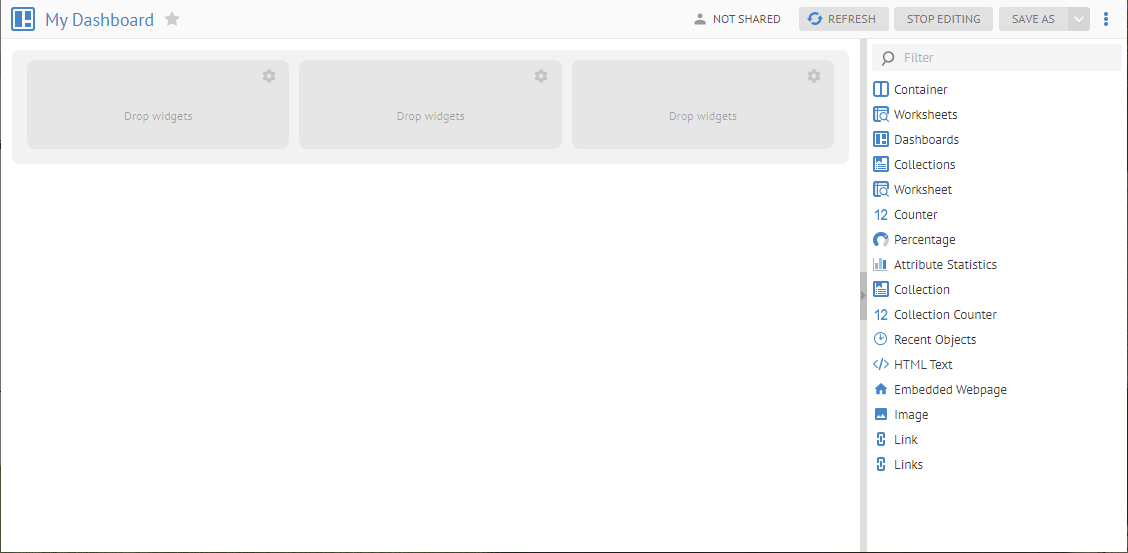
One may now edit the dashboard
Add a Container to a Dashboard
In order to place more horizontal structure into a cell in a dashboard, you may drag a container into any location a widget can be placed.
Containers may be placed to any level of depth inside of cells which are themselves inside a container and so on.
Steps
- Navigate to the dashboard.
- ClickMore Actions and then Customize
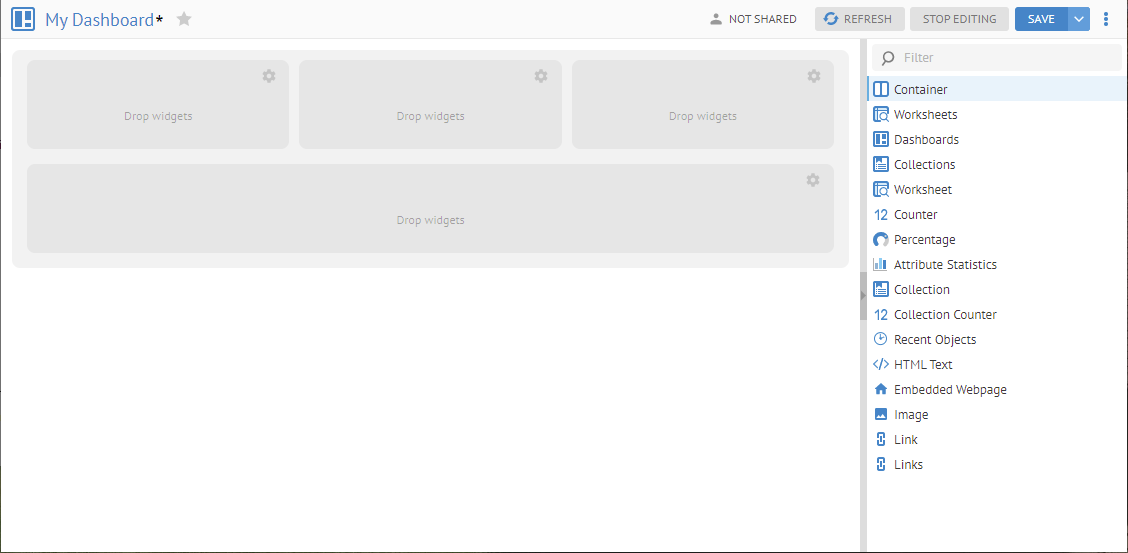
- Drag the Container widget into the dashboard.
Example
Navigate to My Dashboard and click More Actions > Customize. Drag the Container widget below the three sections of the dashboard.
On the right you see the list widgets that may be included in the report.
Explorer Further
Add columns to a Container
You may insert columns before or after. This may be specified in the settings of the container
Steps
- Navigate to the dashboard.
- ClickMore Actions and then Customize.
- Click Settings for the container.
- Select Insert columnbefore or after.
Example
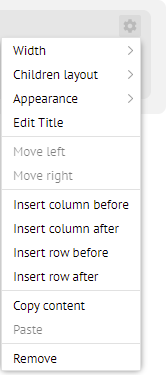
Drag a container at the bottom of the dashboard and click  Settings for the container.

Select Insert column before.
We have a new column.
Add Rows to a Container
Just as with a dashboard, you may insert columns before or after. This may be specified in the settings of the container
Steps
- Navigate to the dashboard.
- Click
 More Actions and then Customize.
 - Click
 Settings for the container.
 - Select Insert rowbefore or after.
Example
Drag a container at the bottom of the dashboard and click  Settings for the container.
Select Insert row before.
We have a new column.
Add a Widget to a Dashboard
You may include a variety of widgets in a dashboard or within Containers in a dashboard.
Steps
- Drag the widget from the pallet on the right into below an object or inside a container.
Examples
Common Widget Properties
The following properties are on the Display Options tab, common to all widgets.
TITLE: Title presented at the top of the widget.
TITLE COLOR: Color of the title text presented at the top of the widget.
DESCRIPTION: Description for the widget.
Show only as tooltip: Description will only be presented when you move the pointer over the widget.
WIDGET MAXIMUM HEIGHT: Maximum height that the UI should provide for the widget in pixels.
Hide Widget when empty: Do not show the widget if empty. The meaning of empty varies by widget.
Worksheets, Dashboards and Collections Widget
With one of these widgets you may embed a reproduction of the options under the WORKSHEETS, DASHBOARDS or COLLECTIONS menu inside a dashboard.
Drag the Dashboards widget into the center portion of the dashboard.
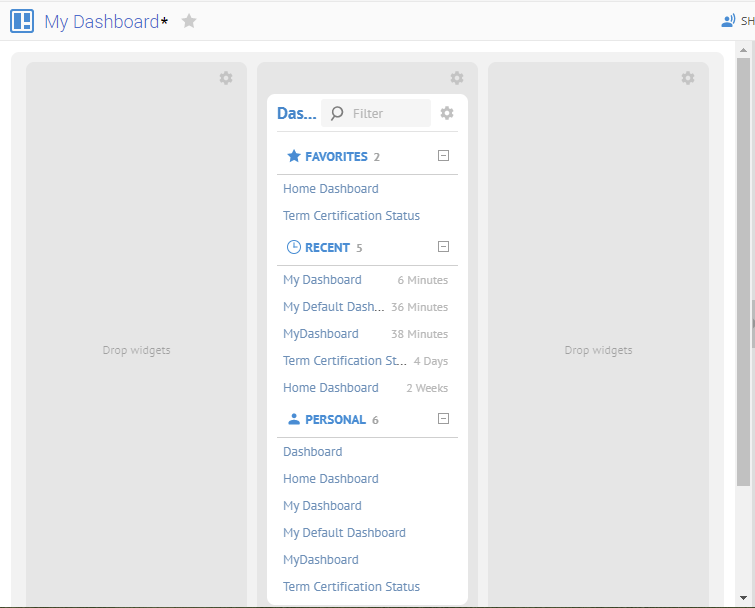
We have a reproduction of the options under the DASHBOARDS menu.
Worksheet Widget
With this widget you may embed the results of a worksheet into the dashboard.
Drag the Worksheet widget into the left portion of the dashboard.
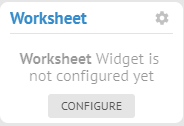
Click CONFIGURE.
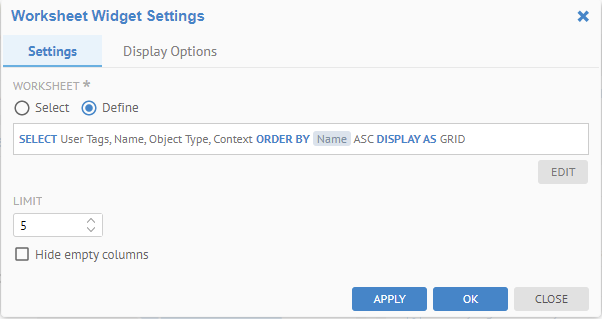
Hide empty columns mean that attribute columns which are empty for all the results in the list will be hidden.
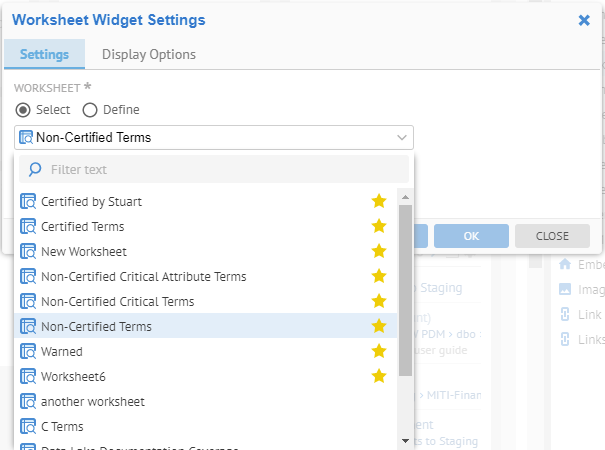
You may Define a query right in the widget or Select a worksheet already defined to reuse.
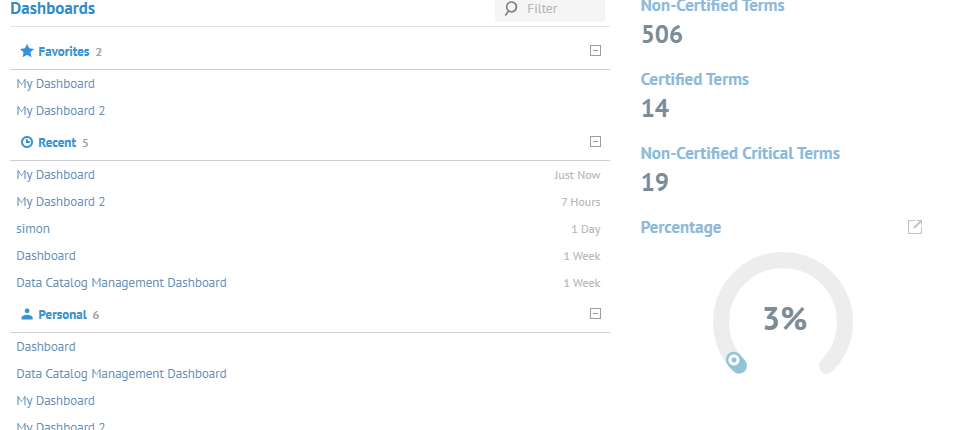
Click Select and pick Non-Certified Terms from the list.
Click APPLY.
The Dashboard is updated in the background.
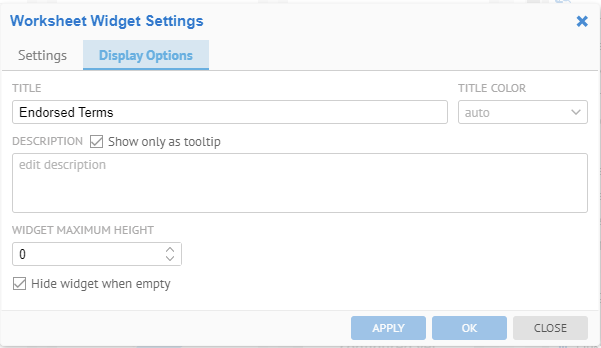
Click Display Options
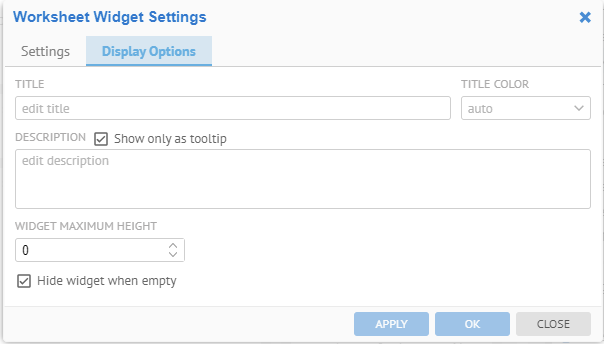
These are the common display options you may specify on the widget.
Click CLOSE.
Counter Widget
With this widget you may embed a count of the elements in a worksheet into the dashboard.
Drag the Counter widget into the right portion of the dashboard and click CONFIGURE. Select the Non-Certified Terms worksheet.
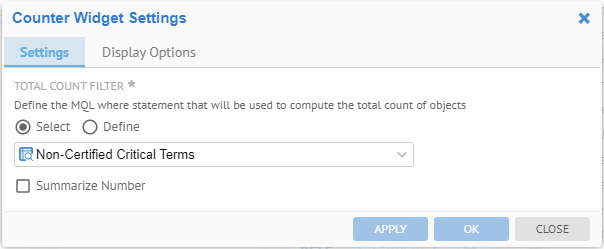
You may check the box for Summarize Number in order to ???
Click OK

We have the total number of terms which have not been certified.
Percentage Widget
With this widget you may embed percentages based upon particular columns of a worksheet into the dashboard.
Drag the WorksheetPercentage Statistics widget into the bottom portion of the dashboard.
Click Define next to the TARGET COUNT FILTER and click CONFIGURE.
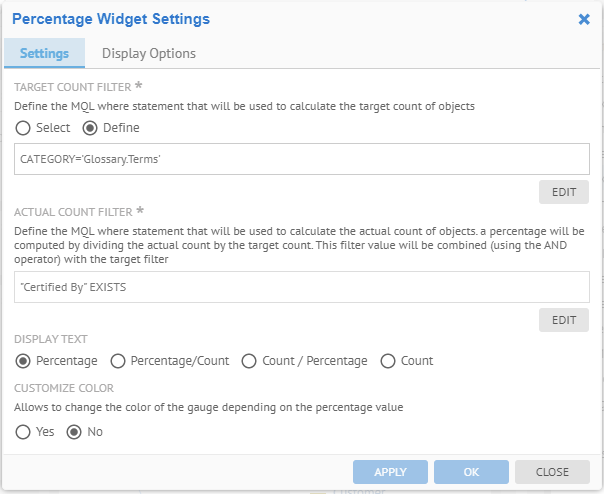
Click EDIT to create a query (worksheet equivalent) which contains all terms.
The Target is the set that designates completeness.
Click EDIT next to ACTUAL COUNT FILTER to create a query (worksheet equivalent) which will provide the actual count of objects to report.
Click Percentage. Click OK. Click SAVE. Click STOP EDITING.
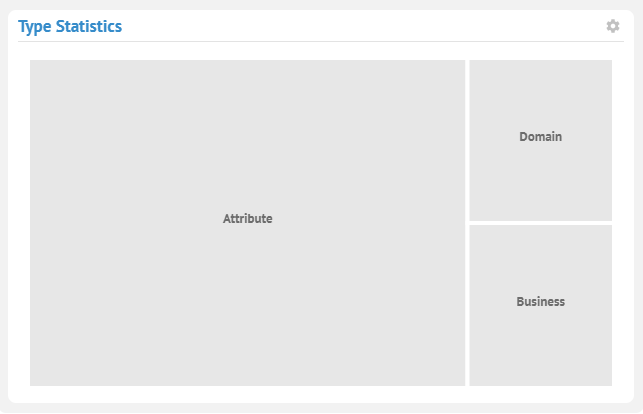
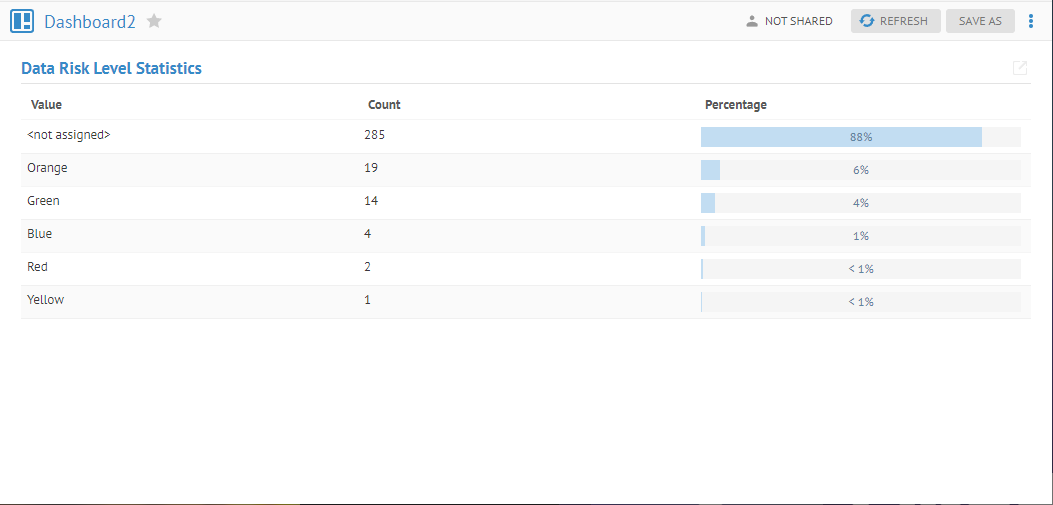
Attribute Statistics Widget
With this widget you may embed statistics based upon particular columns of a worksheet into the dashboard.
Drag the Attribute Statistics widget into the bottom portion of the dashboard.
Click CONFIGURE. Select the Non-Certified Terms worksheet and select the
- Certified Terms worksheet
- Type attribute
- Pie chart type.
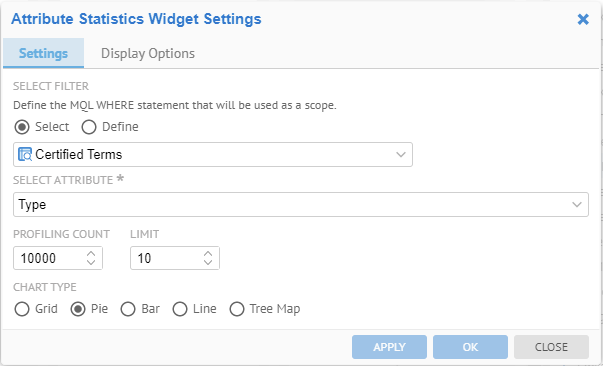
Click APPLY.
APPLY applies the changes immediately in the background.
Go to the Display Options tab and:
- Enter “Certified Terms by Type” in the title
- Uncheck the Hide widget when empty checkbox.
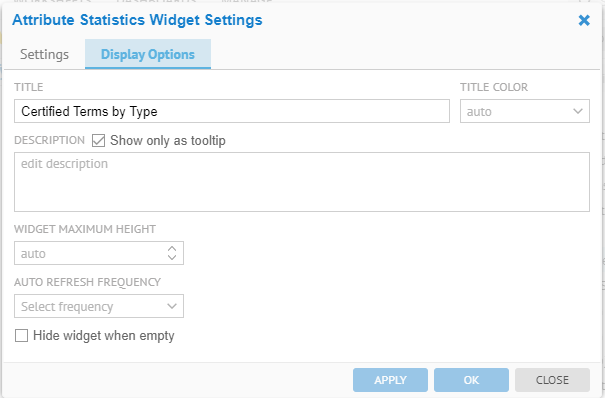
Click OK
OK applies the changes and closes the dialog.
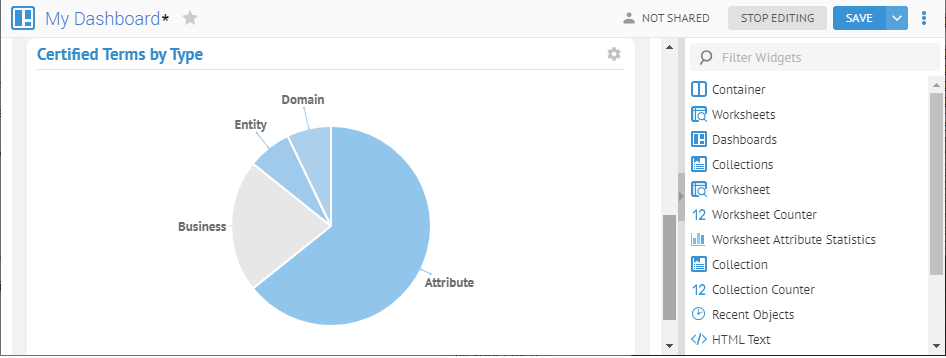
Now, lets Configure the widget again and specify a Tree Map, instead of the Pie.

And the result is:
Now, let’s specify Define for the SELECT FILTER.
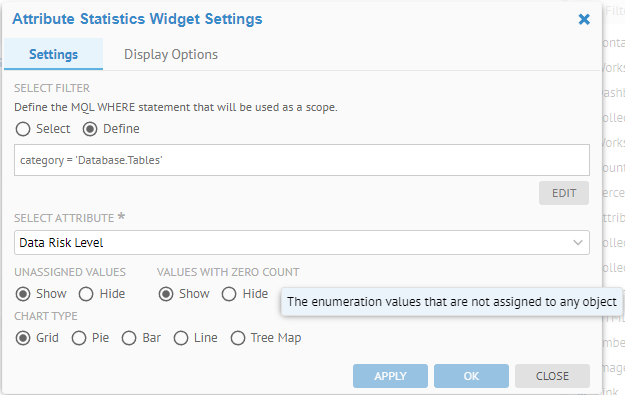
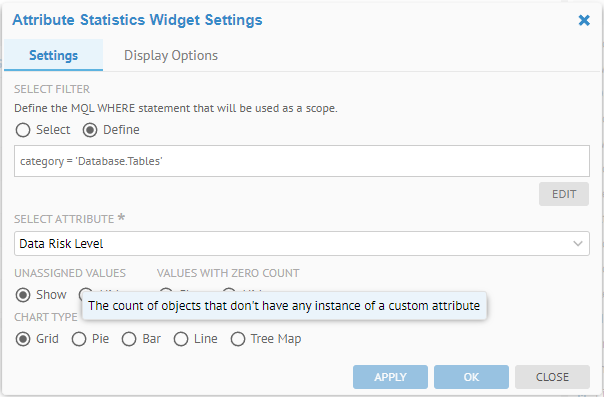
Now one may Show either UNASSIGNED VALUES and/or VALUES WITH ZERO COUNT.
Collection Widget
With this widget you may embed the contents of a collection into the dashboard.
Create a Container at the bottom of the dashboard. Drag the Collection widget into the container and click CONFIGURE.
Select the Hot Reports collection. Set the LIMIT (number of lines) to 3.
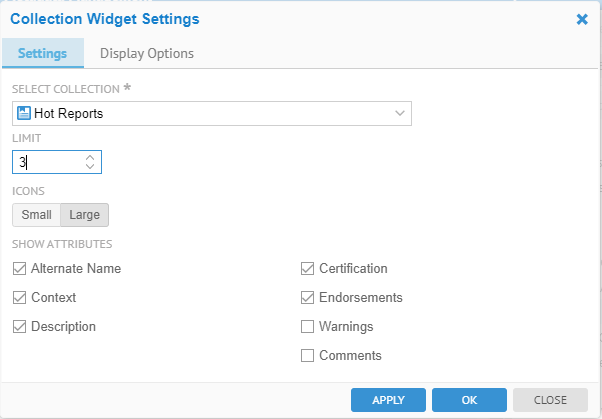
Click OK.
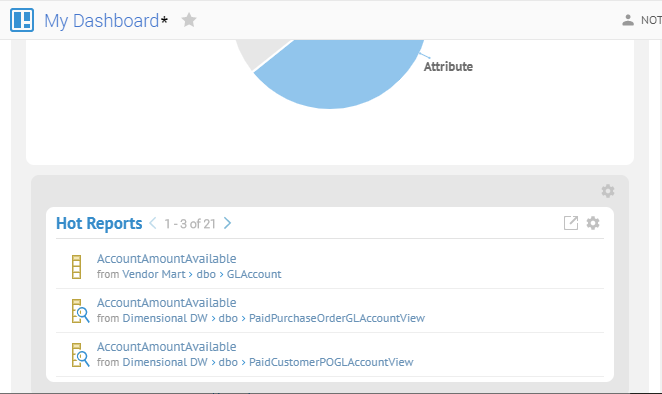
The top three Hot Reports are embedded in the dashboard.
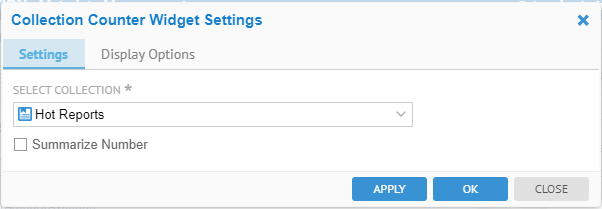
Collection Counter Widget
With this widget you may embed a count of the elements in a collection into the dashboard.
Drag the Collection Counter widget into the bottom portion of the container that the Hot Reports Collection widget is in dashboard and click CONFIGURE.
Select the Hot Reports collection.
Go to the Display Options tab and enter “Top 3 Hot Reports of “ in the Title.
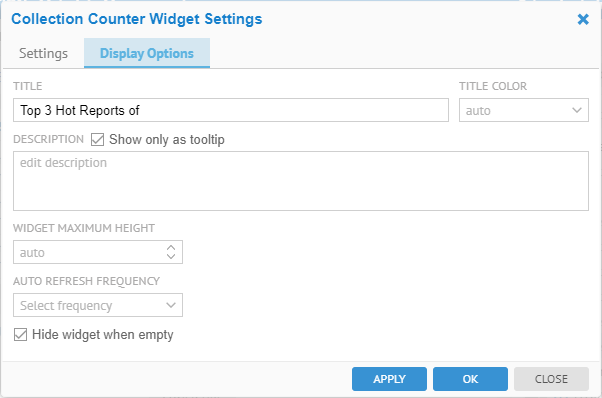
Click OK.
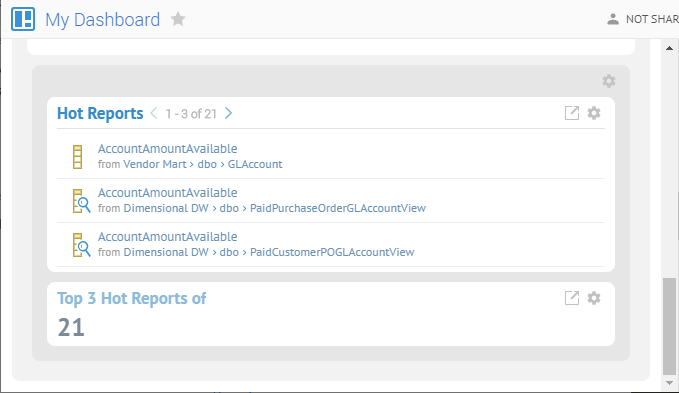
The number of Hot Reports is now embedded in the dashboard.
Recent Objects Widget
With this widget you may embed a reproduction of the OBJECTS > Recent menu list into the dashboard.
Drag the Recent Objects widget into the bottom portion of dashboard.
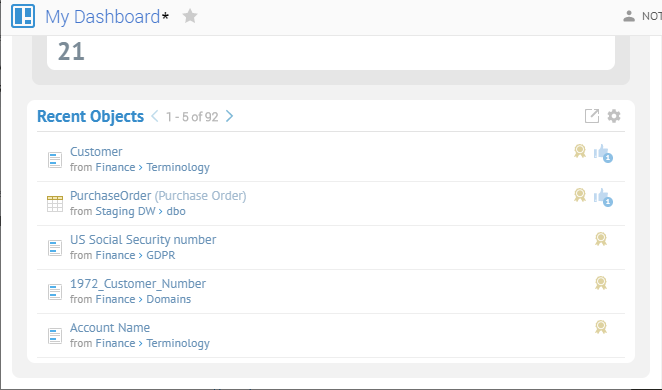
A list of recently visited objects is now embedded in the dashboard.
HTML Text Widget
With this widget you may embed HTML formatted text into the dashboard.
By default, the Tomcat server is configured to reject any image not hosted on the application server. As a result, the link, html and image widgets do not allow referencing external images.
A simple change to the default tomcat configuration (in the $MM_HOME/tomcat/conf/web.xml) can fix that. Change:
<filter>
<filter-name>SecurityHeadersFilter</filter-name>
<filter-class>MITI.tomcat.filter.SecurityHeaders</filter-class>
<init-param>
<param-name>Content-Security-Policy</param-name>
<param-value>default-src 'self'; child-src 'self'; img-src 'self' data:; script-src 'self' 'unsafe-eval' 'unsafe-inline'; style-src 'self' 'unsafe-inline';</param-value>
</init-param>
<init-param>
<param-name>X-Content-Type-Options</param-name>
<param-value>nosniff</param-value>
</init-param>
<init-param>
<param-name>X-XSS-Protection</param-name>
<param-value>1; mode=block</param-value>
</init-param>
</filter>
To:
<filter>
<filter-name>SecurityHeadersFilter</filter-name>
<filter-class>MITI.tomcat.filter.SecurityHeaders</filter-class>
<init-param>
<param-name>Content-Security-Policy</param-name>
<param-value>default-src 'self'; child-src 'self'; img-src * 'self' data:; script-src 'self' 'unsafe-eval' 'unsafe-inline'; style-src 'self' 'unsafe-inline';</param-value>
</init-param>
<init-param>
<param-name>X-Content-Type-Options</param-name>
<param-value>nosniff</param-value>
</init-param>
<init-param>
<param-name>X-XSS-Protection</param-name>
<param-value>1; mode=block</param-value>
</init-param>
</filter>
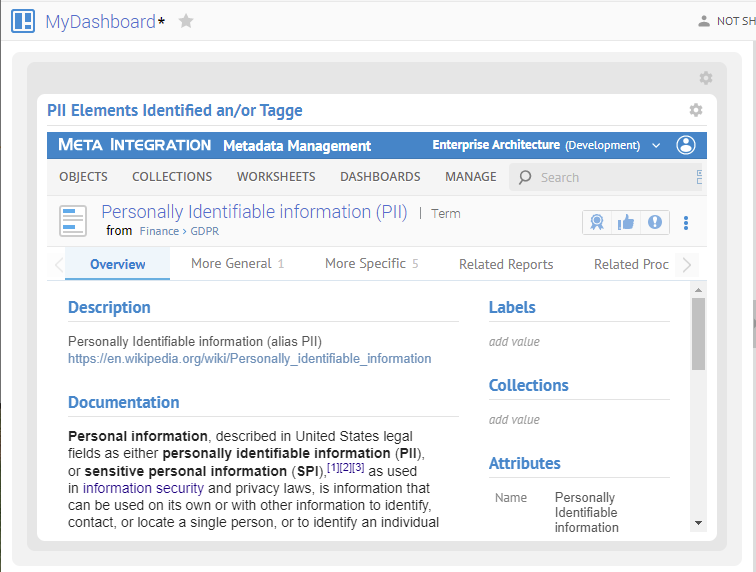
Create a Container at the bottom of the dashboard. Drag the HTML Text widget into the container and click CONFIGURE.
Enter the text “PII Elements Identified and/or Tagged” and format as below:
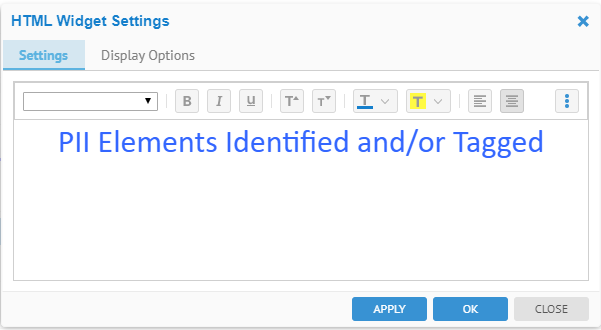
Click OK.
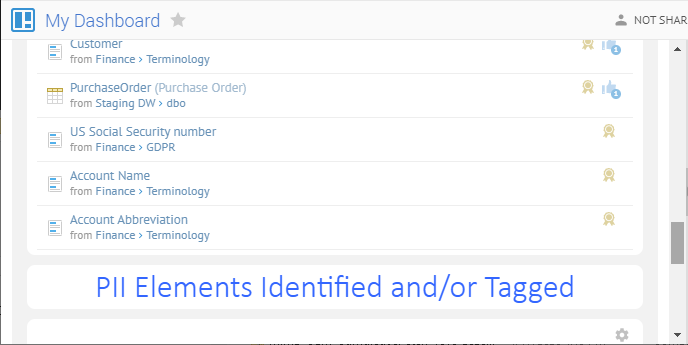
The HTML text is now embedded in your dashboard.
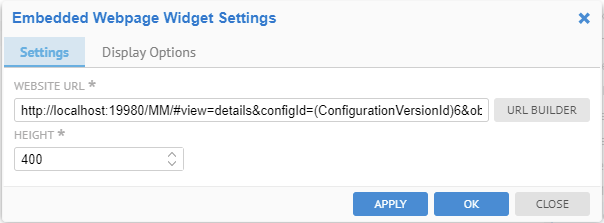
Embedded Webpage Widget
With this widget you may embed any page referenced by a URL into the dashboard.
Drag the Embedded Webpage widget into the bottom of the container with the HTML Text and click CONFIGURE. Then click URL BUILDER
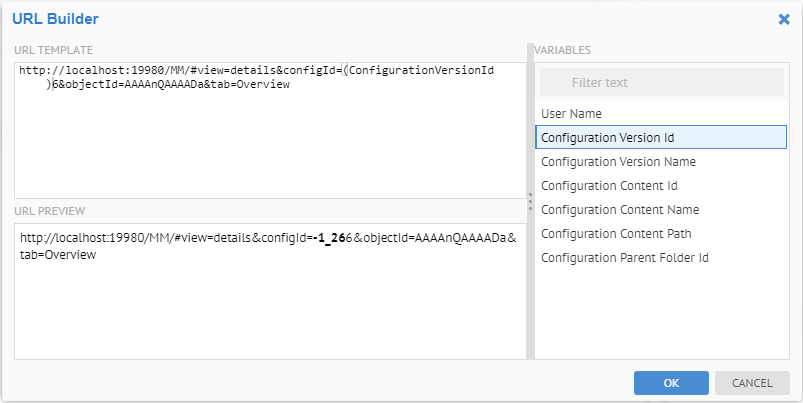
Click OK.
We replaced the fixed configuration version ID with a substitution parameter for it, thus this widget will present the PII element far whatever configuration is currently being viewed.
Click OK.
An HTML page from the product itself is embedded in the dashboard.
Image Widget
With this widget you may embed an image into the dashboard.
The image must be referenced as a URL. The product does not store these images for you.
By default, the Tomcat server is configured to reject any image not hosted on the application server. As a result, the link, html and image widgets do not allow referencing external images.
A simple change to the default tomcat configuration (in the $MM_HOME/tomcat/conf/web.xml) can fix that. Change:
<filter>
<filter-name>SecurityHeadersFilter</filter-name>
<filter-class>MITI.tomcat.filter.SecurityHeaders</filter-class>
<init-param>
<param-name>Content-Security-Policy</param-name>
<param-value>default-src 'self'; child-src 'self'; img-src 'self' data:; script-src 'self' 'unsafe-eval' 'unsafe-inline'; style-src 'self' 'unsafe-inline';</param-value>
</init-param>
<init-param>
<param-name>X-Content-Type-Options</param-name>
<param-value>nosniff</param-value>
</init-param>
<init-param>
<param-name>X-XSS-Protection</param-name>
<param-value>1; mode=block</param-value>
</init-param>
</filter>
To:
<filter>
<filter-name>SecurityHeadersFilter</filter-name>
<filter-class>MITI.tomcat.filter.SecurityHeaders</filter-class>
<init-param>
<param-name>Content-Security-Policy</param-name>
<param-value>default-src 'self'; child-src 'self'; img-src * 'self' data:; script-src 'self' 'unsafe-eval' 'unsafe-inline'; style-src 'self' 'unsafe-inline';</param-value>
</init-param>
<init-param>
<param-name>X-Content-Type-Options</param-name>
<param-value>nosniff</param-value>
</init-param>
<init-param>
<param-name>X-XSS-Protection</param-name>
<param-value>1; mode=block</param-value>
</init-param>
</filter>
Drag the Image widget into the bottom of the container with the HTML Text and click CONFIGURE.
Paste an IMAGE URL.

Click OK.
Link Widget
With this widget you may embed a link into the dashboard.
Drag the Link widget into the bottom of the container with the HTML Text and click CONFIGURE. Then click URL BUILDER
You can build a link that works just like the embedded URL, but not embedded.
By default, the Tomcat server is configured to reject any image not hosted on the application server. As a result, the link, html and image widgets do not allow referencing external images.
A simple change to the default tomcat configuration (in the $MM_HOME/tomcat/conf/web.xml) can fix that. Change:
<filter>
<filter-name>SecurityHeadersFilter</filter-name>
<filter-class>MITI.tomcat.filter.SecurityHeaders</filter-class>
<init-param>
<param-name>Content-Security-Policy</param-name>
<param-value>default-src 'self'; child-src 'self'; img-src 'self' data:; script-src 'self' 'unsafe-eval' 'unsafe-inline'; style-src 'self' 'unsafe-inline';</param-value>
</init-param>
<init-param>
<param-name>X-Content-Type-Options</param-name>
<param-value>nosniff</param-value>
</init-param>
<init-param>
<param-name>X-XSS-Protection</param-name>
<param-value>1; mode=block</param-value>
</init-param>
</filter>
To:
<filter>
<filter-name>SecurityHeadersFilter</filter-name>
<filter-class>MITI.tomcat.filter.SecurityHeaders</filter-class>
<init-param>
<param-name>Content-Security-Policy</param-name>
<param-value>default-src 'self'; child-src 'self'; img-src * 'self' data:; script-src 'self' 'unsafe-eval' 'unsafe-inline'; style-src 'self' 'unsafe-inline';</param-value>
</init-param>
<init-param>
<param-name>X-Content-Type-Options</param-name>
<param-value>nosniff</param-value>
</init-param>
<init-param>
<param-name>X-XSS-Protection</param-name>
<param-value>1; mode=block</param-value>
</init-param>
</filter>
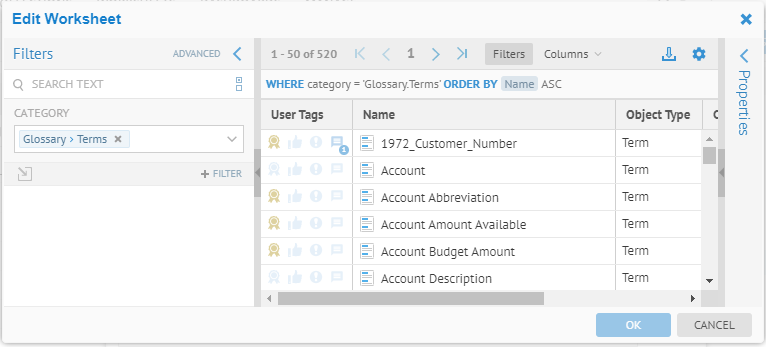
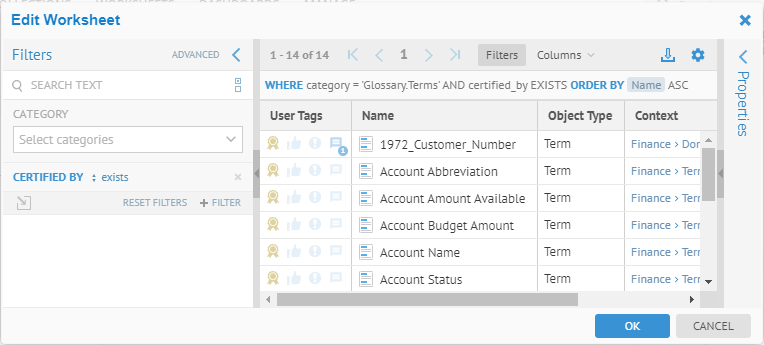
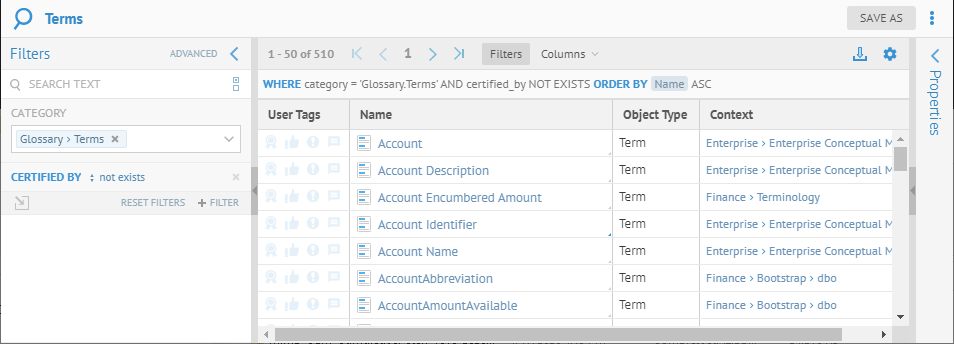
So, let’s get the structure of a URL. Open a new browser tab and go to WORKSHEETS > Glossary > Terms. Then specify a filter where Certified By does Not Exist.

Now, paste that link back into the Link Widget Settings dialog. Click URL BUILDER.
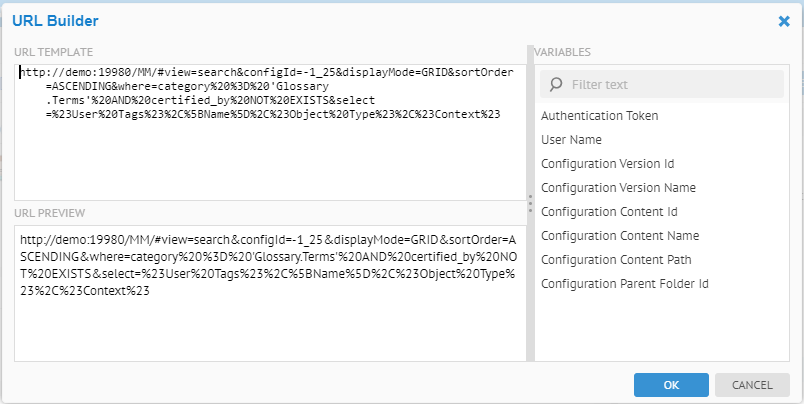
Now, select the “-1_25” (i.e., the congfigId) in the URL and click on Configuration Version Identifier.
The URL is replaced with a substitution parameter. In this way, you may use this link in ANY configuration, and it will always present the terms without certification.
Go to the Display Options tab and specify “Link to Terms to be Certified” as the Title. Click Save.
Click Save for the dashboard.
Links Widget
With this widget you may embed a link into the dashboard.
Drag the Links widget into the bottom of the container with the HTML Text and click CONFIGURE. Then click URL BUILDER
You can build a link that works just like the embedded URL, but not embedded.
So, let’s get the structure of a URL. Open a new browser tab and go to WORKSHEETS > Glossary > Terms. Then specify a filter where Certified By does Not Exist.
Now, paste that link back into the Link Widget Settings dialog. Click URL BUILDER.

Now, select the “-1_25” (i.e., the congfigId) in the URL and click on Configuration Version Identifier.
The URL is replaced with substitution parameter. In this way, you may use this link in ANY configuration, and it will always present the terms without certification.
Go to the Display Options tab and specify “Link to Terms to be Certified” as the Title. Click Save.
Click Save for the dashboard.
Rename a Dashboard
When on the dashboards object page one may simply edit the name in place to rename a Dashboard.
Steps
- Navigate to My Dashboard and click on its name.
Example
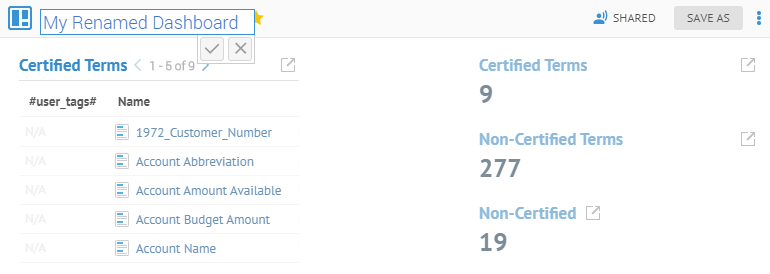
Navigate to My Dashboard and click the name and type “My Renamed Dashboard”.
Copy a Dashboard Container
You may copy any container or widget and then paste into another that you have already included in a dashboard.
Steps
- Navigate to My Dashboard
- ClickMore Actions and then Customize
- Click Settings and select Copy for the container or widget you wish to copy from.
- Include a new container or widget in the dashboard.
- Click Settings and select Paste for the new container or widget
Did this page help you?
If you find any issues with this page or its content – a typo, a missing step, or a technical error – let us know how we can improve!