
Manage Authentication
Upon external authentication (LDAP, OAuth and SAML2), a valid user is created in the system (if not already there) based upon those credentials from the external authentication authority and will then be in MANAGE > Users. Thus, there is no need to import users in these external authentication scenarios.
Manage Native Authentication
In this mode, users may be defined as a user defined locally within Talend Data Catalog . All create, edit, group assignments and deletion actions on that user may only be made within Talend Data Catalog .
When logging in using native authentication mode, if the user name is associated with a native user the system will authenticate that user with native authentication (based on the local password).
Set Native Authentication
Steps
- Sign in as a user with at least the Security Administratorcapability global role assignment.
- Go to MANAGE > Users in the banner.
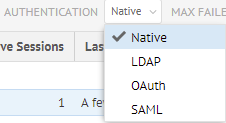
- Select Native from the Authentication pull-down.
Example
Sign in as Administrator.
Go to Tools > Administration > Users.
Select Native from the Authentication pull-down.
Create a New Native User
Native users are manually created/updated by the Administrator. A Native user is required to have a password defined at the creation time. Native Users can coexist with LDAP users, which may be useful in creating temporarily logins for administrators, support, consultants, etc.
Steps
- Sign in as a user with at least the Security Administratorcapability global role assignment.
- Go to MANAGE > Users in the banner.
- Click the
 icon.
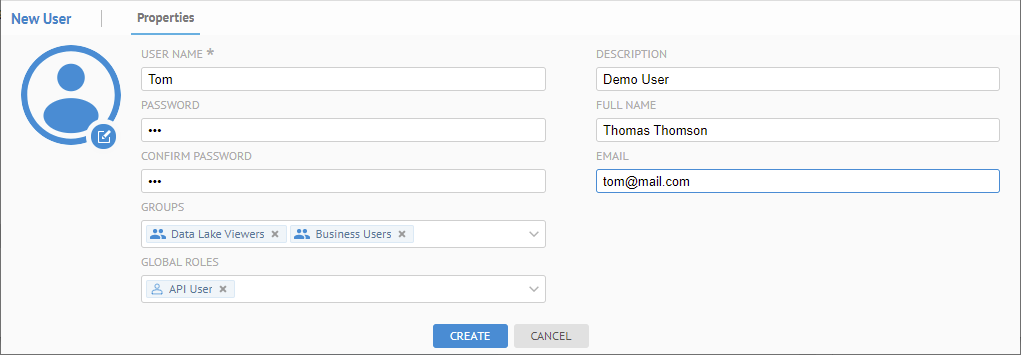
icon. - At the bottom of the screen, in the Properties tab, provide a Username, Password, and other identifying information.
- Check the Named License checkbox if you want to designate this user as a named user for licensing purposes.
Only available if named user licenses are enabled.
- Assign a group to the user.
- Assign global roles to the user.
Example
Sign in as Administrator.
Go to MANAGE > Users in the top banner.
Click Add. At the bottom of the screen, in the Properties tab, provide a Username, Password, and other identifying information.
See more details about editing a user account.
Click CREATE.
Manage LDAP Authentication
In order to leverage existing LDAP users and ensure that they may use their existing authentication when accessing this product, there is an LDAP authentication mode in Talend Data Catalog . In general, the process is:
- Set LDAP authentication mode.
- Configure the connection to your LDAP environment.
- Optionally configure automated group assignment based upon LDAP attributes.
Once the above is completed, existing LDAP users may simply sign in with their LDAP credentials and they will be identified users in Talend Data Catalog .
Upon external authentication (LDAP), a valid user is created in the system (if not already there) based upon those credentials from the external authentication authority and will then be in MANAGE > Users. Thus, there is no need to import users in these external authentication scenarios.
Set LDAP Authentication
Steps
- Sign in as a user with at least the Security Administratorcapability global role assignment.
- Go to MANAGE > Users in the banner.
- Select LDAP from the Authentication pull-down.
Example
Sign in as Administrator.
Go to MANAGE > Users.
Select LDAP from the Authentication pull-down.
As you are altering the methods of authentication which are in effect, you will receive a confirmation dialog.
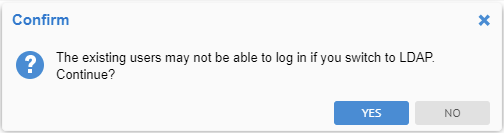
Click YES.
Configure LDAP Authentication
Once you have enabled LDAP authentication, configuration is based upon defining the proper connection to the LDAP server.
Steps
- Sign in as a user with at least the Security Administratorcapability global role assignment.
- Go to MANAGE > Users in the banner.
- Be sure LDAP Authentication is enabled.
- Click the Configure Authentication icon.
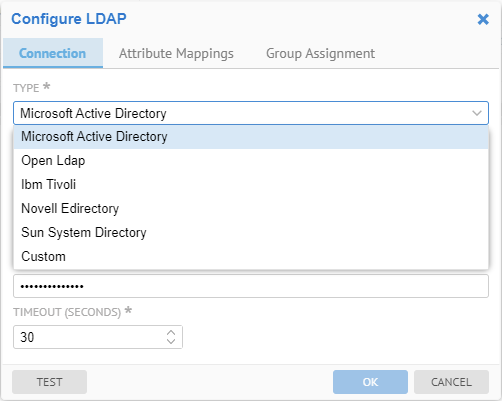
- Specify the Type of LDAP to be used, which are a set of pre-defined attribute mappings. These include:
- Microsoft Active Directory
- Open LDAP
- IBM Tivoli
- Novell EDirectory
- Sun System Directory
- Custom.
If you select Custom, you may specify further in the Attribute Mappings tab.
With Windows Active Directory, it is generally best to use to the UPN (User Principal Name) format (e.g., USER@FQDN) instead of the Windows domain style (DOMAIN\USERNAME) format (e.g., corp\mc25438. In fact, the Active Directory is configured as a forest, it is mandatory to use the UPN and switch from the default port to the global catalog port as well.
- Enter the connection parameters available in the Connection tab.
- Enter the mapping information for LDAP attributes in the Attribute Mappings tab.
- Use the Test button to validate the settings.
- Go to the Group Assignment tab to auto-assign groups based upon the LDAP security model.
Example
Sign in as Administrator.
Go to Tools > Administration > Users.
Select LDAP from the Authentication pull-down.

Specify Microsoft Active Directory as the Type of LDAP to be used.
Enter the connection parameters for the LDAP server.
- The URL is generally in the format:
ldap://<server name or IP address>:<port>
- The User and Password are just for testing and configuration purposes.
- Set TIMEOUT (SECONDS)
If you are seeing slow performance when authenticating LDAP users, oftentimes what is taking the vast majority of the time is retrieving the data from the LDAP server. This may often be the case when you are using Microsoft Active Directory on the default port 389. It is recommended to switch to the global catalog on port 3268 (generally the same URL but with the different port).
Click the TEST button to validate the settings.
Go to the Attribute Mappings tab to define user attribute mappings.
Go to the Group Assignment tab to auto-assign groups based upon the LDAP security model.

If you do not click the TEST button, a test connection will be attempted anyway on clicking OK and it must pass successfully before the dialog closes. You may always click CANCEL to cancel the change.
Create a New LDAP User
There is no need to create an LDAP user manually. Instead, an LDAP user is automatically created/updated as a result of a successful LDAP authentication login. Thus, all that is required is that the user/password combination is valid for the LDAP authentication connection definitions and query rules.
The LDAP user attributes (login, full name, e-mail, description, etc.) are automatically mapped to selected LDAP attributes (e.g. sAMAccountName is used by default for login on Microsoft Active Directory). In addition, one may change this mapping using the Advanced LDAP connection button.
Manage OAuth Authentication
Configuration of Talend Data Catalog to support an external SSO environment requires working with your System Administrator. In this mode, the system default login page is disabled and not presented. It must be replaced by an external authentication login system.
Administrators can always login even in External Authentication Mode using the dedicated administrator rescue login URL: http://localhost:<port>/MM/Auth?nativeLogin, where <port> is the http port that Talend Data Catalog responds to.
The OAuth specification defines a delegation protocol that is useful for conveying authorization decisions across a network of web-enabled applications and APIs. OAuth is used in a wide variety of applications, including providing mechanisms for user authentication.
Talend Data Catalog supports the OAuth 2.0 protocol for external authentication.
Upon external authentication (OAuth), a valid user is created in the system (if not already there) based upon those credentials from the external authentication authority and will then be in MANAGE > Users. Thus, there is no need to import users in these external authentication scenarios.
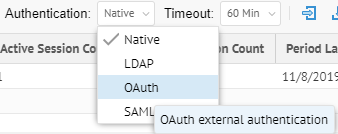
Set OAuth Authentication
Steps
- Sign in as a user with at least the Security Administratorcapability global role assignment.
- Go to MANAGE > Users in the banner.
- Select OAuth from the Authentication pull-down.
Example
Sign in as Administrator.
Go to Tools > Administration > Users.
Select OAuth from the Authentication pull-down.
Configure OAuth Authentication
Steps
- Sign in as a user with at least the Security Administratorcapability global role assignment.
- Go to MANAGE > Users in the banner.
- Select OAuth from the Authentication pull-down.
- Click ConfigureAuthentication.
Example
Sign in as an Administrator.
Go to MANAGE > Users in the banner.
Select OAuth from the Authentication pull-down.
Click Configure Authentication.
Configure the OAuth Server
In order to enable an external authentication server using the OAuth 2.0 protocol, the Administrator needs to configure the OAUTH server. The following example shows the Configure OAUTH Server editor parameters using the Google server.
Steps
- Sign in as a user with at least theApplication Administratorcapability global role assignment.
- Go to MANAGE > Users in the banner.
- Click ConfigureAuthentication.
- Go to the Connection tab.
Example
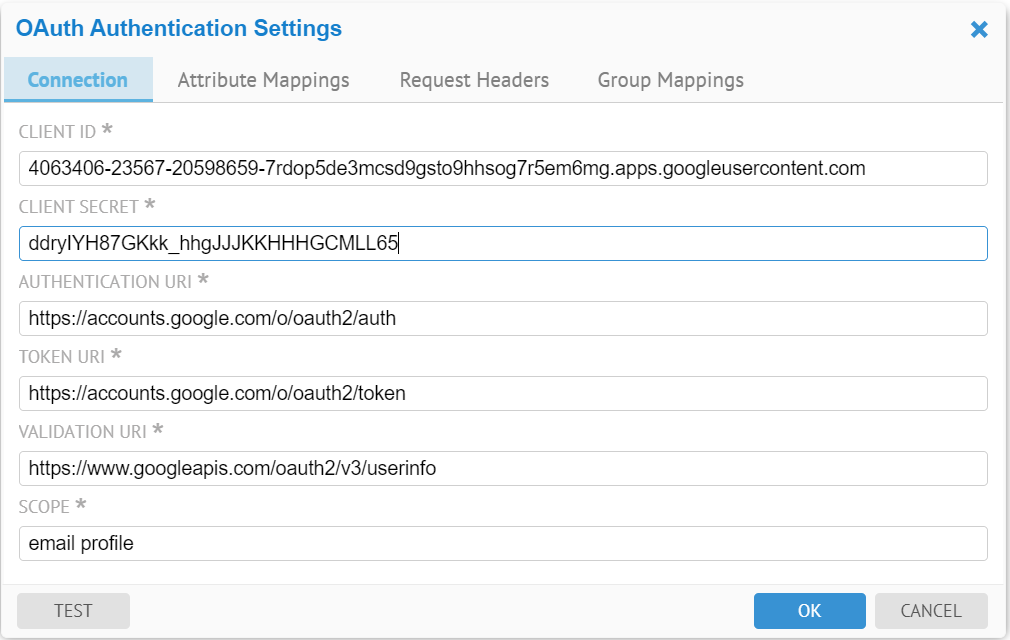
The user needs to obtain OAuth 2.0 client credentials, such as Client Id, Client Secret from the external authentication server, such as Google and Facebook.
Besides the Client Id and Client Secret, the OAUTH Server configuration also requires the external authentication server Authentication URI, token URI and a few other parameters:
- Authentication URI: a URI on the external authentication server that handles the user authentication. The result is an authorization code, which the application can exchange for an access token and a refresh token.
- Token URI: a URI on the external authentication server that exchanges the authentication code for an access token.
- Validation URI: a URI on the external authentication server that validates the access token and provides access to the user’s account
- Scope: One or more scope values indicating which parts of the user’s account an access token permits.
Go to the Attribute Mappings tab to define user attribute mappings.
Go to the Group Assignment tab to auto-assign groups based upon the OAuth security model.
Add an External Authentication User
External authentication users are automatically created/updated by successful external authentication login. They are assigned groups according to the rules provided by the authentication system, or the guest group by default.
One may specify additional group assignments manually (see Assign a group to a user).
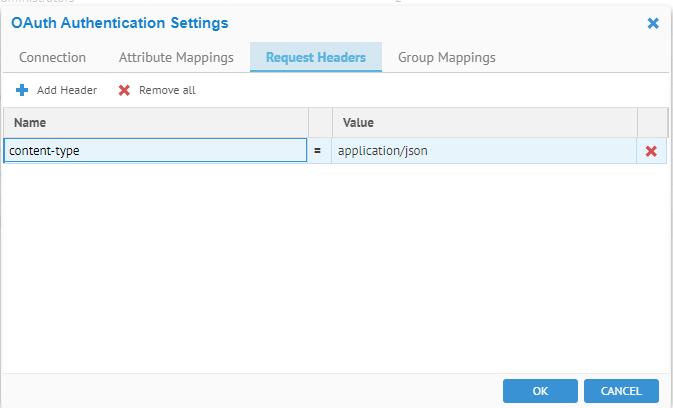
Request Headers
The Request Headers tab specifies extra parameters to be added in the HTTP requests to the external authentication server by Talend Data Catalog .
Steps
- Sign in as a user with at least theApplication Administratorcapability global role assignment
- Go to MANAGE > Users in the banner.
- Click ConfigureAuthentication.
- Go to the Request Headers tab.
- Click the Add action icon.
- A Client submits an authentication request via the User Interface of a Resource Server
- The Resource Server presents the Client with an Authorization Grant, and redirects the Client to the Authorization Server
- The Client requests an Access Token from the Authorization Server using the Authorization Grant Code
- The Client logs in to the Authorization Server, and if the code is valid, the Client gets an Access Token that can be used to request a protected resource from the Resource Server
- After receiving a request for a protected resource with an accompanying Access Token, the Resource Server verifies the validity of the token directly with the Authorization Server
- If the token was valid, the Authorization Server sends information about the Client to the Resource Server
In this case the Talend Data Catalog application server is the Resource Server, the Google Authorization Server is the Authorization Server, and the end user is the Client. The OAuth server configuration parameters should look like those in the screenshots in the Configure the OAuth Server section.
Once you have specified OAuth External Authentication Mode
- Talend Data Catalog presents the end user with an Authorization Grant, and redirects the end user to the Google Authorization Server’s Authentication URI https://accounts.google.com/o/oauth2/auth. The scope values “email profile” indicates that we are not requesting access to the user’s Google data, just wanting to know the user’s email address and basic profile information.
- The end user requests an Access Token from the Google Authorization Server’s Token URI https://accounts.google.com/o/oauth2/token, using the Authorization Grant Code.
- The end user logs in to the Google Authorization Server, and if the code is valid, the end user gets an Access Token that can be used to request a protected resource from Talend Data Catalog .
- After receiving a request for a protected resource with an accompanying Access Token, Talend Data Catalog verifies the validity of the token and gets the user’s name and other profile info directly with the Google Authorization Server by sending a validation request to the Google Authorization Server’s Validation/User Info URI https://www.googleapis.com/oauth2/v3/userinfo using the Access token.
- If the access token is valid, the Google Authorization Server sends information about the end user based on the scope values to Talend Data Catalog . Below is an example of the data in JSON.
{ "sub": "110248495921238986420",
"name": "Aaron Parecki",
"given_name": "Aaron",
"family_name": "Parecki",
"picture": "https://lh4.googleusercontent.com/-kw-iMgD_j34/AAAAAAAAAAI/AAAAAAAAAAc/P1YY91tzesU/photo.jpg",
"email": "aaron.parecki@okta.com",
"email_verified": true,
"locale": "en",
"hd": "okta.com"
}
Using the given User Attribute Mapping, Google's name attribute is mapped to this products login and full name attributes, Google's sub attribute is mapped to distinguished name attribute in Talend Data Catalog , Google's email attribute is mapped to email attribute in Talend Data Catalog .
- Talend Data Catalog logs the end user into the system and grants the protected resource to the user based on the end user’s roles.
In this case the server at Talend Data Catalog is the Resource Server, the Azure Active Directory (Azure AD) Web API is the Authorization Server, and the end user is the Client. The OAuth server configuration parameters look like the following:

The {tenant} value in the path of the request can be used to control who can sign into the application. The allowed values are tenant identifiers, for example, 8eaef023-2b34-4da1-9baa-8bc8c9d6a490 or contoso.onmicrosoft.com or common for tenant-independent tokens. The OAuth authentication workflow with Azure AD Web API is similar to the workflow with the Google Authorization Server.
Manage SAML2 Authentication
SAML (Security Assertion Mark-up Language) is an umbrella standard that covers federation, identity management and single sign-on (SSO).
Talend Data Catalog supports the SAML 2.0 protocol for external authentication.
SAML requesters and responders communicate by exchanging messages. The mechanism to transport these messages is called a SAML binding. Talend Data Catalog supports the following SAML bindings: HTTP redirect and HTTP POST.
Administrators can always login even in External Authentication Mode using the dedicated administrator rescue login URL: http://localhost:<port>/MM/Auth?nativeLogin, where <port> is the http port that Talend Data Catalog responds to.
A misconfigured authentication scheme can result in user’s being able to access portions of the application which should be restricted. This requires the Identity provider to sign the SAML response and/or assertion that it sends to the Service Provider (the application server). When configuring the SAML Server in the application server, set the Signature Element accordingly, i.e. Response, Assertion or Both:
At one time the product used to use the entire identity provider URL as an identifier of the SP (i.e. SP's entity id). However, with improvements for related SAML issues, it now uses only host name as the SP's entity id. Thus, you should now ensure that the audience restriction on the Okta server side should match the service provider's entity id. Otherwise, the application server will no longer authenticate using SAML OKTA.
SAML requests sent from the service provider (i.e., the application server) to the IDP server and SAML responses sent from the IDP server to the service provider can be signed or unsigned, but not encrypted.
https://www.metaintegration.com/MITI/Help/UserGuide/#!Documents/samlfaq.html

A sample decoded request:
{code:java}
<samlp:AuthnRequest xmlns:samlp="urn:oasis:names:tc:SAML:2.0:protocol"
xmlns:saml="urn:oasis:names:tc:SAML:2.0:assertion"
ID="ONELOGIN_04d4bf69-4348-4148-b4bf-1f0d05a4802c"
Version="2.0" IssueInstant="2020-06-03T17:21:25Z"
Destination="https://dev-388428.oktapreview.com/app/nonedev388428_saml2test_1/exki10h88urLntvTj0h7/sso/saml"
ProtocolBinding="urn:oasis:names:tc:SAML:2.0:bindings:HTTP-POST"
AssertionConsumerServiceURL="http://mitiauth.com:19980/MM/Auth">
<saml:Issuer>mitiauth.com</saml:Issuer>
<samlp:NameIDPolicy Format="urn:oasis:names:tc:SAML:2.0:nameid-format:transient" AllowCreate="true" />
</samlp:AuthnRequest>{code}
Frequently Asked Questions:
- The value of NameIDPolicy in SAML request is “urn:oasis:names:tc:SAML:2.0:nameid-format:transient”
- The value of Issuer in SAML request is the host name portion of the unique id for the SAML identity provider which you specify in the SAML configuration as the Identity provider
- The assertion consumer service URL is http://<server>:<port>/MM/Auth where server and port are the server and port number where the application server service is running.
- The Service provider (entity id) is the host name where you are running the application server. We use that as the issuers in the SAML requested generated by the application server. Configure the app id and Audience restriction on the ADFS side accordingly.
Upon external authentication (SAML2), a valid user is created in the system (if not already there) based upon those credentials from the external authentication authority and will then be in MANAGE > Users. Thus, there is no need to import users in these external authentication scenarios.
Set SAML2 Authentication
Steps
- Sign in as a user with at least theApplication Administratorcapability global role assignment
- Go to MANAGE > Users in the banner.
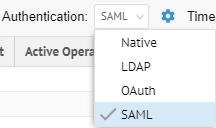
- Select SAML from the Authentication pull-down.
Example
Sign in as Administrator.
Go to Tools > Administration > Users.
Select SAML from the Authentication pull-down.
Configure SAML Authentication
Steps
- Sign in as a user with at least theApplication Administratorcapability global role assignment
- Go to MANAGE > Users in the banner.
- Click Configure Authentication.
Example
Sign in as an Administrator.
Go to MANAGE > Users in the banner.
Select SAML from the Authentication pull-down.

Click  Configure Authentication.
MM does not use any Azure AD API to read the group assignments. All information about the user is extracted from the standard SAML response from AD FS, an IDP sits on top of the AD. If the user has created an attribute mapping for the GROUPS attribute and mapped group mappings from the external groups to the local groups, the external user will be automatically assigned a local group upon login.
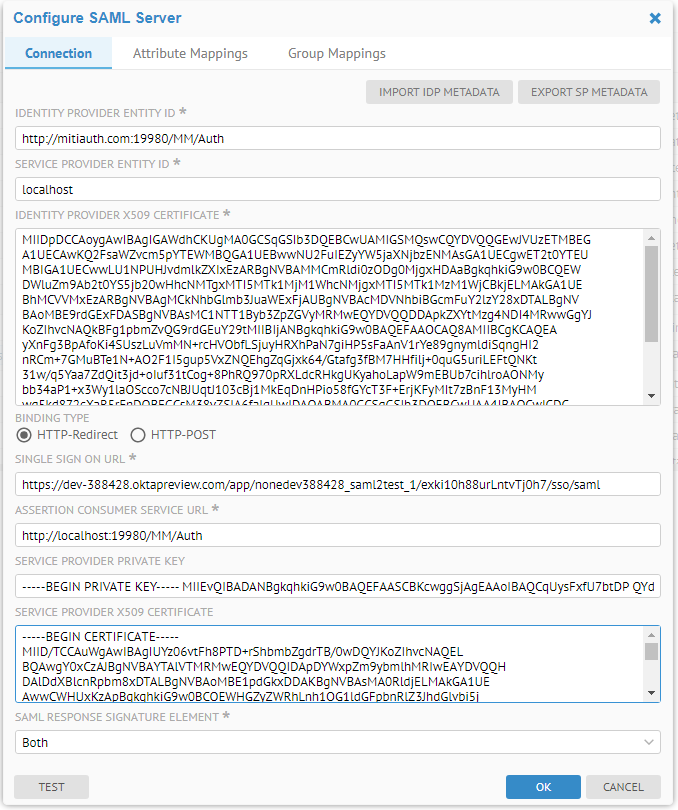
Configure the SAML server
In order to enable an external authentication server using the SAML2 protocol, the Administrator needs to configure the SAML server. The following example shows the Configure SAML Server editor parameters.
Steps
The user needs to obtain the following information about the Identity Provider (and Service Provider if the application server is behind a load balancer or proxy server.)
- IDENTITY PROVIDER X509 CERTIFICATE: The URL of the IdP server
- X509 CERTIFICATE: the public X509 certificate of the Identity Provider which allows Talend Data Catalog to verify the signatures therefore establish trust in the messages that have been exchanged
- BINDING TYPE: The manner in which binding is accomplished, either by redirect or POST.
- SINGLE SIGN ON URL: the URL for single sign on.
- SAML RESPONSE SIGNATURE ELEMENT: Whether the SAML authentication response message and SAML assertion are digitally signed by the Identity Provider or not.
The user may configure the SIGNATURE ELEMENT to be one of the following values: Response, Assertion, Both and Neither. Talend Data Catalog will return an error message at the SAML user login time if an element is configured as signed but the element in the SAML response was not signed by the Identity Provider.
If an element is configured as not signed, Talend Data Catalog will not validate the signature in that element even if it may have been signed by the Identity Provider.
- IMPORT IDP METADATA: Allows the application server to read the identity provider’s SAML metadata file which is an XML document that contains information necessary for interaction with the Identity Provider. This document contains the URLs of endpoints, information about supported bindings, identifiers and public keys. After parsing the SAML metadata file, the application server will automatically fill in the other fields from the values specified in the SAML metadata file. The user still needs to configure the Attribute Mappings and Group Mappings to complete the SAML Server configuration.
- EXPORT SP METADATA: Allows you to export the SAML Server Provider metadata. The application server SP uses the protocol (http or https), server name and the port number that the browser uses to generate the endpoint URLs in the metadata. You may need to customize the SP auto-generated metadata file if it does not work as is.
- SERVICE PROVIDER ENTITY ID: The host name of the service provider. If the MM application server is behind a loader balancer or proxy server, this should be the host name of the loader balancer or proxy server. We use that as the issuers in the SAML requests generated by the MM application server. Configure the app id and Audience restriction in the IdP server accordingly.
- ASSERTION CONSUMER SERVICE URL: SAML protocol binding to be used when returning the SAML response from the IdP server if a proxy server or loader balancer is used on the SP side. This is used as the recipient or destination URL of the SAML responses. If the MM application server is behind a loader balancer or proxy server, the protocol, host name, and port in the URL should match those of the loader balancer or proxy server.
- SERVICE PROVIDER PRIVATE KEY: the private key of the Service Provider. If both Service Provider’s private key and X509 certificate are specified, the SAML authentication requests will be digitally signed by the application server service provider.
- SERVICE PROVIDER X509 CERTIFICATE: the public X509 certificate of the Service Provider. If both Service Provider’s private key and X509 certificate are specified, the SAML authentication requests will be digitally signed by the application server service provider.
Configuring SAML with Microsoft Active Directory FS.
AD FS is a service provided by Microsoft as a standard role for Windows Server that provides a web login using existing Active Directory credentials. Instructions for configuring and installing AD FS can be found at Microsoft AD FS website.
In your AD FS installation, please note the value for the 'SAML 2.0/W-Federation' URL in the AD FS Endpoints section. If you chose the defaults for the installation, this will be '/adfs/ls/'. Use this value for the Single Sign On URL in configuring the Talend Data Catalog SAML Server.
The Identity Provider should take the value for the ‘Identifier’ URL in the AD FS Relying Party Trusts section.
The SAML server configuration sample parameters look like the following:
Sample decoded response
Here is a sample decoded response in which both response and assertion are signed. We omitted the signatures in the sample. The Attribute statement in the assertion contains the user attributes First Name, Last Name, Login, Email, Full Name and Department.
<saml2p:Response xmlns:saml2p="urn:oasis:names:tc:SAML:2.0:protocol" Destination="http://localhost:19980/MM/Auth"
ID="id137413689899007971127215705"
IssueInstant="2019-02-12T22:07:10.610Z" Version="2.0"
xmlns:xs="http://www.w3.org/2001/XMLSchema">
<saml2:Issuer xmlns:saml2="urn:oasis:names:tc:SAML:2.0:assertion" Format="urn:oasis:names:tc:SAML:2.0:nameid-format:entity">http://mitiauth.com:19980/MM/Auth
</saml2:Issuer>
<ds:Signature xmlns:ds="http://www.w3.org/2000/09/xmldsig#">
...
</ds:Signature>
<saml2p:Status xmlns:saml2p="urn:oasis:names:tc:SAML:2.0:protocol">
<saml2p:StatusCode Value="urn:oasis:names:tc:SAML:2.0:status:Success"/>
</saml2p:Status>
<saml2:Assertion xmlns:saml2="urn:oasis:names:tc:SAML:2.0:assertion" ID="id137413689899744821682619951" IssueInstant="2019-02-12T22:07:10.610Z" Version="2.0" xmlns:xs="http://www.w3.org/2001/XMLSchema">
<saml2:Issuer Format="urn:oasis:names:tc:SAML:2.0:nameid-format:entity" xmlns:saml2="urn:oasis:names:tc:SAML:2.0:assertion">http://mitiauth.com:19980/MM/Auth</saml2:Issuer>
<ds:Signature
...
</ds:Signature>
<saml2:Subject xmlns:saml2="urn:oasis:names:tc:SAML:2.0:assertion">
<saml2:NameID Format="urn:oasis:names:tc:SAML:1.1:nameid-format:unspecified">john.smith@metaintegration.com
</saml2:NameID>
<saml2:SubjectConfirmation Method="urn:oasis:names:tc:SAML:2.0:cm:bearer">
<saml2:SubjectConfirmationData NotOnOrAfter="2019-02-12T22:12:10.610Z" Recipient="http://localhost:19980/MM/Auth"/>
</saml2:SubjectConfirmation>
</saml2:Subject>
<saml2:Conditions NotBefore="2019-02-12T22:02:10.610Z" NotOnOrAfter="2019-02-12T22:12:10.610Z" xmlns:saml2="urn:oasis:names:tc:SAML:2.0:assertion">
<saml2:AudienceRestriction>
<saml2:Audience>http://localhost:19980/MM/Auth
</saml2:Audience>
</saml2:AudienceRestriction>
</saml2:Conditions>
<saml2:AuthnStatement AuthnInstant="2019-02-12T22:01:23.062Z" SessionIndex="id1550009230610.1252365793" xmlns:saml2="urn:oasis:names:tc:SAML:2.0:assertion">
<saml2:AuthnContext>
<saml2:AuthnContextClassRef>urn:oasis:names:tc:SAML:2.0:ac:classes:PasswordProtectedTransport
</saml2:AuthnContextClassRef>
</saml2:AuthnContext>
</saml2:AuthnStatement>
<saml2:AttributeStatement xmlns:saml2="urn:oasis:names:tc:SAML:2.0:assertion">
<saml2:Attribute Name="First Name" NameFormat="urn:oasis:names:tc:SAML:2.0:attrname-format:unspecified">
<saml2:AttributeValue xmlns:xs="http://www.w3.org/2001/XMLSchema" xmlns:xsi="http://www.w3.org/2001/XMLSchema-instance" xsi:type="xs:string">John</saml2:AttributeValue>
</saml2:Attribute>
<saml2:Attribute Name="Last Name" NameFormat="urn:oasis:names:tc:SAML:2.0:attrname-format:unspecified">
<saml2:AttributeValue xmlns:xs="http://www.w3.org/2001/XMLSchema" xmlns:xsi="http://www.w3.org/2001/XMLSchema-instance" xsi:type="xs:string">Smith</saml2:AttributeValue>
</saml2:Attribute>
<saml2:Attribute Name="Login" NameFormat="urn:oasis:names:tc:SAML:2.0:attrname-format:unspecified">
<saml2:AttributeValue xmlns:xs="http://www.w3.org/2001/XMLSchema" xmlns:xsi="http://www.w3.org/2001/XMLSchema-instance" xsi:type="xs:string">john.smith@metaintegration.com</saml2:AttributeValue>
</saml2:Attribute>
<saml2:Attribute Name="Email" NameFormat="urn:oasis:names:tc:SAML:2.0:attrname-format:unspecified">
<saml2:AttributeValue xmlns:xs="http://www.w3.org/2001/XMLSchema" xmlns:xsi="http://www.w3.org/2001/XMLSchema-instance" xsi:type="xs:string">john.smith@metaintegration.com</saml2:AttributeValue>
</saml2:Attribute>
<saml2:Attribute Name="Full Name" NameFormat="urn:oasis:names:tc:SAML:2.0:attrname-format:unspecified">
<saml2:AttributeValue xmlns:xs="http://www.w3.org/2001/XMLSchema" xmlns:xsi="http://www.w3.org/2001/XMLSchema-instance" xsi:type="xs:string">John Smith</saml2:AttributeValue>
</saml2:Attribute>
<saml2:Attribute Name="Department" NameFormat="urn:oasis:names:tc:SAML:2.0:attrname-format:unspecified">
<saml2:AttributeValue xmlns:xs="http://www.w3.org/2001/XMLSchema" xmlns:xsi="http://www.w3.org/2001/XMLSchema-instance" xsi:type="xs:string">Administrators</saml2:AttributeValue>
</saml2:Attribute>
</saml2:AttributeStatement>
</saml2:Assertion>
</saml2p:Response>
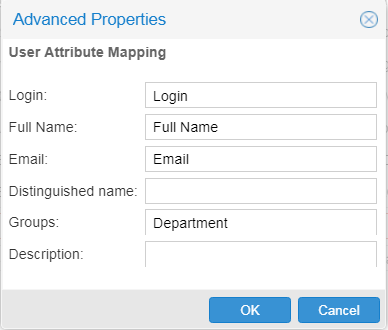
In configuring the SAML Server, one can use the following Attribute Mappings corresponding to the attributes received from the SAML response above.

The wildcard (“%”) may be used when configuring group mappings.

The % matches zero or more characters.
In Okta, the user “Susan Smith” belongs to the groups Everyone and Developers.

After login via the SAML server on Okta, she is now a part of the Producers group:

SAML2 authentication workflow
Steps
- A Client submits an authentication request via the User Interface of a Service Provider
- To authenticate the Client, the Resource Server constructs a SAML Authentication Request, signs and optionally encrypts it, and sends it directly to the Identity Provider (IdP).
- The Service Provider redirects the Client’s browser to the IdP for authentication.
- The IdP verifies the received SAML Authentication Request and if valid, presents a login form for the Client to enter his username and password.
- Once the Client has successfully logged in, the IdP generates a SAML Assertion (also known as a SAML Token), which includes the Client identity (such as the username entered before) and sends it directly to the Service Provider.
- The IdP redirects the Client back to the Service Provider
- The Service Provider verifies the SAML Assertion, extracts the Client identity from it, assigns correct permissions for the Client and then logs him in to the service
Talend Data Catalog does not have the private key of the Identity Provider. Therefore the SAML Assertion received by the Talend Data Catalog can be signed but not encrypted. To validate the signature, Talend Data Catalog only needs the Identity Provider’s public key. However to decrypt the SAML Assertion, Talend Data Catalog would need to have the Identity Provider’s private key. Requiring the Assertion to be signed allows Talend Data Catalog to verify that the assertion contents have not been altered in transit.
Similarly the SAML Authentication Request sent by Meta Integration® Metadata Management (MIMM) can be signed but not encrypted. Talend Data Catalog uses the private key and X.509 certificate of the SP to sign the SAML Authentication Request.
A custom SAML application which Okta Single Sign ON URL is http://mitiauth.com:19980/MM/Auth, is created and configured in Okta. This application can be used as an Identity Provider to demonstrate the SAML authentication workflow. In this case the service at MM.com is the Service Provider, the custom SAML app configured in Okta is the Identity Provider, and the end user is the Client. The SAML server configuration parameters look like the following:

The User Attribute Mapping looks like below:

Steps
Following is the authentication workflow in Talend Data Catalog :
- An end user clicks on the “Login” button on a metadata management service at Talend Data Catalog .
- To authenticate the user, Talend Data Catalog generates a SAML Authentication Request and redirects the user to the Okta Single Sign-On URL endpoint with the request embedded. This endpoint is unique for each application within each Okta tenant. Below is the Okta Single Sign-On login window.
- Once the user is redirected to Okta they’ll need to enter their Okta credentials, unless they had already authenticated into Okta in a previous session within the same browser. In either case, a successful authentication request will send a POST request to the Talend Data Catalog Assertion Consumer Service, i.e. the Talend Data Catalog Authentication Servlet, with an embedded SAML response from Okta. At a minimum, the response will:
- Indicate that it is indeed from Okta and hasn’t been altered, and contain a digital signature proving such. This signature will be verified by Talend Data Catalog using a public key from Okta that was previously stored in the SAML Server Configuration.
- Indicate that the user has authenticated successfully into Okta
- Indicate who the user is via the NameID, a standard attribute used in SAML assertions. Besides the NameID attribute, the response may also contain other attributes specified in the User Attribute Mapping. Talend Data Catalog may retrieve the user information from these attributes..
- After the assertion is successfully parsed and validated by the Talend Data Catalog Authentication Servlet, the user will then be redirected to the Talend Data Catalog default relay state, e.g., metadata explorer, which is usually the same page they would wind up if they were to simply log in with a username and password.
Go to the Group Assignment tab to auto-assign groups based upon the LDAP security model.
Signing in with a custom SAML app configured in Okta
A custom SAML application which Okta Single Sign ON URL is http://mitiauth.com:19980/MM/Auth, is created and configured in Okta. This application can be used as an Identity Provider to demonstrate the SAML authentication workflow. In this case the service at MM.com is the Service Provider, the custom SAML app configured in Okta is the Identity Provider, and the end user is the Client. The SAML server configuration parameters look like the following:

The User Attribute Mapping looks like below:
Steps
Following is the authentication workflow in Talend Data Catalog :
- An end user clicks on the “Login” button on a metadata management service at MM.com.
- To authenticate the user, Talend Data Catalog generates a SAML Authentication Request and redirects the user to the Okta Single Sign-On URL endpoint with the request embedded. This endpoint is unique for each application within each Okta tenant. Below is the Okta Single Sign-On login window.
- Once the user is redirected to Okta they’ll need to enter their Okta credentials, unless they had already authenticated into Okta in a previous session within the same browser. In either case, a successful authentication request will send a POST request to the product’s Assertion Consumer Service, i.e. the Talend Data Catalog Authentication Servlet, with an embedded SAML response from Okta. At a minimum, the response will:
- Indicate that it is indeed from Okta and hasn’t been altered, and contain a digital signature proving such. This signature will be verified by Talend Data Catalog using a public key from Okta that was previously stored in the SAML Server Configuration.
- Indicate that the user has authenticated successfully into Okta
- Indicate who the user is via the NameID, a standard attribute used in SAML assertions. Besides the NameID attribute, the response may also contain other attributes specified in the User Attribute Mapping. Talend Data Catalog may retrieve the user information from these attributes..
- After the assertion is successfully parsed and validated by the this product’s Authentication Servlet, the user will then be redirected to the this product’s default relay state, e.g., MM Explorer, which is usually the same page they’d wind up if they’d simply logged into the Talend Data Catalog with a username and password.
Here are some FAQ’s about SAML Authentication:
Q: Is the product SAML 2.0 compliant?
A: Yes.
Q: Which SAML 2.0 profile is supported by target application - SP initiated SSO / IDP initiated SSO? ST preference is SP initiated SSO.
A: The product supports SP initiated SSO.
Q: Are SAML bindings based upon HTTP POST [ for IDP initiated SSO ] and HTTP Redirect/POST [ for SP initiated SSO ]?
A: Yes.
Q: Digital Signature from ST IDP: are X.509 Certificates issued by private CA is supported for digital signature of SAML messages/responses from ST IdP server (FIM)?
A: Yes.
Digital Signature from ST IDP: is it true that X.509 Certificate will be of type SHA2 (sha1 type of certificate is not accepted due to security policies)?
A: Yes. the product rejects signatures with deprecated algorithms (sha1).
Q: Digital Signature from ST IDP: is the Digital Signing Algorithm RSA SHA256?
A: The product supports several signing algorithms:
- 'http://www.w3.org/2000/09/xmldsig#rsa-sha1'
- 'http://www.w3.org/2000/09/xmldsig#dsa-sha1'
- 'http://www.w3.org/2001/04/xmldsig-more#rsa-sha256'
- 'http://www.w3.org/2001/04/xmldsig-more#rsa-sha384'
- 'http://www.w3.org/2001/04/xmldsig-more#rsa-sha512'
The default is rsa-sha256.
Q: Can the target system (Service Provider: SP) provide metadata xml file to provide SP configuration information?
A: A: Yes. There is an Export SP Metadata feature which allows the user to download the SP’s metadata.xml which includes entity id, ACS URL, and X.509 certificate etc.
Q: Attribute contract: Which user attribute will be used for user identification in SAML assertion? e.g. email or Login name etc.
A: The product supports Attribute Mappings from the SAML attributes in the SAML assertion to user attributes. The login attribute can be mapped from any SAML attribute, e.g. email or login, as long as the attribute value is unique.
Q: Attribute contract: How the user identity should be passed in the SAML Token - as SAML Subject or SAML Attribute.
A: The user identity should be passed in the SAML response message as a SAML attribute.
Q: Attribute contract: What additional user attributes are required in SAML token and why? For e.g. Firstname, Lastname, Organization etc.
A: The only mandatory user attribute is the login (which can be mapped from a unique SAML attribute). The login is used as the user name. Other attributes, such as Full Name, Email, Distinguished Name, Groups or Description, are optional.
Q: Use of Digital Signature from SP (on SaaS side)?
A: Yes. The product’s SP uses a X.509 certificate to sign the SAML authentication requests if the user has specified the private key and X509 certificate of the SP. If that is the case, the user needs to configure their Identify Provider server with the SP’s X.509 certificate to verify the signature.
Q: Do you ensure SAML Authentication requests from SP are digitally signed by RSA SHA256 or RSA SHA384 or RSA SHA512 (SP will use its own X.509 certificate to sign)?
A: Yes. SAML Authentication requests from SP are digitally signed by RSA SHA256 using its private key and X.509 certificate.
https://www.metaintegration.com/MITI/Help/UserGuide/#!Documents/saml2authenticationworkflow1.html
Did this page help you?
If you find any issues with this page or its content – a typo, a missing step, or a technical error – let us know how we can improve!