
Results Panel in a Worksheet
Whether editing a saved worksheet or simply working with a search result that is presented as a worksheet, this is the common environment for filtering and manipulating that worksheet.
Steps
- Open a worksheet by any of the create methods detailed., or go to
- WORKSHEETS > Manage,
- WORKSHEETS > Favorites >,
- WORKSHEETS > Recent >.
From here you may:
- Page through the results using the first, previous, next and last controls above the results.
- Expand the Filters panel on the left to add additional filters.
- Expand the Details panel on the right to view details about the selected result line.
- Click on the option icons:
- Click Refresh to redisplay with all the latest filters and configuration details
- Click Download as CSV to produce a CSV file of the results reflecting the filters, columns, sort order and other configuration details.
- Click Configure Columns to add/remove heading columns from the worksheet.
- Click Configure Sort to specify sort order by columns.
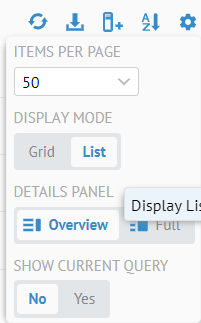
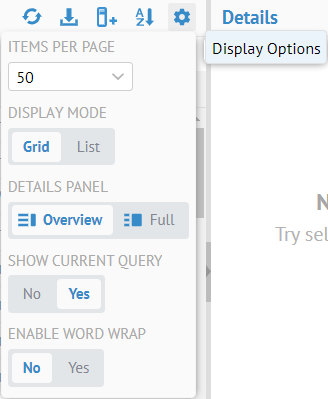
- Click Display Options for the worksheet, including:
- ITEMS PER PAGE to control the number of results per page in the UI
- DISPAY MODE to toggle between the List mode (with name and definition) and Grid mode (allowing multiple header columns and sort order by column)
- DETAILS PANEL to toggle between showing only the equivalent of the Overview tab of the object page or Full to show the entire object page for the selection in the Details panel (on the right).
- SHOW CURRENT QUERY to toggle the display of the filter MQL display
- ENABLE WORD WRAP to toggle the display of multiple lines per result item in Grid model.
These worksheet preferences are stored in the worksheet itself. Thus, when you save, share, or capture a URL of a worksheet or use it in a dashboard, etc., it maintains these preferences until updated.
- Click the More actions icon in the far right of the header to select the following:
- Get Sharable Link for a worksheet
There is currently no REST API method to download a worksheet to a CSV file. This limitation is because the methods to execute a query, e.g. “/entities/executeMQLQuery”, already exist in the REST API producing a JSON output of what would be contained in an equivalent worksheet.
- SAVE AS a saved (and sharable) worksheet.
If you have sufficient permission, you may edit cells in the metadata results. To do this, either double-click that cell or right-click and select Edit. You may then use the Tab and Enter keys to traverse the grid for editing further.
Curating rows
You may click the Certify, Endorse and/or Warn icons for any row.
Bulk Editing
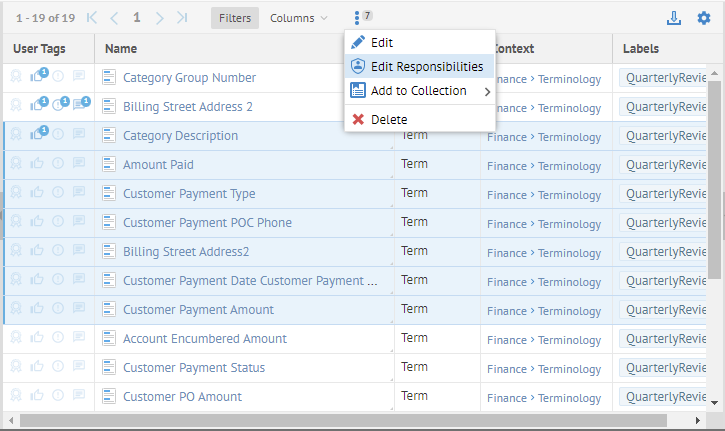
Multi-select: You may select more than one row (Shift-click, Ctrl-click, etc.). With this feature one may apply an action to all of the selected rows. Only those actions available to ALL of the selected rows will be presented.

For all the selected objects, you may bulk edit:
- Common Attributes that apply to all object types, including curation
- Custom attributes available to all the objects
- Basic Object Attributes that apply to all the objects.
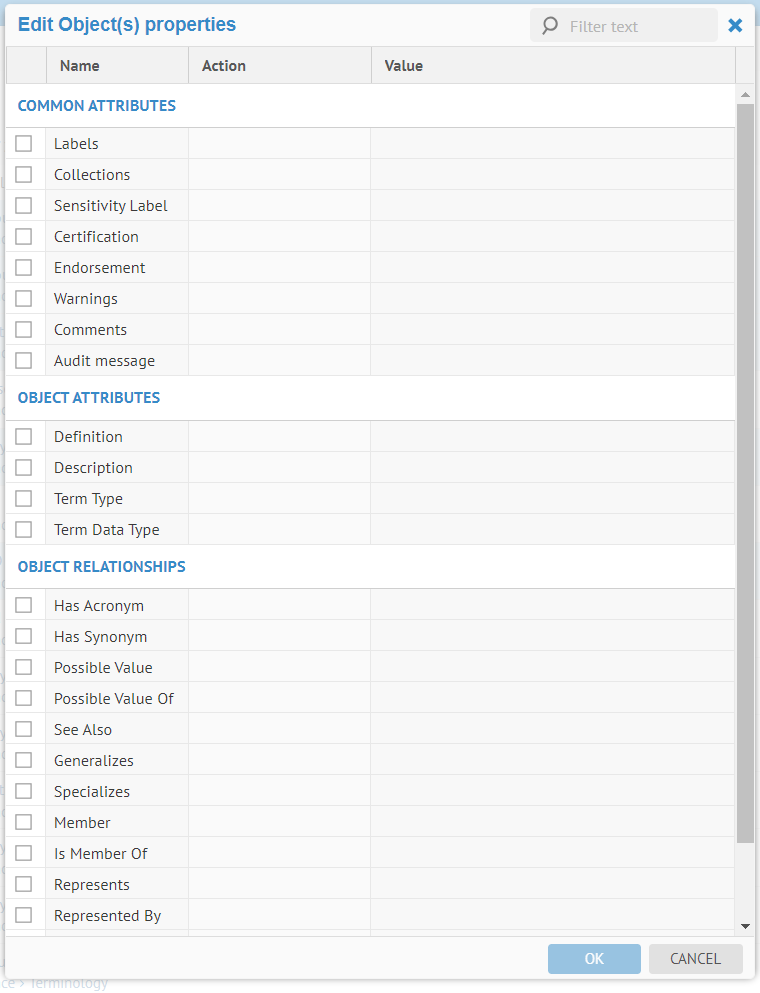
You may also add multi-selections to a collection

Special Bulk Edit Example
Responsibilities
You may edit the object role responsibility assignments for multiple items in a worksheet. To do so, select multiple items and right-click one and select Edit Responsibilities.
Bulk editing of stewardship is handled this way as stewardship is assigned via assignment of the Stewardobject role. In addition, in earlier versions of the production, stewards were the ones notified of changes to model. This is no longer the case. Instead, watchers are notified of changes to models when enabled. The migration from stewards to watchers is performed automatically on upgrade from previous versions and thus all stewards become watchers.

Click ADD ROLE and select Steward as the role to add.

As you are editing multiple objects and multiple responsibilities, any changes you make will apply identically to ALL the objects. However, you may control whether the new role assignment replaces, extends for removes a current role assignment.
We want to simply assign the Steward role to Stuin addition to (adding) whatever other assignments are there, so click Add.
Click EDIT and select Stu (Stewart Steward).

Click OK.

and again click OK to commit all changes.

Now, Stu is assigned the object role of Steward to all the selected objects.
Specify Columns and Sort Direction
You may control the heading columns displayed in the Grid view of a worksheet. You may also sort the results by these heading columns.
Specify Heading Columns to Include in a Worksheet
Click the Configure Columns icon to add/remove columns from the worksheet
Select the columns you wish to add from the available columns side and click the Add selected column(s) icon.
Select the columns you wish to remove from the Select columns side and click the Remove selected column(s) icon.
Remove all the selected columns with the << icon.
Any of the filter criteria may also be selected as column values.
Specify Sort Order of Heading Columns in a Worksheet
You may specify the sort order of the worksheet results.
Sorting in this manner applies to all the results of the search, not just the page you are viewing. These are the only criteria where you may sort the entire result set, rather than just sorting the page as the column sorting options only apply to the current page in the user interface.
In addition, the column included in this ORDER BY option will be remembered when saving or sharing the worksheet or when send the URL to others.
Steps
- Open a worksheet by
- Select the worksheet to use from the pick lists:
- Favorites
- Recent
- Personal
- Shared with me
- Click Columns v.
- Click in the ORDER BY pull-down box.
- Pick a column.
- Specify Ascending or Descending.
- Click outside the Columns v dialog.
- Press EXECUTE as needed.
Example
Go to any worksheet. Click Columns v and select the Type column in ORDER BY.

Column Header Sort
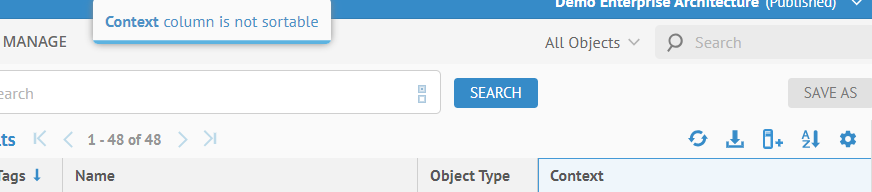
You may simply click on a column header to toggle the sort on that column between ascending and descending and relevance order.
Some columns are not sortable. These are documented in the Developer’s Guide as it is a fundamental feature of Metadata Query Language (MQL). If a column does not support sort the UI will provide a temporary dialog to that effect.
Grid vs. List Mode
One may toggle between presenting the results as a simple collection or as a spreadsheet-like grid. Talend Data Catalog provides a rich set of features to manage the columns in a grid and allows for editing of the cells just as with a spreadsheet.
Grid Mode

List Mode

Action Icons in Columns
Certain action icons (e.g., Open in third-party tool) may be included in worksheets as a column.
Steps
- Open a worksheet by any of the create methods detailed, or go to
- WORKSHEETS > Manage,
- WORKSHEETS > RECENT >,
- WORKSHEETS > FAVORITES >.
- Click Columns and add an action icon column
- Click outside the dialog box.
Example
Click WORKSHEETS > Qlik Sense > Apps and click Columns > Open in Tool and add to the Selected Columns and click outside the dialog box.


Click on Open and you are taken to Qlik Sense.
You must define the external Tools URL for this link to Qlik Sense to work properly.
Paginated Display and Navigation
If the list of objects is long, only a portion of that list is presented. This portion is referred to as a Page. Talend Data Catalog provides a number of common display and navigation tools for these lists.
Local sorting, i.e., when clicking on a column header, only applies to a page of the results at a time. Be sure to specify a large enough Items per page to ensure that you are getting the results you expect.
Identify distinct values by column
You may quickly obtain a list of the distinct values available in the metadata. To do this, right-click a cell in the grid and select that option.
Example
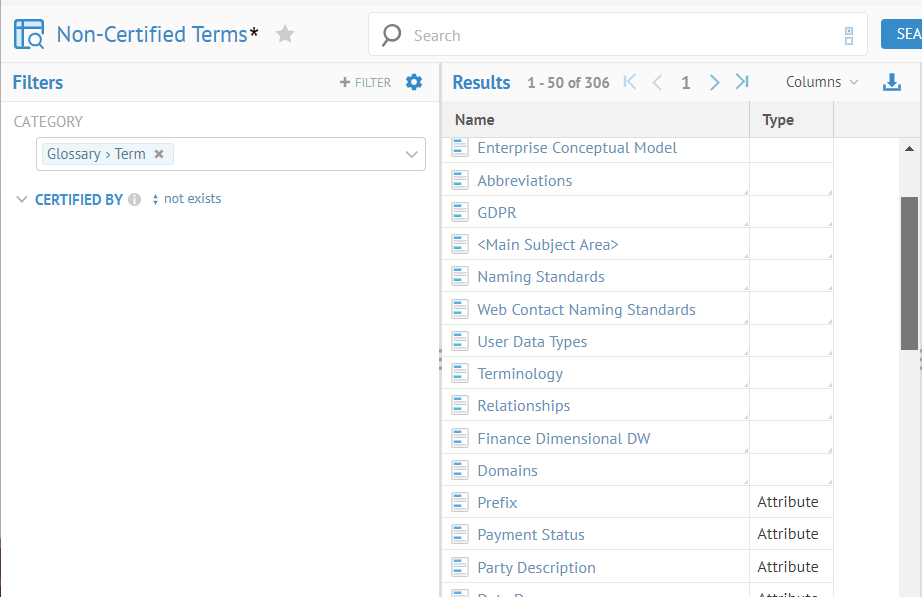
Filter on the Dataset objects Category. Switch to Grid mode. Right-click on the Object Type column and select Distinct Values.

The result is statistics on the distinct values present according to the filters defined:


Show Execution History
You can see a history of the queries executed as part of updates to filtering, etc., in a worksheet.
Steps
- Open a worksheet (search or otherwise).
- In the Results panel click Preferences > SHOW CURRENT QUERY
- Click the Show execution history icon.
Example


Worksheet Results Preferences
Steps
- Click Display Options for the worksheet, including:
- ITEMS PER PAGE to control the number of results per page in the UI
- DISPAY MODE to toggle between the List mode (with name and definition) and Grid mode (allowing multiple header columns and sort order by column)
- DETAILS PANEL to toggle between showing only the equivalent of the Overview tab of the object page or Full to show the entire object page for the selection in the Details panel (on the right).
- SHOW CURRENT QUERY to toggle the display of the filter MQL display
- ENABLE WORD WRAP to toggle the display of multiple lines per result item in Grid model.
These worksheet preferences are stored in the worksheet itself. Thus, when you save, share, or capture a URL of a worksheet or use it in a dashboard, etc., it maintains these preferences until updated.
You may specify larger limits on the number of items per page and items to export by updating the Worksheet Export Maximum number of objects and Worksheet Maximum number of objects per Page in Group Preferences for a group that the user is a member of.
Did this page help you?
If you find any issues with this page or its content – a typo, a missing step, or a technical error – let us know how we can improve!