
Metamodel Editing
A metamodel contains Model Types (e.g. a glossary model). Those models are in turn constructed from a pool of Object Types. Finally, those objects are constructed from a pool of Attribute Types. Various relationships may also be defined between object types. In this way:
- Any number of models, objects, relationships, and attributes may be defined.
- They may all be shared across model types.
- Models may be instantiated as part of a configuration or in the repository management panel.
- They are then populated with actual objects, relationships among objects and attribute values in the user interface, just as any other pre-defined object may be.
Steps
- Sign in as a user with at least the Application Administratorcapability global role assignment.
- Go to MANAGE > Metamodel in the banner
- Click START EDITING.
- Click STOP EDITING, when finished with the metamodel updates.
You will be prompted to SAVE if there are unsaved changes.
- Click SAVE to save changes without stopping editing.
If you do not SAVE during or at the end of the editing session, all changes are lost.
- Click More Actions > Import to extend the metamodel with changes from an XML file.
The format of this XML file may be obtained by exporting the current metamodel.
- Click More Actions > Export Package to export a package to an XML file.
- Click More Actions > Edit main diagram to show all the object types and attribute types in the different model types and allow one to edit the diagram.
- Click More Actions > Show inherited characteristics to show inherited attribute, relationships, etc. of the Object Types and Model Types.
- Click More Actions > Show Package Names to show the package in which each object is a member.
It is generally best practice to build from the “ground up” when extending the metamodel. Thus, one will want to:
-Expand the pool of shared attributes types
-Define the object types
-Assign attributes types to those object types
-Define relationships among those object types
-Finally, collect the object types together into model
As diagrams are associated with models, at some point you will want to collect the work-in-progress together and visualize.
The user interface will provide validation warning when there is an issue with an already defined attribute, object or model type.
Example
We will create a business policy metamodel where we can define a particular company’s policies in a hierarchical fashion and relate them to business rules.
Sign in as Administrator, go to MANAGE > Metamodel in the banner, and click START EDITING.
We will then perform each of the below design activities.
Edit Metamodel Attribute Types
The modeling starts by defining reusable attributes promoting data standardization among business objects. These attributes can be of any basic type (e.g., integer, string, date, or enumeration), In addition, there are more interactive types like (email, web URL, or phone number), which allow one to send an email, make a phone call, etc., from within the implemented model when it is populated.
Metamodel attribute types may also be treated as custom attributes on an imported object or modeled (data model) object. You define them just as below, and associate them with defined imported object types.
Whenever an attribute type has been used in an instance, its datatype cannot be changed anymore.
Steps
- Begin editing the metamodel.
- Go to the Attribute Types panel on the left.
- Here you may:
- Click on an Attribute Type and then edit its properties in the panel at the bottom, including:
- NAME – Name of the attribute type
The name of any Attribute Type must be unique in the entire repository. Thus, it behooves you to consider the naming carefully.
- DEFINITION – Description of the attribute type
- EDITORS – Groups or users which can edit attribute values of this type. When left empty then all users may edit the attribute values as long as they have the object role assignment on the object with Metadata Editor capability.
- VIEWERS – Groups or users which can edit attribute values of this type. When left empty then all users may view the attribute values as long as they have the object role assignment on the object with Metadata Viewer capability.
- USAGE– Models and object types which “use” this attribute type.
When creating custom attributes for imported model object, they are still attribute types in the pool and may be then used by both custom object types and imported object types.
- DATATYPE – Data type that attributes of this type will conform to and be validated against (on data entry, etc.)
- DEFAULT VALUE – The value assigned by default when an attribute of this type is instantiated.
- PACKAGE – Metamodel package that the object type is a member of.
- Click Add to create a new type of attribute
- Click Delete to remove the selected type of attribute.
Clicking SAVE after deleting an Attribute Type removes it entirely from the repository, including all metadata objects which contain it. Also, all instantiated objects lose that attribute value assignment of that type. There is no undo.
You may see list of objects which object types or model types are using the current attribute under Usage.
Example
Again, we are creating a business organization metamodel where we can define a particular company’s areas of business in a hierarchical fashion (business unit organization chart) and then organize harvested metadata within that structure.
Attributes required for this are:
Attribute Type Name | Definition | Data Type |
(Business Policy) Name | Name | All objects have a Name of type String |
Policy Number | Unique identifier for a business policy valid across all business units. | String |
As we were editing earlier, we should already be signed in as Administrator, and at MANAGE > Metamodel, and have already clicked START EDITING.
In the Attribute Types panel (left), click New Attribute Type.

Enter “Policy Number” in the NAME and “Unique identifier for a business policy valid across all business unites.” in the DEFINITION. Then click OK.
We do not need to create a Name attribute, as all objects inherit the Name attribute.

The DATATYPE defaults to String and that works here.
Specify Demo Business Rules and Policies as the PACKAGE.

Click SAVE and then STOP EDITING.
We are now ready to build up our Object Types.
After we have done so, those object types will be included in the USAGE list:

Create a New Custom Attribute
In order to associate a new custom attribute with an imported object type, you must first define the attribute type.
Sing in as Administrator, go to MANAGE > Metamodel, and click START EDITING.
In the Attribute Types panel (left), click Add.
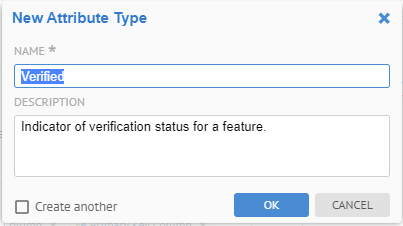
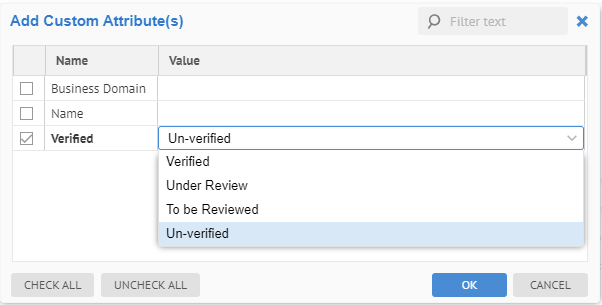
Enter “Verified” in the NAME and “Indicator of verification status for a feature.” in the DESCRIPTION. Then click OK.
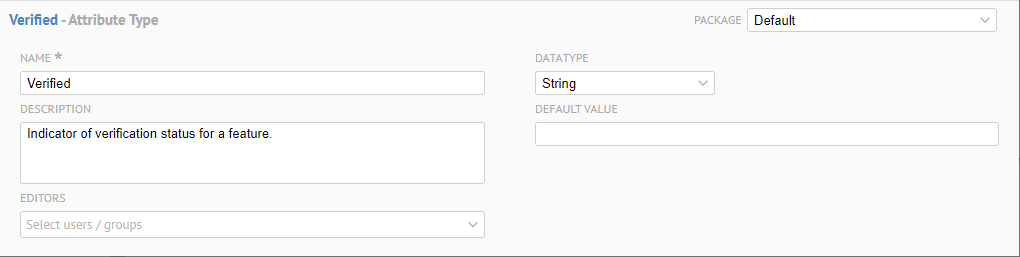
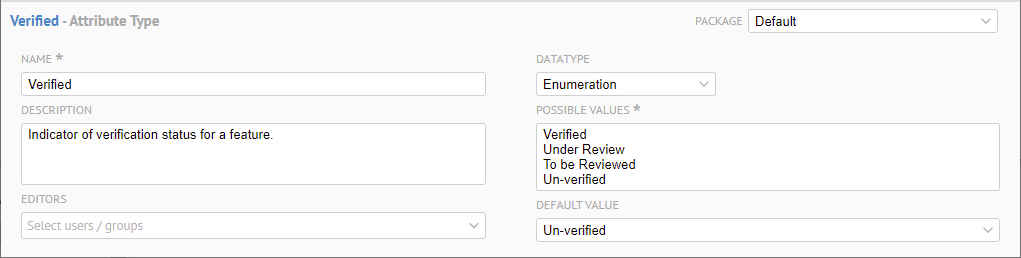
The DATATYPE defaults to String but change this to Enumeration.
Enter the four POSSIBLE VALUES and DEFAULT VALUE, as below:
Click STOP EDITING.
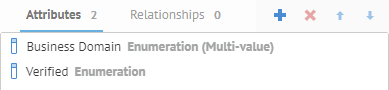
Now, it is time to associate this attribute type with imported object types so that imported objects have the option of Verified as a custom attribute.
Create a Structure Data Type Attribute
Steps
- Begin editing the metamodel.
- Go to the Attribute Types panel on the left.
- Click on the New Attribute Type (plus sign) and provide a name
- Edit its properties in the panel at the bottom, specifying Structure for the DATATYPE
- Click the Add Property (plus sign) in the STRUCTURE ATTRIBUTES section to include properties in the structure.
Example
As we were editing earlier, we should already be signed in as Administrator, and at MANAGE > Metamodel, and have already clicked START EDITING.
In the Attribute Types panel (left), click New Attribute Type.

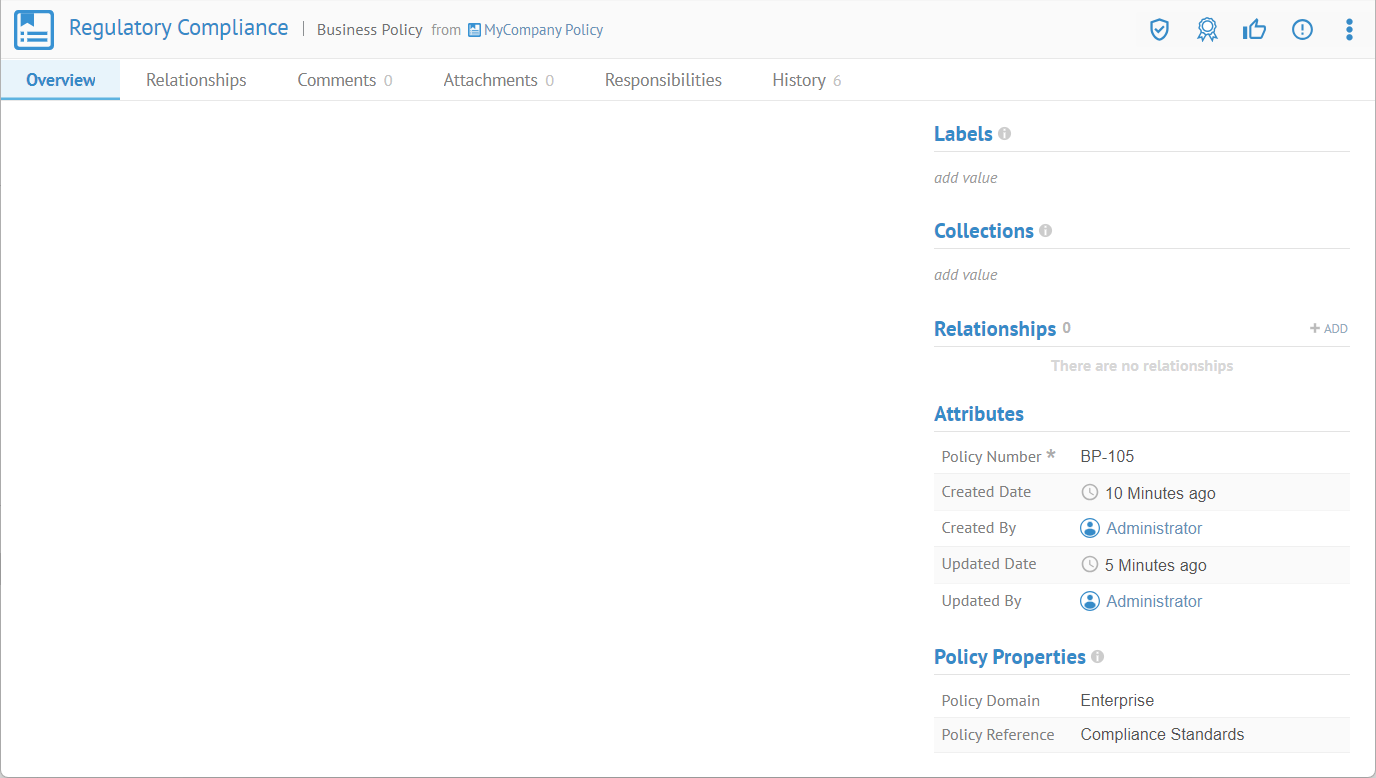
Enter “Policy Properties” in the NAME and “Collection of properties that a business policy should have” in the DEFINITION. Then click OK.
Select Structure from the DATATYPE pulldown.

Click the Add Property (plus sign) in the STRUCTURE ATTRIBUTES section and enter “Policy Domain” in the Name, String as the Datatype and “Area of applicability for a policy” in the Definition.

Repeat for “Policy Reference”, String and “References to the Master Business Strategic Plan guiding the policy”.

When populated and then actually presented on the object page, these structure attributes for a section with a header.
When presented in a grid, each property in the structure get a column and may be edited that way.

Possible Custom Attribute Data Types
Attribute Data Type | Definition |
Definition | Free form text without rich text features |
Boolean | True or False |
Integer | Whole number |
Date | Calendar date |
DateTime | Date and time |
Enumeration | May chose one from a pick list of valid values |
Enumeration (Multi-value) | May chose one or more items from a pick list of valid values |
String | Free form text without rich text features |
Multiline Text | Textual string presented as one or more lines for viewing and editing |
HTML | Textual field which is edited with the HTML editor |
URL | Text that is expected to be a valid uniform resource location presented as a hyperlink |
Text that is validated to be an email address | |
Phone number | Text that is expected to be a valid telephone number |
User | Pick list of users in the system. May choose one. |
Users | Pick list of users in the system. May choose more than one. |
Structure | A collection of attributes grouped into one container attribute |
Selecting Users
The Select Users widget is used to pick one (User data type) or many (Users data type) user or groups of users.
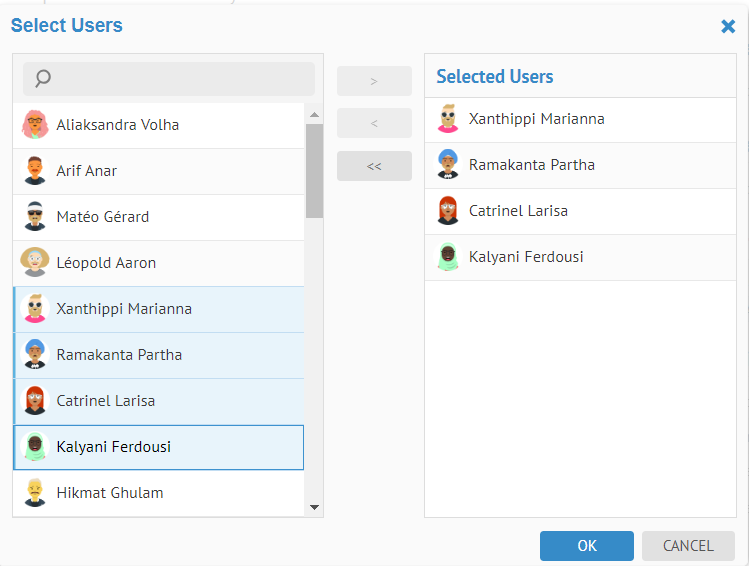
One may multi-select and click > to include users.
One multi-select and click < to remove a selection of users.
One may click << to remove all selected users.
Reserved Attribute Type Names
As Talend Data Catalog is optimized for the data governance and data cataloging use case, the name of any Attribute Type is required to be unique in the entire repository. This requirement promotes a unified naming standard that is important for displaying and querying information consistently and tries to prevent users from defining multiple attributes with the same name to represent different information.
In addition, when creating / renaming an attribute we need to make sure that we don't reuse one of the system attribute names to avoid name collisions in the select statement of a worksheet
"Business Name"
"Business Name Inferred"
"Business Name Inferred Origin"
"Business Description"
"Business Description Inferred"
"Business Description Inferred Origin"
"Content Name"
"Content Description"
"Native Id"
"Labels"
"Classifications"
"Classifications Matched"
"Classifications Approved"
"Classifications Rejected"
"Collections"
"Term Classification"
"Used"
“Updated By”
"Updated Date"
"Viewed Date"
"Workflow Actions"
"Workflow State"
"Workflow Published"
"Deprecated"
"Context"
"External Url"
"User Tags"
"Certified"
"Endorsement Count"
"Warning Count"
"Comment Count"
"Column Statistics"
"Column Histogram"
"Object Id"
"Object Stable Id"
"Object System Type"
"Object Type"
"Object Type Id"
"Object Profile"
"Hide Data"
"Relationship Type"
"Certifications"
"Endorsements"
"Warnings"
"Comments"
Edit Metamodel Object Types
After defining the pool of Attribute Types, we will need, we then create Object Types based on these reusable attribute types, along with and custom associations between these Object Types, including regular reference relationships, composition links (UML aggregations), and UML generalization allowing you to define abstract business objects.
Whenever a metamodel relationship has been used in an instance, its cardinalities cannot be changed anymore.
When creating custom attributes for imported model object, they are still attribute types in the pool and may be then used by both custom object types and imported object types. As imported object type attribute extensions, they are referred to as custom attributes.
Once you include attributes in an object type, you may specify mandatory attributes (required by the user interface) by including them in the MANDATORY ATTRIBUTES list. In this way, the user interface will require a value is entered in those attributes when they are a part of that object type. Also, these attributes are required to be entered as soon as an instance of the object is created, so they are included in the New Object dialog.
So, if Policy Number is an attribute of Business Policy and Business Rule, you may make it mandatory for a Business Policy but not for a Business Rule.
Mandatory attribute settings only apply to custom object types, not imported object types, thus one cannot specify mandatory attributes for imported objects.
Steps
- Begin editing a metamodel.
- Go to the Object Types panel in the middle.
- Here you may:
- Click on an Object Type and then edit its properties in the panel at the bottom, including:
- TYPE– Type of the object
- Custom– Custom object type to be part of a custom model
- Imported– Imported object type. Has a scope defined as a collection of profile categories of types of objects in imported models (e.g., tables or dimensions).
- Binary Relationship– Relationships between source and destination object types that exist as an object in their own right.
- NAME – Name of the object type
The name of any Object Type must be unique in the entire repository. Thus, it behooves you to consider the naming carefully
- DEFINITION – Description of the object type
- PARENT OBJECT TYPE – Object types inherit attribute types and relationships from their parent.
Multiple inheritance is not permitted. There may only be one parent object type. The root of this tree is the Entity object type.
- ABSTRACT OBJECT TYPE– Abstract object types are never instantiated and are only defined to have common attributes types and relationships which are to be inherited by multiple child object types.
- MANDATORY ATTRIBUTES – A list of attribute types already assigned to the object type that are to be made mandatory (required) data entry in the user interface.
- PACKAGE – Metamodel package that the object type is a member of.
- (Contained) Attributes and Relationships – Widget for adding attribute types and relationships to an object type. Click the tab (either Attributes or Relationships) you wish to edit and:
- Click Add to include a new attribute type or relationship to the object type
- Click Delete to remove the selected attribute type or relationship from the object type.
- Click UPDATE ICON to provide an icon that will be displayed for every instantiated object of this type.
- Click Add in the header of the Object Types panel to create a new object type
- Click Delete in the header of the Object Types panel to remove the selected object type.
Clicking SAVE after deleting an Object Type removes it entirely from the repository including all instances in custom models. However, this is only possible if all depended objects are first removed or edited to not depend upon the object to be deleted.
- Right-click and select Show usage diagram to see the dependent objects.
Example
Custom Object Types
Again, we are creating a business organization metamodel where we can define a particular company’s areas of business in a hierarchical fashion (business unit organization chart) and then organize harvested metadata within that structure.
Object types required for this are:
Object Type Name | Definition | Attribute Types Contained |
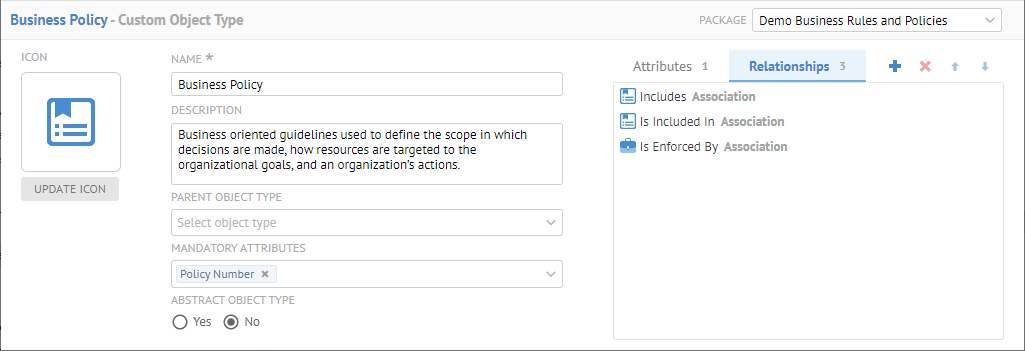
Business Policy | Business oriented guidelines used to define the scope in which decisions are made, how resources are targeted to the organizational goals, and an organization’s actions. |
|
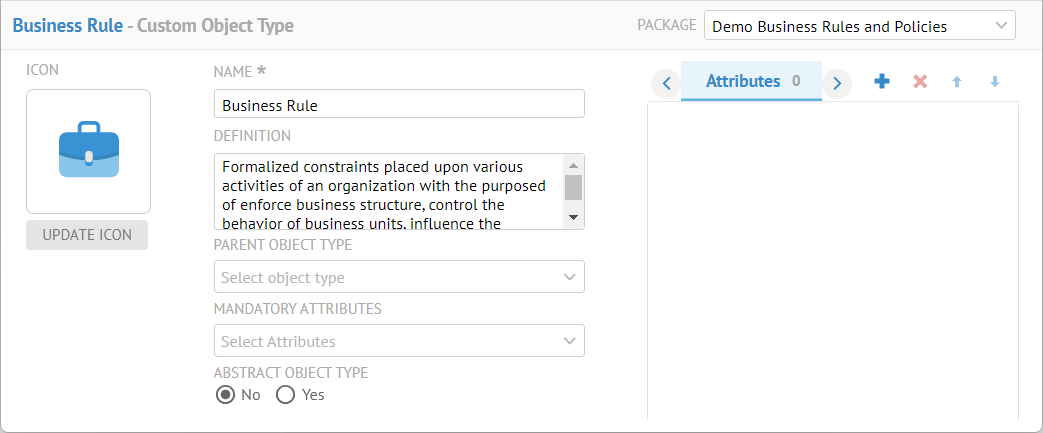
Business Rule | Formalized constraints placed upon various activities of an organization with the purposed of enforce business structure, control the behavior of business units, influence the business overall. |
|
As we were editing earlier, we should already be signed in as Administrator, and at MANAGE > Metamodel, and have already clicked START EDITING.
In the Object Types panel (in the middle), click Add.
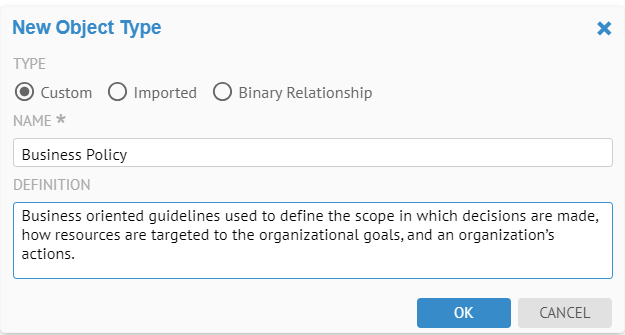
Enter “Business Policy” in the NAME and “Business oriented guidelines used to define the scope in which decisions are made, how resources are targeted to the organizational goals, and an organization’s actions.” in the DESCRIPTION. Then click OK.
To add an Icon use the UPDATE ICONfeature.
Specify Demo Business Rules and Policies as the PACKAGE.

Also, add the Policy Properties attribute type.

Right-click and select Show usage diagram.

Now you see what must be updated in order to delete the Business Policy object type.
Now, do the same for Business Rule:

After we have done so, those object types will be included in the USAGE list on attribute types, like Policy Number.

Imported Object Types
In the case of imported objects, the possible types are defined as a part of profiles which are associated with the different metadata sources (e.g., RDBMS, Tableau, Talend DI, etc.). The purpose of defining an imported object type is to group these different profile objects into collections of imported object types which may be extended (with custom attribute types or relationships) all at the same time. E.g., one may wish to define an “Imported Feature” imported object type which includes Fields in Files, Columns in Tables, View Columns in Views, Attributes in Entities, Measures in BI design models, etc.
These attribute types which are associated with and extend the imported object types (collections of imported profile objects) are then referred to as custom attributes.
Sign in as Administrator, go to MANAGE > Metamodel, and click START EDITING.
In the Object Types panel (in the middle), click Add.
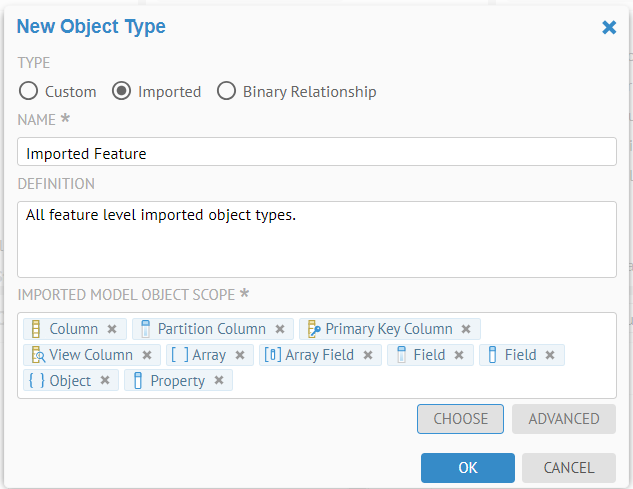
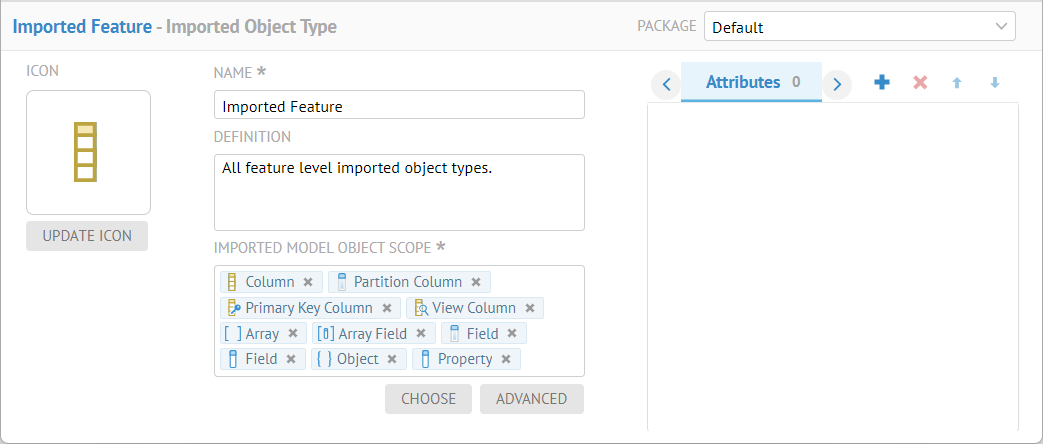
Select Imported. Enter “Imported Feature” in the NAME and “All feature level imported object types.” in the DEFINITION. Then click OK.
Click CHOOSE to select all the feature level type imported categories in the IMPORTED MODEL OBJECT SCOPE by selecting Data Attribute in Dataset.

Click OK.

Add an Icon.

From here you may:
- Click Add in the Attributes tab to specify the attribute types which are already defined and will be included as custom attribute choices for all of the feature level imported objects.
- Click Add in the Relationships tab to define relationships for these imported object types.
In the case of imported objects, the possible types are defined as a part of profiles which are associated with the different metadata sources (e.g., RDBMS, Tableau, Talend DI, etc.). The purpose of defining an imported object type is to group these different profile objects into collections of imported object types which may be extended (with custom attribute types) all at the same time. E.g., one may wish to define an “Imported Feature” imported object type which includes Fields in Files, Columns in Tables, View Columns in Views, Attributes in Entities, Measures in BI design models, etc.
These attribute types which are associated with and extend the imported object types (collections of imported profile objects) are then referred to as custom attributes.
You cannot simply add a custom attribute (Attribute Type) to the Imported Object (Object Type). Instead, you must follow the below example an ensure that you have specified a scope within the set of imported objects to which the custom attribute will apply.
Sign in as Administrator, go to MANAGE > Metamodel, and click START EDITING.
In the Object Types panel (in the middle), click Add.
Select Imported. Enter “Imported Feature” in the NAME and “All feature level imported object types.” in the DESCRIPTION. Then click OK.
Add an Icon.
Click CHOOSE to select all the feature level type imported categories in the IMPORTED MODEL OBJECT SCOPE.

Click Add next to Attributes to specify the attribute types which are already defined and will be included as custom attribute choices for all of the feature level imported objects.
Click SAVE.
To check that this is now a valid custom attribute, search for a feature and try setting a custom attribute on an object.

Associate Attribute Types with Object Types
We are editing the metamodel and specifically an object type. Object types may have any number of attribute types which are drawn from the pool of available attribute types.
Object types associated with custom models can have any number of attribute (types) associated with them. However, these function differently from custom attributes on imported models. Unlike custom attributes, attributes on custom model objects are always considered available to edit. Thus, you do not have to “attach” them to each instantiated object.
For these objects, what this means is that the ALL of the attributes available will show in the object page for every instantiated object, not just the ones you attached a custom attribute to.
Now, add the Policy Number attribute type. Go to the Attributes tab above the widget and click Add.

You may multi-select the Attributes to include using SHIFT-Click or CTRL-Click.
Click OK.

In the Object Types panel, there are seven attribute types associated with Business Unit. NAME and DEFINITION are inherited from the Entity object type.
You may reorder the attribute types using the  Move Down (and Up).
Once you include attributes in an object type, you may specify mandatory attributes (required by the user interface) by including them in the MANDATORY ATTRIBUTES list. In this way, the user interface will require a value is entered in those attributes when they are a part of that object type. So, if Policy Number is an attribute of Business Policy and Business Rule, you may make it mandatory for a Business Policy but not for a Business Rule
Include Policy Number in the MANDATORY ATTRIBUTES list:


In the Object Types panel (in the middle), click Add.

Enter “Business Rule” in the NAME and “Formalized constraints placed upon various activities of an organization with the purposed of enforce business structure, control the behavior of business units, influence the business overall.” in the DEFINITION. Then click OK.
Add an Icon.
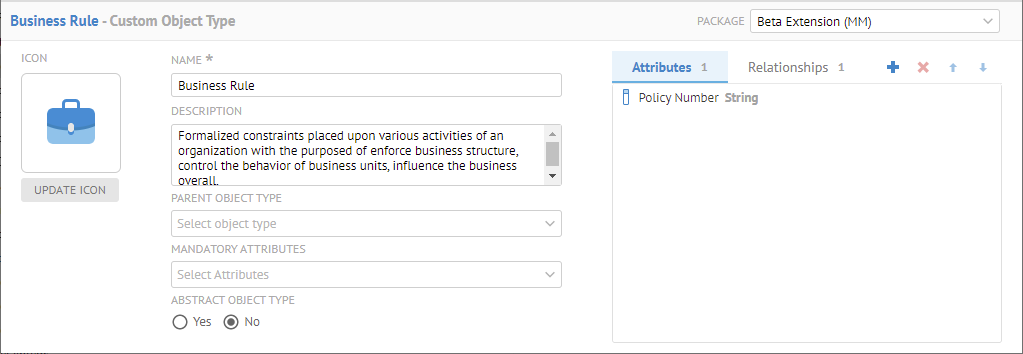
Click SAVE, so we do not lose our work.
We are now ready to define relationships to other object types.
Include Relationships to Other Object Types
Now we can add relationships.
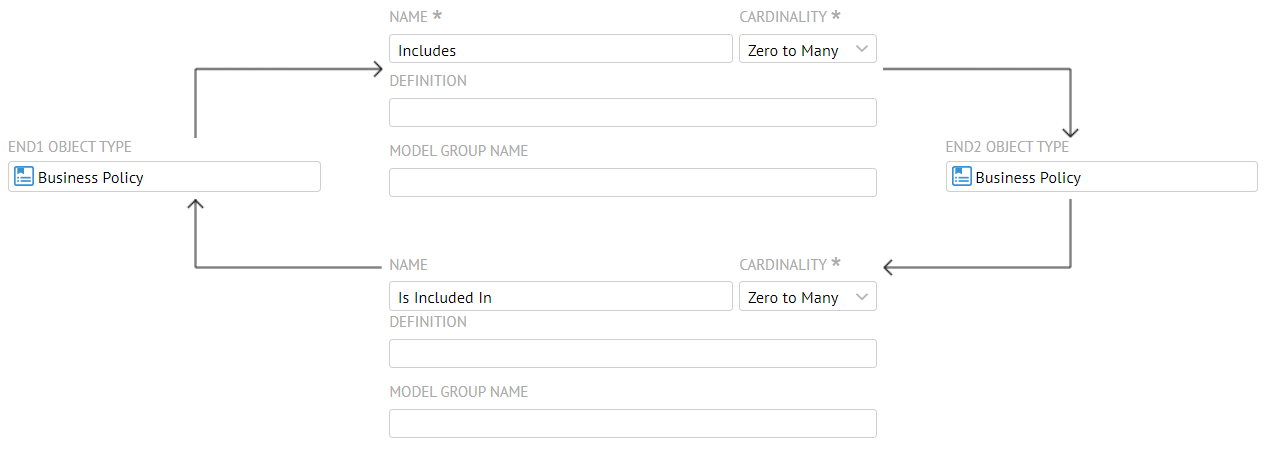
In this case, we will add relationships directly to the object types we have already defined, e.g., Business Policy. We will want to include two relationships for a Business Policy. First is a one-to-many association between policies. This represents a hierarchical structure but is not defining.
These types of relationships which are simply specified as part of the definition of an object type are implemented as simple links between two instantiated objects. They do not exist separately from those objects, so that when you delete one end of the link (one of the object), there is no link remaining.
You may also define relationships as object types themselves, which are instantiated as their own objects and thus may be managed separately from the end points of any links.
Go back to Business Rule and go to the Relationships tab above the widget and click  Add.
Add.

We select an association relationship as there is no composition between two policies.
Specify the same object type (Business Policy) as the END2 OBJCET TYPE and enter “Includes” as the NAME. Specify a CARDINALITY of Many.
Then, check the Bi-Directional box and enter “Is Included by” in the NAME. Specify a CARDINALITY of Many. Click OK.
Check the PARTICIPATES IN SEMANTIC FLOW to include this relationship in usage and definition semantic flow lineage.
If editing and existing association, when you set the PARTICIPATES IN SEMANTIC FLOW, the setting only applies to associations instantiated after this setting is saved. Any already existing associations already instantiated associations (relationships) will NOT be included in the semantic lineage. To do so, you much delete each of the existing relationships and then recreate them.
The NAME will be use as a tab in the object page and may be specified in MQL queries and worksheet filters.
Click SAVE.
Now, we will relate policies to rules.
In the Relationships tab click Add.

We select an association relationship neither policies nor rules are composed of each other.
Specify the other object type (Business Rule) as the END2 OBJCET TYPE and enter “Is Enforced By” as the NAME. Specify a CARDINALITY of Many.
Then, check the Bi-Directional box and enter “Enforces” in the NAME. Specify a CARDINALITY of One.
Click UPDATE ICON and provide something nice and click OK.

The NAME will be use as a tab in the object page and may be specified in MQL queries and worksheet filters.
Click SAVE.
You may always review relationships with the dialog by clicking on the relationship in the Object Types section.

Define Relationships with Imported Objects
Just as you may define relationships among custom objects, you may also define relationships between custom objects and imported objects. In this way, the objects populating a custom model may reference objects in imported models.
In this case, we have one relationship, from Business Rules to Key Metrics in imported models. This is a many-to-many association.
Go back to Business Rule and go to the Relationships tab above the widget and click Add.

We select an association relationship as there is no composition between these two objects.
Specify the Imported Object object type as the END2 OBJCET TYPE and enter “Is Measured By” as the NAME. Specify a CARDINALITY of Many.
Then, check the Bi-Directional box and enter “Measures” in the NAME. Specify a CARDINALITY of Many.
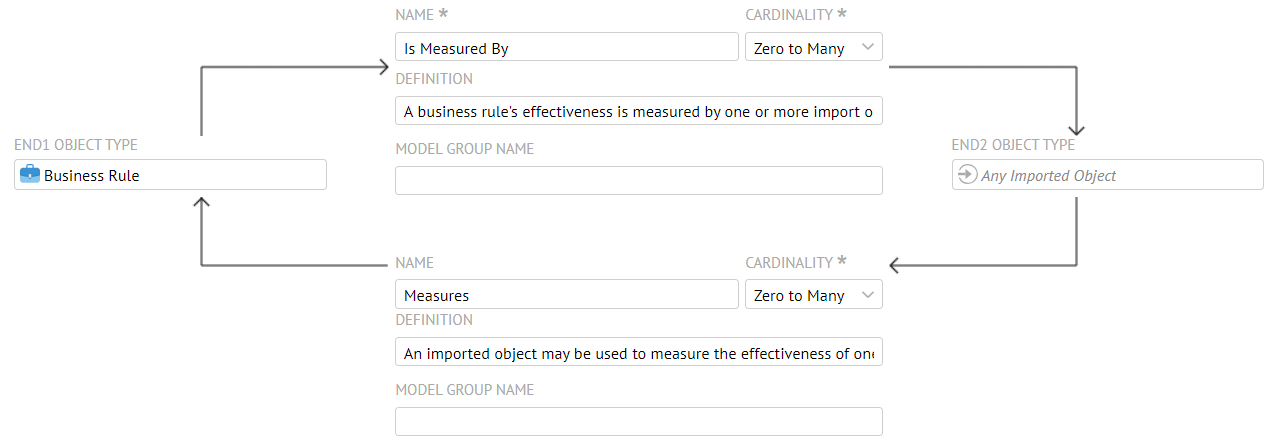
Click OK.
We are now ready to place the object types in a model.
Abstract Object Types
In order to more easily facilitate the design of common features across similar object types, the metamodeling capability include the ability to define abstract object types.
Examples include:
- Any Object which represents any standard, custom or imported object type (as used in the Defines/Is Defined By relationships on the Semantic Link object type).

- Any Imported Object is a (virtual) subtype of Any Object representing only Imported Objects created by import bridges.

- Glossary Object is an abstract object type for all objects that may be contained within a glossary.
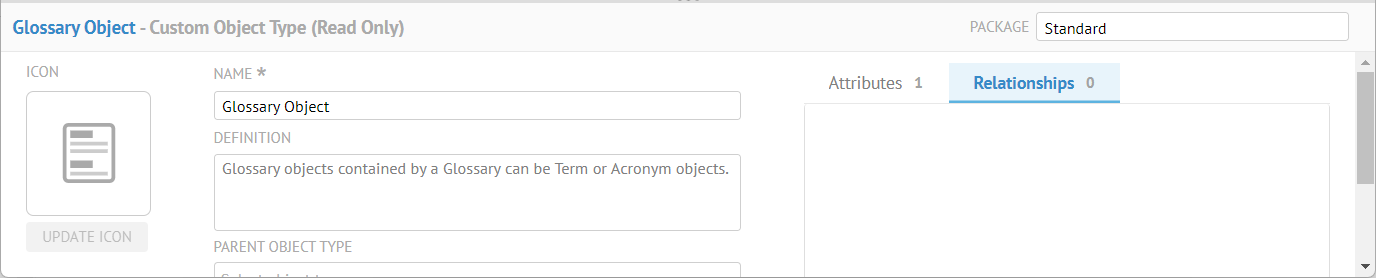
Those other object types, Term and Acronym inherit the attributes of a Glossary Object.

See the notation showing inheritance.
These abstract object types are virtual (implemented as filters) and cannot be subtyped.
Base Object Types
It proves convenient when defining relationships to be able to easily identify the scope of object types one wishes to link to. E.g., to refer to any “column-like” object, such as a column in a table, attribute in a entity, field in a file, etc., there is the Any Feature base object type.
They are handled just like abstract object types.
The include:
- Any Classifier – Any table-like object
- Any Feature – Any column-like object
- Any Imported Object – Any object contained within an imported model
- Any Object – Any object type
You may also define relationships as object types themselves. In this case, they are not simply listed in the Relationships tab when editing an object type, like Includes, Is Included In or Is Enforced By in the previous examples:

Instead, relationships object type are in fact their own object types. E.g., Semantic Link:
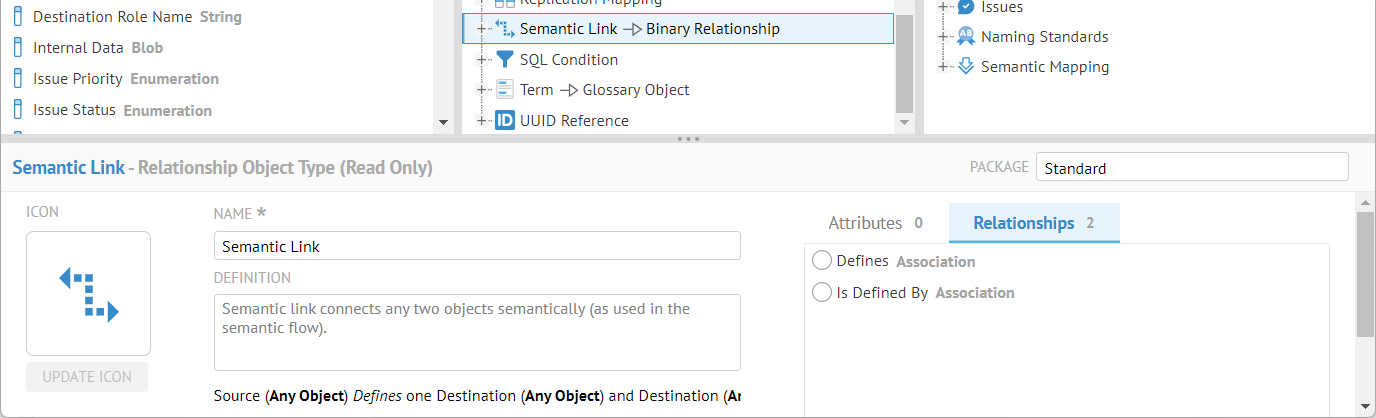
The Semantic Link is a first class citizen of the Object Types (middle) panel and contains two relationships (not object type relationships), Defines and Is Defined By.
In this way, when one creates a model with these relationship object types, they are instantiated as their own objects and thus may be managed separately from the end points of any links.
Relationship object types come in two types:
- The Binary Relationshipabstract object type connects two objects at the instance level (e.g., like the Semantic Link object type above).
- The N-ary Relationship abstract object type connects more than two objects at the instance level (e.g., like the Classifier Map object type below).
These new relationship objects types are directional (roles can be source or target) and can optionally carry semantic flow (on all roles in such case).
Note that these new abstract relationship object types cannot be subtyped.

Example
For examples, please refer to the actual example section for the two relationship object types outlined above.
Semantic Links and Semantic Mappings
A Semantic Link is a binary object type between, e.g., a term and an imported column, that is collected up into Semantic Mapping models.
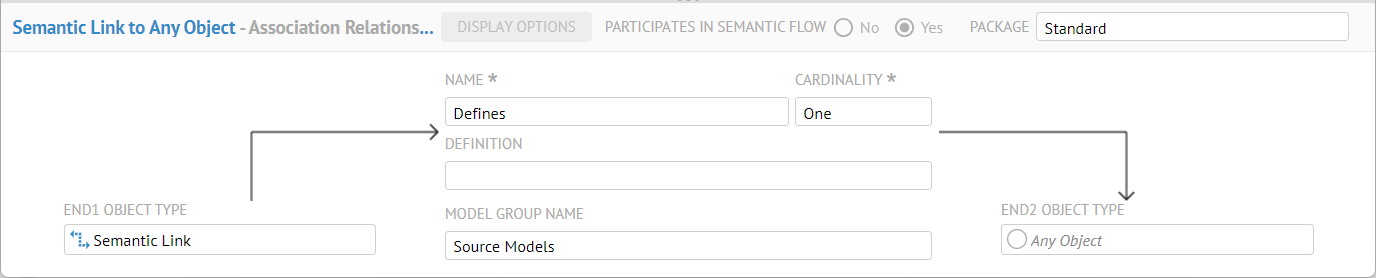
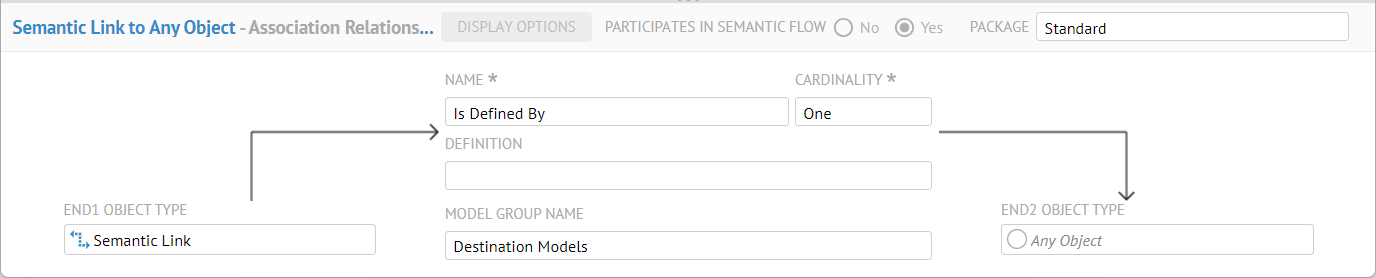
A Semantic Link contains two association type relationships, Defines and Is Defined by, which may link to any type of object.

Each of these association type relationships is directional and is included in the semantic flow.
Finally, Semantic Links are instantiated as part of a Semantic Mapping model type, and thus you must define such a model to contain them.
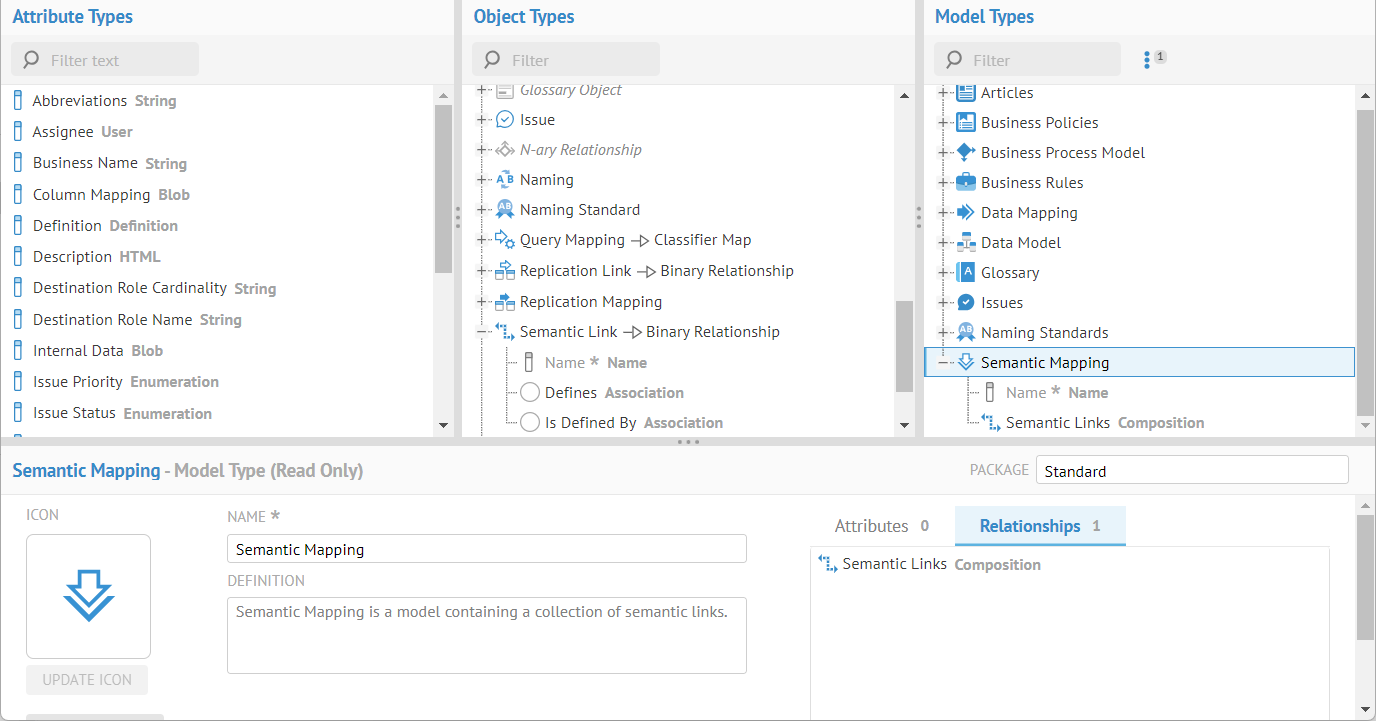
Use of semantic mappings and semantic links is detailed in the semantic mapping section.
Classifier Maps and Query Mappings in Data Mappings
A Classifier Map is an N-ary object type between, e.g., a source classifier (table), destination classifier (table), a control classifier (table) term and any number of feature maps (column maps). A Classifier Map is itself and abstract object type and an example includes the Query Mapping that is collected up into Data Mapping models.
A Query Mapping Link contains two association type relationships, Defines and Is Defined by, which may link to any type of object.

You may see the four association relationships are inherited from the abstract object types (Map Destination, Map Source, Map Control and Feature Maps) Two additional composition relationships are SQL Conditions and Aliases.

Map Destination, Map Source and Map Control are simply relationships from classifier to classifier (table to table), many sources and controls but only one destination.

Finally, Query Mappings are instantiated as part of a Data Mapping model type, and thus you must define such a model to contain them.

Use of query mappings and data mappings is detailed in the data mapping section.
Edit Model Types
Finally, object types are associated to custom models, ready to be populated.
Steps
- Begin editing a metamodel.
- Go to the Model Types panel on the right.
- Here you may:
- Click on a Model Type and then edit its properties in the panel at the bottom, including:
- NAME – Name of the model type
The name of any Model Type must be unique in the entire repository. Thus, it behooves you to consider the naming carefully
- DESCRIPTION – Description of the model type
- PACKAGE – Metamodel package that the model type is a member of.
- (Contained) Attributes and Relationships – Widget for adding attribute types and relationships to object types. Click the tab (either Attributes or Relationships) you wish to edit and:
- Click Add to include a new attribute type or relationship
- Click Delete to remove the selected attribute type or relationship.
- Click UPDATE ICON to provide an icon that will be displayed for every instantiated model of this type.
- Click EDIT DIAGRAM to edit the diagram of the model
- Click Add in the header of the Model Types panel to create a new model type
- Click Delete in the header of the Model Types panel to remove the selected model type.
SAVE-ing after deleting a Model Type removes it entirely from the repository. Also, all instantiated model and contained objects will be removed. There is no undo.
Example
Again, we are creating a business organization metamodel where we can define a particular company’s areas of business in a hierarchical fashion (business unit organization chart) and then organize harvested metadata within that structure.
As we were editing earlier, we should already be signed in as Administrator, and at MANAGE > Metamodel, and have already clicked START EDITING.
In the Model Types panel (on the right), click Add.
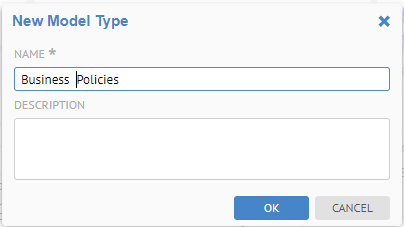
Enter “Business Policies” in the NAME and click OK.
Click UPDATE ICON and provide something nice.
Click SAVE.
To add object types to the model type, we must include them using relationships.
In this case, we have only one relationship. It is a container relationship between the model and business units.
Go to the Relationships tab above the widget and click  Add.
Add.
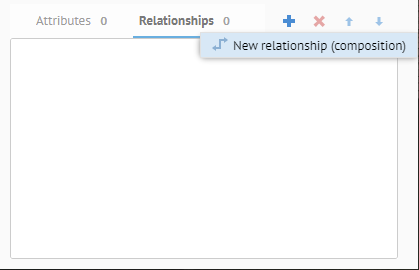
We may only select the composition relationship so that the model will be composed of the objects, in this case Business Policies. As with other composition relationships, the UI will understand that this it should be presented as a hierarchy.
Specify the same object type (Business Unit) as the CHILD OBJCET TYPE and enter “Business Policy” as the GROUP NAME. Specify a CARDINALITY of Many so that we can have more than one business rule at the root and click OK.
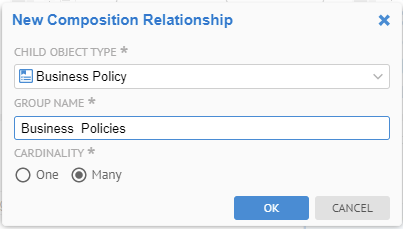
The GROUP NAME will be use as a tab in the object page and may be specified in MQL queries and worksheet filters.
Click SAVE and we have a model type.

Please do the same for a model type named “Business Rules” which contains Business Rules.

Next, click EDIT DIAGRAM to show the diagram and clean it up.
Show and Edit a Diagram of a Model Type
A diagram representing the objects in a model and their relationships is generated automatically. One may view the diagram and edit the layout.
Steps
- Sign in as a user with at least the Application Administratorcapability global role assignment.
- Go to MANAGE > Metamodel in the banner
- Click More Actions > Show main diagram to show a diagram of the contained object types, attribute types and their relationships.
- Select a Model Type and Click SHOW DIAGRAM or right-click on a Model Type to show a diagram for just the object types and relationships in that model.
- You may use all the usual diagram viewing and editing controls.
- Click START EDITING to and then show the diagram as above to edit the diagram.
- Click STOP EDITING, when finished with the diagram updates.
You will be prompted to save if there are unsaved changes
- Click SAVE to save changes without stopping editing.
Example
Again, we are creating a business organization metamodel where we can define a particular company’s areas of business in a hierarchical fashion (business unit organization chart) and then organize harvested metadata within that structure.
As we were editing earlier, we should already be signed in as Administrator, and at MANAGE > Metamodel, and have already clicked START EDITING.
Right-click the Business Policies model type and select Edit Diagram.

There are all the usual diagram editing controls.
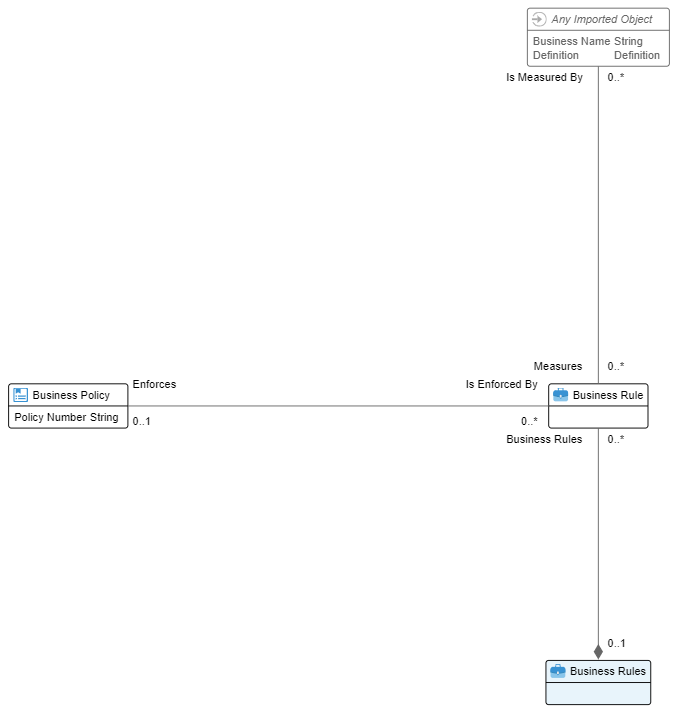
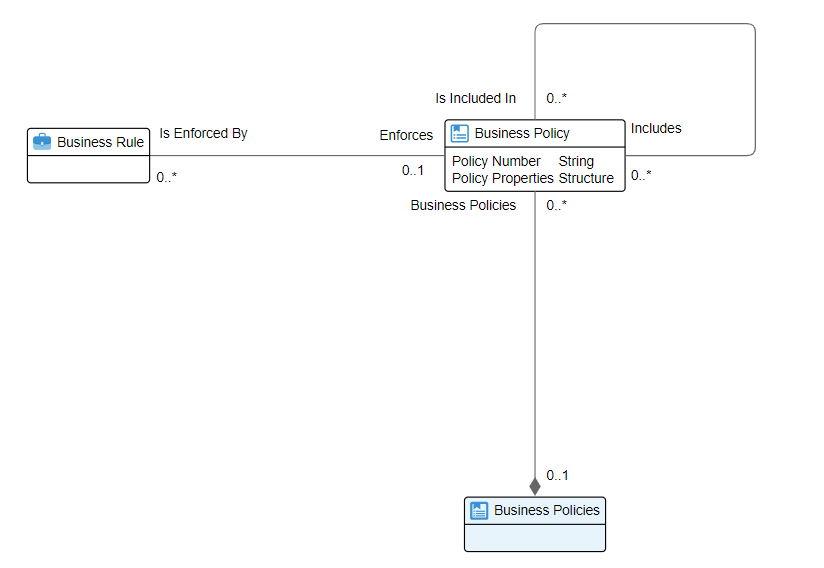
The layout was pretty good to begin with. Let us simply:
- Move Business Rule to the left of Business Policy
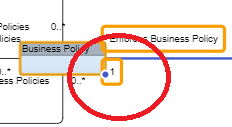
- Move the Endorces/Is Endorced By verb phrases and cardinality to the line between those two and ensure the line is straight.. To move the connection of a relationship, click the relationship and zoom in enough to see a dot where it connects and move that dot
- Reduce the size of the Includes/Is Included In relationship loop so the diagram resizes nicely
Click Diagram Properties and note one may change a number of characteristics for these diagrams.

Click SAVE and STOP EDITING.
Metamodel Naming Standards
Object Names
Object names:
- Must be unique throughout the repository
- Become section headers and tab names in the object page for a custom model
- Become Object Type in worksheets
For object names one should use:
- Singular noun optionally preceded with an adjective
- Short as possible while still unique.
Examples
- Policy
- Business Rule
- Imported Object
A noun depicting the name of the child object.
The name is plural when the cardinality is Many and singular when the cardinality is 1 (“Parent” has “Child” or “Children”).
Examples
Order has Customer Address
Association Role Names
Association role names:
- Must be unique for both the END1 and END2 objects
- Become section headers and tab names in the object page for a custom model
- Become Object Type in worksheets
For object names one should use:
- Singular noun optionally preceded with an adjective
- Short as possible while still unique.
A role name of a uni-directional relationship is a noun. It is plural when the cardinality is many.
A bi-directional relationship has one role name as noun and another one as a verb.
When there are multiple relationships to an object each role name should depict the name of the end2 object.
Examples
A Term has Synonym Terms.
A Term has Acronym
A Policy Is Enforced by Rules
A Term Defines Imported Objects
An Imported Object is Defined By Term s
Did this page help you?
If you find any issues with this page or its content – a typo, a missing step, or a technical error – let us know how we can improve!